
How to get a Kimono Sleeve? (Part 1)
Ich habe ja den Schnitt aus Pattern Magic 3 ausprobiert, doch der basiert auf einem T-Shirt Block mit Kimonoärmel. (Generell praktisch zu nähen, wenn es schnell gehen soll oder man einen gemusterten Stoff nicht durch Nähte stören will.) Und so einen hatte ich nicht.
I’d tried Pattern Magic 3 but that required a block for knit fabric with kimono sleeves. (A versatile pattern shape if you want a quick project and also if you have a pattern on your fabric you do not want to disturb by to many seams.) But I didn’t have any.
Aber ich habe einen schmalen normalen T-Shirt Schnitt der einem Block nahe genug kommt, daß man ihn umbasteln kann. Hier zeige ich wie.
But I have an ordinary pattern for a T-Shirt which is close enough to a block to use it as a base for transformation Now I’ll show you how.
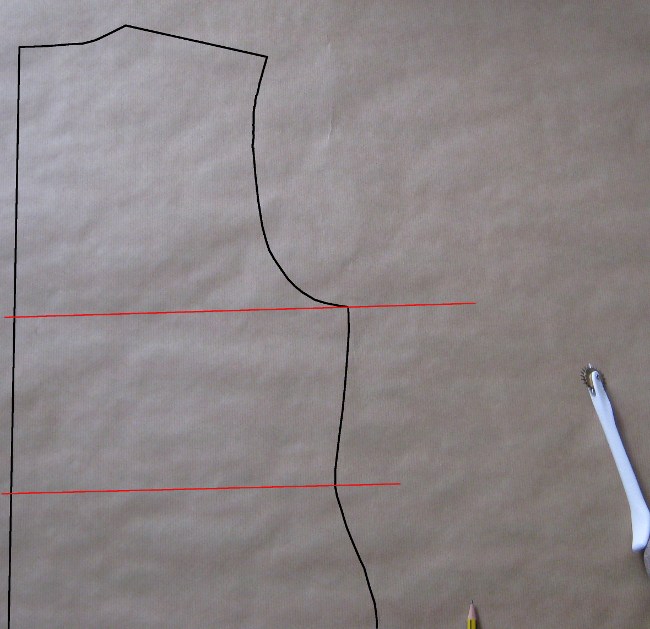 Zuerst übertrage ich mein Rückenteil auf Packpapier. Dazu habe ich das Schnitteil auf den Bogen Packpapier gelegt und mit dem Kopierrädchen (das mit den spitzen Metallzähnen, keines mit weichem Plastik) durchgerädelt. Ganz wichtig: Ohne Nahtzugaben! Die Linien habe ich mit Bleistift nachgezeichnet. (Die schwarze Umrisslinie auf dem Bild hier ist mit dem Computer nachbearbeitet.)
First I made a copy of my back pattern on a sheet of craft paper. I just placed the pattern on the craft paper and used a copy wheel to trace it. (You need a wheel with metallic spikes, not one of those soft plastic ones.) Very important:Use your patten without seam allowances! Then I used a pencil to follow the spiked lines, (The black lines on the pic here were added with the help of gimp, they were not on the paper.)
Dann braucht man zwei Hilfslinien im 90° Winkel zur hinteren Mitte bzw. zum Fadenlauf. Eine auf Taillenhöhe, also da, wo der Schnitt am Schmalsten ist und eine zweite, die genau durch den Beginn des Armausschnittes verläuft. Diese habe ich auf dem Bild rot markiert.
Then you need two lines which run horizontally to the grainline (usually the center back). One runs through the waist, so where your pattern is most narrow, the other one runs through the beginning of the sleeve opening.
 Dann werden Punkte markiert. Der erste auf der oberen Hilfslinie, 3,5cm nach außen. Von da aus eine senkrechte Hilfslinie runter zur Taille. Für den zweiten mißt man den Abstand zwischen den Hilfslinien und markiert dann etwas weniger als 1/3 davon von oben nach unten. (Bei mir 5 cm.) Hier war ich mir nicht sicher, ob man das auf der geschwungenen Linie tun sollte oder etwas daneben, weil die Anleitung an der Stelle eine gerade Linie vorsieht, keine gekurvte. Deswegen habe ich den Punkt etwas neben die Nahtlinie gezeichnet. Auf der Nahtlinie wäre aber auch okay gewesen, so im Nachhinein. Von dem Punkt aus dann weitere 6cm nach unten gehen und den dritten Punkt auf der Seitennaht markieren.
Now we need construction points. For the first one you take the upper horizontal line and mark a point 3.5cm outside the pattern. Then mark a line from there downward to waist level. The line runs parallel to the grain line. The next point is down the side seam, a little less than 1/3 of the distance between both horizontal lines. And from that point you go another 6 cm down the side seam and mark a third point.
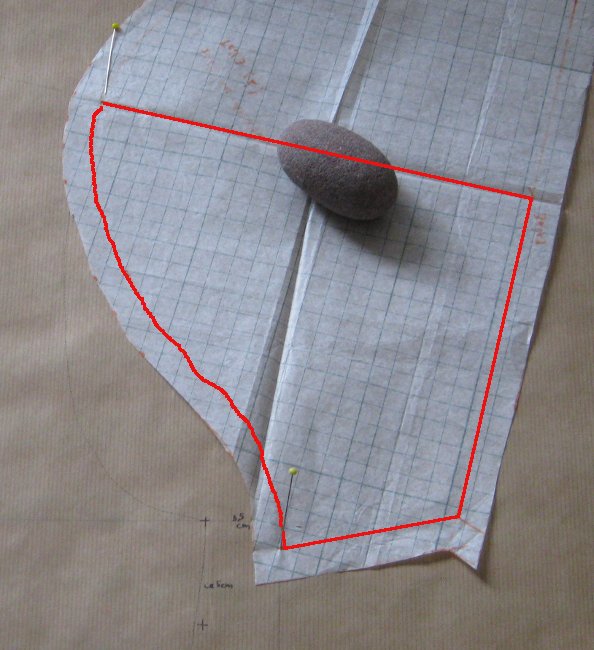 Als nächstes braucht man den halben Hinterärmel ohne Nahtzugaben. Also das, was den roten Linien entspricht. Ich habe etwas gemogel… Die obere Kante des halben Ärmels wird genau an das Ende der Schulternaht gelegt. Ich habe es da mit einer Nadel fixiert. Dann wird der Ärmel so gedreht, daß das untere Ende der Ärmelansatznaht genau auf die senkrechte Hilfslinie vom 3,5 cm Punkt aus trifft. Die Mittelline des Ärmels und die Saumlinie werden auch wieder mit dem Rädchen durchgerädelt.
Now you need half a sleeve, be sure to take the back sleeve. (I did cheat and used my complete sleeve pattern, it was small enough not to mess everything up. But what you really need is the shape of the red line.) You pin the top of the sleeve exactly to the end of the shoulder seam. While the bottom point of the sleeve cap has to meet the line that goes down from the 3.5 cm point. I traced the later sleeve seam and the hemline again with my tracing wheel.
 Hier noch mal in der Großaufnahme der Punkt, an dem der Ärmel und die Hilfslinie sich treffen. (Wie immer kann man die Bilder übrigens in einer größeren Version sehen, wenn man drauf klickt.)
Here a close up of the spot where the sleeve and the vertical line we drew before meet.
An der Stelle eine Nadel senkrecht durch das Papier stecken….
Pin a needle through exactely that spot…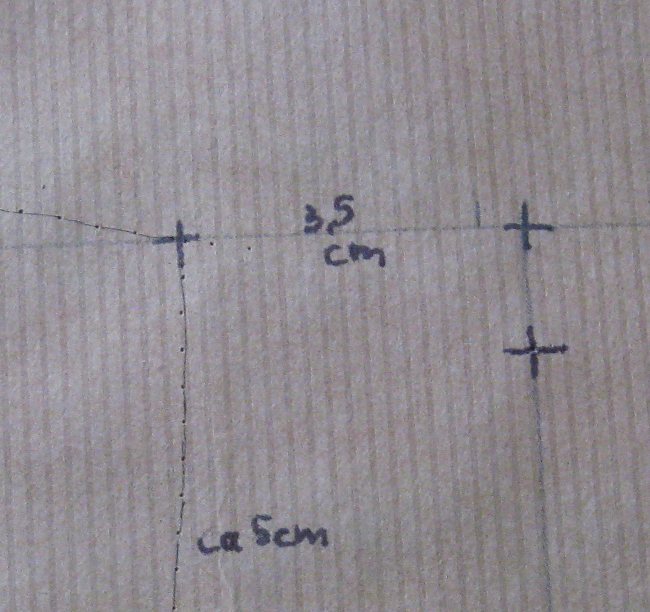
…denn dadurch sieht man den Punkt immer noch, wenn man den Ärmelschnitt weggenommen hat und kann ihn gut mit einem Stift markieren.
… so you can still see the spot after removing the sleeve pattern and you can make a nice and clear cross with a pen. (And as always: if you want so see a bigger picture, just click on it and you get the bigger version.)
 Jetzt markieren wir noch die Stelle mit einem Kreuz, wo der Ärmelsaum auf die obere Hilfslinie trifft.
Now we mark with a cross where the sleeve hem crosses the upper horizontal line.
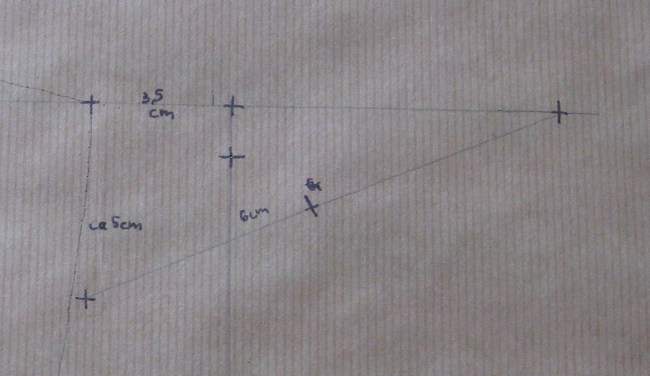
Dann verbinden wir unseren mittleren Hilfspunkt auf der Seitennaht mit einer geraden Linie mit dem Saumpunkt.Auf dieser Linie markieren wir noch einen Punkt, 6 cm vom Hilfspunkt auf der Seitennaht entfernt.
Then we connect the middle cross on the side seam with the sleeve hem point with a straight line. On this line we mark another point, 6 cm away from the side seam.
(Und demnächst geht es weiter…)
(To be continued…)