
Button and Mitt
Ich liebe ja inzwischen Handstulpen: Man kann ganz toll Einzelknäuel und Reste aufstricken und ich trage sie gerne am Computer, weil ich da chronisch kalte Finger habe. Mein Lieblingsmodell vom Winter wird aber inzwischen etwas zu warm, also habe ich mich nach einer etwas leichteren Variante umgesehen.
I love fingerless mitts a lot: They are great for using lonesome skeins of yarn or bigger remnants and I like to wear them when typing on the computer because I tend to get cold fingers. My favorite typings mitts from last winter are getting a bit too warm though, so time for something a little less heavy.
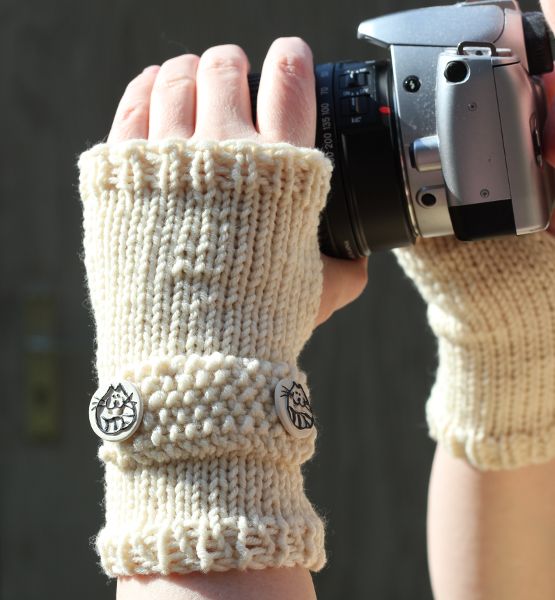
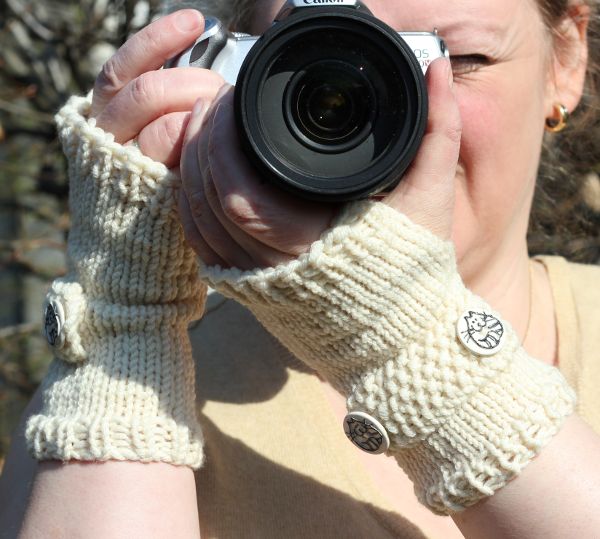 Diesmal wurden es die Button Flap Fingerless Mitts von Missy Angus, die ich bei Ravelry gefunden habe. Als Garn habe ich ein Knäuel „Torino“ von Tahki Yarns verwendet, das aus meiner Bestellung von Webs vor etlichen Jahren stammt. Die Knöpfe sind Keramikknöpfe von Jim Knopf, die schon seit einigen Jahren in meiner Knopfdose wohnen.
I chosse the Button Flap Fingerless Mitts by Missy Angus which I found via ravelry. Yarn is a skein „Torino“ by Tahki Yarns from my Web’s order years ago. Buttons are ceramic buttons from Jim Knopf which I had in my stash for some time.
Die Anleitung ist klar und die Stulpen sind einfach und schnell gestrickt. Ich mußte allerdings nach der Daumenöffnung noch mal auftrennen, um die Anzahl der Runden bis zum Daumenloch um eine zu verringern. Auch das Fingerbündchen habe ich um eine Runde gekürzt. Mein Garn war etwas knapp und ich wollte unbedingt die Riegel auch stricken können, weil die m.E. den Witz am Design ausmachen.
 Instructions were clear so it was an easy and fast knit. I had to rib down to beyond the thumb hole though and reduce the number of rounds to the tumb hole by one and then also making the finger cuff one round shorter. I was a bit short of yarn, but wanted absolutely to do the flaps, because they are what makes the pattern interesting IMHO.
Ich habe dann die Gelegenheit genutzt, mal neue Techniken zum Anschlagen (Alternierend aufgestrickter Kordelanschlag) und Abketten (Jenys überraschend dehnbare Abkettmethode) auszuprobieren. Um die Knöpfe aufzunähen habe ich einen Strang des Strickgarns mit farblich passenden AlterfilS 120 kombiniert, damit die Keramikknöpfe auch sicher halten.
Since it was all so easy I tried new techniques to cast on (Alternating Cable Cast On) and bind off (Jeny’s Surprisingly Stretchy Bind Off). To sew the buttons I split the yarn and combined one strand of it with a thread of AlterfilS 120 in the same color. Ceramic buttons are relatively heavy and always have a bit rough holes, so some stabile poly thread is great to make lasting buttons.
Das Ergebnis gefällt mir super gut, das Einzige was ich bei der Anleitung noch gerne gehabt hätte wäre eine genauere Angabe, wo denn der Riegel aufgenäht werden soll. Ich bin nicht so gut darin, daß vom Photo abzuleiten… Aber wie man sieht, habe ich das dann auch hinbekommen. Und das Garn ist auch superweich und trägt sich genauso wunderbar, wie es sich stricken ließ.
I absolutely love the result. The only detail where I had whished more precice in instructions was about where exaclty to place the flaps. Figuring out that from a picture is not exeactely what I am good at…. But as you can see I’ve managed. And the yarn is soft and wears as lovely as it was to knit.
(Für die Bilder geht mein Dank diesmal an eine junge Freundin, Nina W. Pfeiffer, die mir hier mit Geduld und Talent ausgeholfen hat. Wird einfach schöner, als mit Selbstauslöser…)
(Credits for the pictures go to a young friend, Nina W. Pfeiffer, who helped me with talent and patience. Looks so much nicer than with the timer…)