Jersey without a serger: closed seams
Bleiben noch zwei Nähte zu schließen: Die Seitennaht (bzw. zwei davon) und die Ärmeleinsatznaht. Hier bügle ich die Nahtzugaben nicht auseinander. An der Seitennaht weil es mich da nicht stört und es anders schneller geht und an der Ärmeleinsatznaht, weil es da keinen Sinn macht.
So there are two other seams to do, the sideseam and the seam that connects the sleeve to the body. In both cases I finish both seam allowances as one. On the side seam because it doesn’t disturb me there and it’s quicker and on the sleeve because it’s the better option.
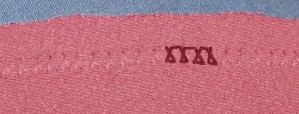
Für die Seitennaht wähle ich die faule Variante: den eingebauten Overlockstich meiner Nähmaschine. Ich habe sogar zwei davon, dieser nennt sich „geschlossener Overlockstich“. Leider paßt das Nähgarn hervorragend zum Stoff und meine Kamera kann kontrastarme Sachen gar nicht gut darstellen. Deswegen habe ich das Stichbild über einige Stiche hinweg nachgezeichnet, damit jeder gucken kann, ob er auf seiner Maschine auch so einen Stich hat.
Auch die Seitennaht braucht bei einem Shirt nicht wahnsinnig viel Dehnbarkeit, vor allem so viel, daß sie den Stoff nicht „einhält“ und kürzer ist als das restliche Shirt. Der Overlockstich ist dafür mehr als ausreichend, er ist weniger elastisch als eine echte Overlocknaht, aber für die meisten Einsatzzwecke mehr als ausreichend. Ich habe auch schon Badeanzüge damit genäht. Wer die Seitennähte lieber auch auseinanderbügeln will kann genauso einen Zickzackstich benutzen, etwa in der gleichen Einstellung wie hier für die Ärmel beschrieben.
Fot the side seams I choose to be lazy and sew them with the build-in overlockstitch of my sewing machine. My sewing thread matches the colour of my fabric very well and my camera is not good taking pictures with low contrast. So I tried to „redraw“ some of the stitches so you can check your machine for a stitch like that.
The side seams of a top also do not need an extreme amount of stretch, it has to be enough that the the seam can stretch as much as the fabric, not less. The overlock stitch of a sewing machine is not as stretchy than a real serger seam, but for most uses it’s absolutely sufficient. I have even sewn swimsuits with the overlock stitch. But if you don’t have a stitch like that or want your seam allowances ironed flat you can use a zigzag stitch, like described for the sleeves.
Danach wird der überstehende Stoff der Nahtzugabe einfach neben der Naht abgeschnitten.
Then you cut back the seam allowance close to the seam.
Die Ärmelansatznaht sollte ebenfalls dehnbar sein. Da ich sie besonders flach möchte, wende ich noch mal eine andere Technik an. (Wobei ich aber auch schon Shirts nur mit dem Overlockstich genäht habe, vor allem, wenn es schnell gehen soll.)
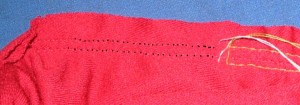
Auch das ist nicht schwierig, ein kleiner Zickzackstich, etwa 1,8 mm lang und 1,5 mm breit. Oder wie die Dehnbarkeit eben bei eurer Maschine hinkommt. Und dann einfach mit gleicher Einstellung noch mal 6 mm von der Naht entfernt auf der Nahtzugabe nähen. Danach wird die Nahtzugabe schön flach gebügelt und knapp neben der zweiten Nahtlinie abgeschnitten. Die Ziehfäden vom Ärmel einhalten ziehe ich erst danach raus.
Das ist es auch schon.
The seam that connects the sleeve with the body of the garment should also be stretchy. I could use the overlock stitch (I have sewn complete tops with that stitch, no problem), but I want it even flatter. So there is another technique.
Also very easy: You stitch on the seam line with a zigzag stitch. Stitch length about 1.8, stitch width 1.5. Or whatever works for your fabric and your machine. Then you stitch again 6mm from the seamline on the seam allowance. Then I press the seam allowance flat and cut the rest of the seam allowance close to the second stitching. My last step is taking out the threads which held in the sleeve cap.
That’s all.


