
Bei meiner Motivationsjeans wollte ich ja die innere Beinnaht und die Schrittnaht als Kappnaht machen. Das erfordert aber etwas andere Arbeitsschritte für den Reißverschluß, als die Anleitung von Sandra Betzina vorgibt, hier ist meine Anleitung. (Die ähnlich auch für andere Jeans mit Kappnaht gilt.)
For my jeans I couldn’t use the instructions coming with ist, because I wanted flat felled seams on the inner leg seam and the crotch seam. So also the way to sew in the zipper had to be changed. Here is my tutorial. (That of course can be used for similar patterns, too.)
 Folgende Schritte sind schon gemacht: Die hinteren Hosenteile sind an die jeweilige Sattel genäht, auch die Taschen habe ich aufgenäht. An den vorderen Hosenbeinen sind die Hüftpassentaschen fertig gearbeitet.
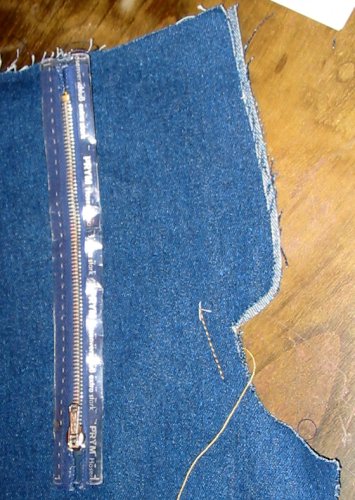
Dann werden die beiden vorderen Hosenteile links auf links aufeinender gelegt und die Schrittnaht von der Markierung für das Ende der Reißverschlußöffnung aus etwa 7 cm weit zugenäht.
Da ich nur im Oberfaden das dicke Nähgarn hatte, mußte ich auch darauf achten, daß die Seite mit dem Übertritt oben liegt.
Before I started the following things were already done: Sewing the yoke pieces to the back pant pieces, sewing on the pockets.At the front pant pieces the pocktes were finished before with all topstitching etc.
The front pants lay wrong sides together and I sew a short (5-7cm long) seam on the crotch seam, starting from the end of the front opening.
I used the thick decorative thread only in the needle, not in the bobbin, so it was important to sew from the right side. That is the side of the opening that will be on top of the other after the zipper is sewn in.
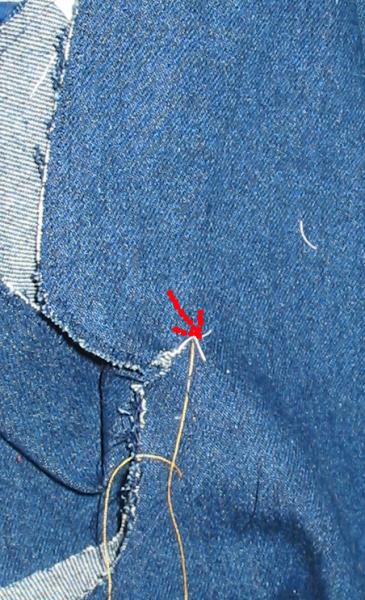 Danach ist ein kleiner Schnitt nötig.
Auf der Seite des Untertritts genau bis zum Beginn des Schlitzes einschneiden.
Außerdem auf dieser Seite die Nahtzugabe auf 3cm Länge auf etwa 5mm Breite zurüchschneiden und die Kappnaht auf dieser kleinen Strecke vorläufig einfalten und stecken
Then a small cut is needed. You cut on the side of the zipper that will be not on top once the opeining will be finished. You cut exactely to the point where the opening starts.
Also you cut the seam allowance back to 5mm on a length of 3cm and fold this little bit of flat felled seam provisory down.
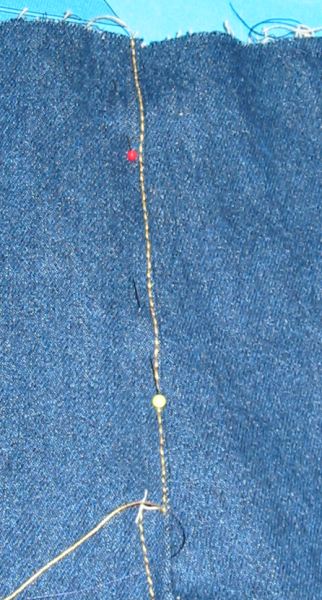
 Jetzt kommt endlich mal der Reißverschluß an die Reihe,
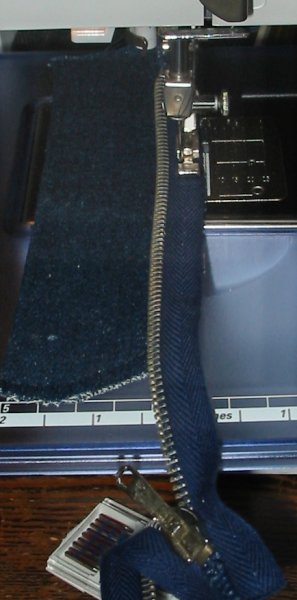
Der Schlitzbeleg wird links auf links gefaltet und mit den offenen Kanten aufeinander genäht.
Ich habe dazu einen Overlockstich benutzt, denn versäubert muß die Kante auch werden.
Dann wird der Reißverschluss geöffnet und auf den Schlitzbeleg genäht. (Bei mir ist es das rechte Reißverschlußband, weil ich einen „Frauenschlitz“ genäht habe. Bei Jeans kann man natürlich auch den Schlitz auf der „männlichen Seite“ nähen.
Da sowohl Stoff als auch Reißverschlußband recht fest sind, ist es eigentlich kein Problem, das Reißverschlußband bündig an die zusammengenähte Kante zu legen und einmal festnähen. Natürlich nur bis zur Rundung, das Reißverschlußband wird nict gebogen, das bleibt grade. Dieses Festnähen ist eigentlich mehr ein heften, weil ja später noch mal festgenäht wird. Aber die Stiche müssen nicht wieder raus, keine Sorge. *g*
(Man tut sich übrigens leichter, wenn man den Reißverschluß ein paar Zentimeter länger kauft als benötigt und hinterher abschneidet.)
Next step is sewing the zipper to the fly (is it that in English?). For the fly you fold the piece left sides together and sew along the open sides. I used an overlockstitch of my machine to prevent fraying the edge. If you have a serger that’s fine, too. Of course.
I made my opening on the „female“ side, for jeans you can also make it on the „male“ side.
So I’ve opened my zipper, aligned the right zipper band with the sewn side of the fly and stitched A long stitch is okay, because this serves more like basting. (But you won’t have to rip it out later…)
(You’ve probabely noticed on the pic that my zipper is a good deal longer than needed. That makes sewing in easier and it will be cut to the right length later.)
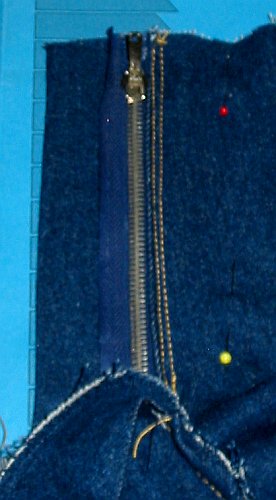
 Nachdem der Reißveschluss auf dem Schlitzbeleg befestigt ist, kann er auch an die Hose.
Vorher sollte man allerdings die andere Seite des Schlitzes, also den Übertritt, an der Kante absteppen. wieder genau bis zur Markierung. Dabei ist die Kappnaht darunter noch nicht genäht, aber eingefaltet, damit man sieht, wo man den Schltzbeleg einfalten muß.
Achtung: Wenn man diesen Vogueschnitt mit Kappnähten arbeitet, ist es eine sehr gute Idee, den angeschnittenen Schlitzbesatz am Übertritt einen Zentimeter breiter zuzuschneiden! Sonst kann er beim Absteppen nicht oder nicht gut mitgefaßt werden. (Ich habe es hinterher rausgefunden… Noch ein paar Handstiche mehr…)
Danach wird auf der Untertrittseite das „Sandwich aus Reißverschluss und Schlitzbeleg einfach unter die umgeklappte Kante des Untertritts gelegt, so daß die Zähnchen rausschauen und neben den Zähnchen festgesteppt.
Ich habe zwei Reihen mit dem dicken Garn gesteppt, auch dem Design gekaufter Jeans abgeguckt.
Now zip and fly become part of the pants.
Before you do that you fold the facing of the other side of the opening to the wrong side of the fabric and topstitch the edge. You stitch ftom top to the notch for the end of the opening. The flat felled seam will start below that point and folding it in for some centimeters helps you to see, where the fold has to be.
Attention! When you are sewing these Vogue pants with flat felled seams as I did it is an excellent idea to make the cut on facing about 1 cm wider! Elseway the topstitching of the opening will nocht or hardly cathc teh facing. I found out too late… some more handstitching to fix…
Okay, back to attatching the zip to the pants.
Super easy, you fold the facing of the other side oft the opening, take the „sandwich“ of ziper and fly and lay it under the fold. The metal part of the zipper aligned with teh fold line.
Then stitch. I did two rows of stitching with my decorative thread, but that is matter of taste. Do the design you like!
 So sieht das dann aus, mit den zwei Steppnähten.
Danach wird der Reißverschluß geschlossen, der angeschnittene Beleg der Schlitzkante wird mir einigen Stecknadeln gestgesteckt. Das sind die Nadeln rechts vom Reißverschluß.
An dieser Stelle noch mal Achtung! So wie ich genäht habe, wird der Untertritt offensichtlich breiter als in der Anleitung vorgesehen. Das macht die Hose nun keineswegs anangenehmer zu tragen, aber man muß natürlich auch den Bund entsprechend länger zuschneiden, gut einen Zentimeter länger. Und den Besatz des Bundes auch. (Ich hatte zum Glück reichlich Stoff um neu zuzuschneiden…)
That’s what it looks like, two rows of stitching with the thicker thread.
After that you pull the zipper close and secure the cut on facing with some pins. Those are the pins on the right of the zipper.
Here again attention! The way I’ve sewn the zipper to the fly makes tis side of the pants wider than it was meant to be. As this is the side that is below this doesn’t change the size neither makes it the pants less comfortable. But you have to add the length (a bit more than 1 cm) to the waistband also. And the facing of the waistband. (Luckily I had enough fabric to cut it again….)
 Jetzt wird das andere Hosenteil einfach gerade draufgelegt und knapp neben der Kante durch alle Lagen festgesteckt.
Dabei sollte natürlich die vordere Mitte der beiden Hosenteile aufeinander liegen.
Statt sich daran sklavisch zu halten, achte ich lieber darauf, daß der Schlitz gerade zugesteckt ist, der Stoff also keine Beulen und Wellen hat.
Now you close the zipper opening and pin through all layers.
Of course the front middle of left and right front pant should match.
But if not… it’s better to make sure the fabric layers lay smooth and flat, without bumps.
Enough for today… elseway this post will never be finished. :o) The rest in the next post.
So, für heute erst mal genung, sonst wird dieser Beitrag nie fertig… :o) den Rest gibt es dann beim nächsten Beitrag.