Muster passend nähen

Matching the embroidery

Gestern habe ich immer noch viel “Kleingestichel gemacht, also Sachen die viel Arbeit machen, aber ein wenig sichtbares Resultat ergeben. Wobei das mit dem “wenig sichtbar” hier durchaus Absicht ist. Denn die Stickerei soll an der hinteren Mittelnaht ja möglichst ohne Versatz ineinander übergehen. Und wie man das macht, zeige ich heute.

Yesterday I did more “little stitchy steps”, things that are time consuming, but don’t give a lot of visible results. On the other hand “not visible” is sometimes what is intended, like on the back middle seam where I want the embroidery to match. Hot that can be done I’m going to show today.

AufsteckenDer Trick dabei ist, daß man von der rechten Stoffseite her heftet. Man nennt die Technik auch “hohl heften”.

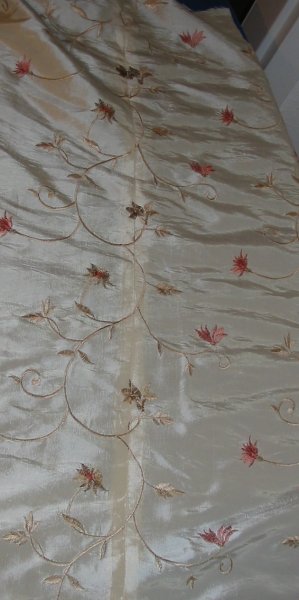
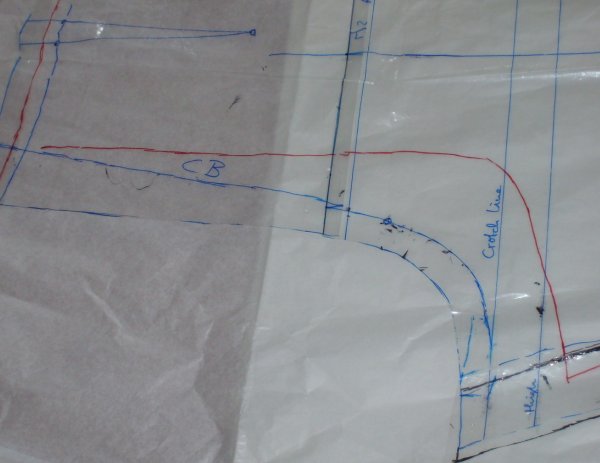
Dazu wird an einem Teil die Nahtzugabe weggefaltet. (Ich habe mit der Maschine eine Heftnaht entlang der Nahtzugabe gemacht um mir die Nahtlinie zu markieren.) Und dann wird das Teil mit der gefalteten Nahtzugabe auf das andere Teil gelegt und die Musterstellen werden passend festgesteckt.

The clue is to baste from the right side.

You fold the seam allowance of one of your fabric pieces to the left side and then you lay it on the other piece, matching the fold to the seamline of the other cut piece. You match the pattern (in my case the flower of the embroidery, but this works equally to match stripes or check or whatever.)

Heften
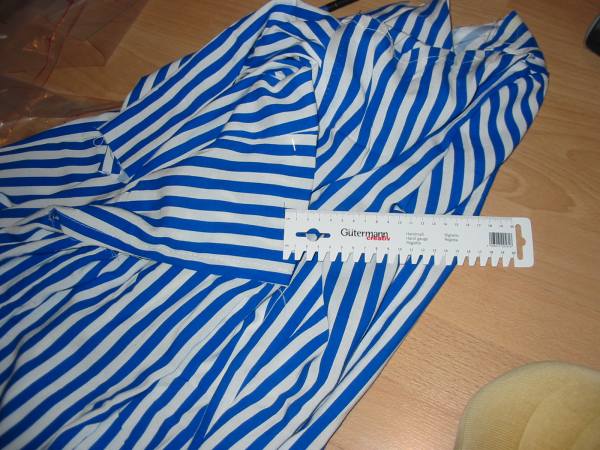
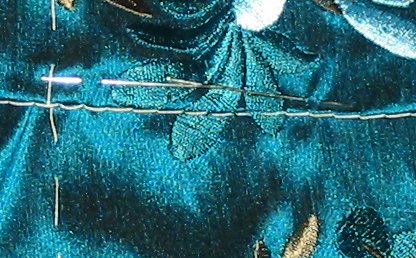
Dann wird geheftet. Weil ich einen feinen Stoff habe benutze ich Nähgarn und eine sehr feine Nadel.

Ich steche abwechselnd genau auf der Nahtlinie des unteren Teils ein…

Then it’s already time for basting. Since I have a fine fabric I am using sewing thread and a very fine needle.

I make one stitch exactely on the seamline….

Heften… und dann einen Stich genau in den Bruch des gefalteten Teils.

… and another stitch exactely in the fold of the other piece.

Und dann wieder in die Nahtlinie, und wieder in den Bruch… und so weiter.

(Wenn man farblich passenden Nähfaden nimmt und ganz kleine Stiche macht, dann kann man im übrigen auch so nähen. Das hilft auch, wenn man mal wieder nach dem Rückschneiden der Nahtzugabe auffällt, daß man die Ärmel falsch eingenäht hat…)

And so you go on, one stitch on the seamline, one stitch in the fold…

(If you take matching thread and then make tiny stitches you can also sew instead of baste. That is very usefull when you find out that you did sew the sleeves on the wrong side after you cut back the seam allowance…)

Heftnaht von links
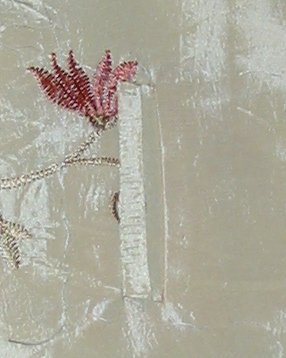
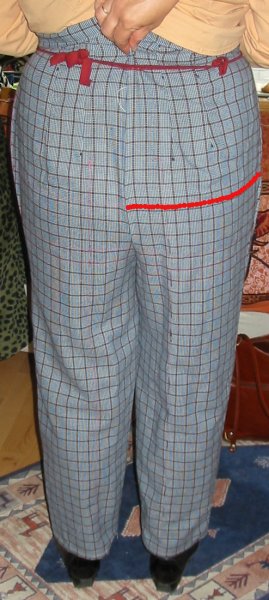
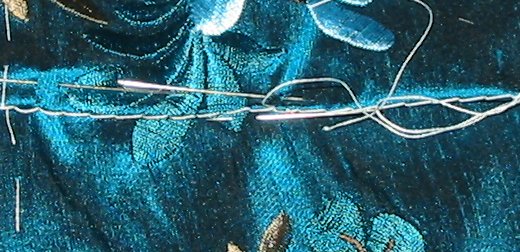
So sieht die Heftnaht dann von der linken Seite aus.

Da ich nur an wenigen Stellen die Stickerei auf der Nahtlinie habe, habe ich auch nur diese Stellen geheftet. Der Rest wurde nur gesteckt.

That’s what the basting looks from the wrong side of the fabric.

Since there are only few motives that cross the seamline I only basted those parts of the seam. For the rest pinbasting had to do.

Naht
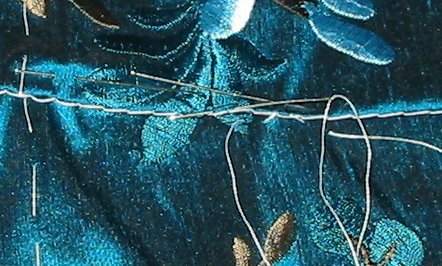
Anschließend wird genau auf der Heftnaht genäht.

Den Heftfaden hinterher wieder herauszuziehen macht nicht wirklich viel Spaß, aber das ist unvermeidlich…

Sewing has to happen exactly on the basting stitches.

Getting out the basting thread is no fun, but that cannot be helped.

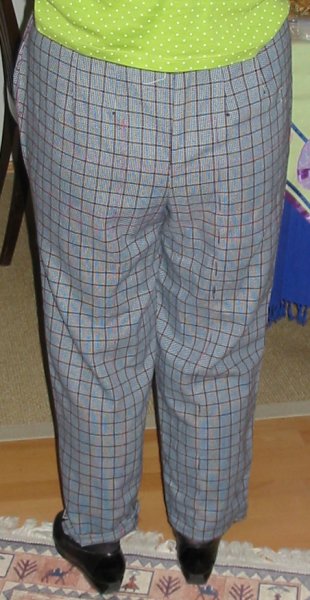
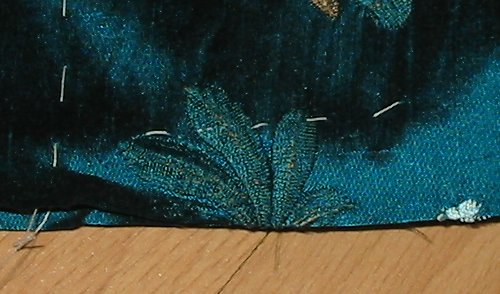
Dann bügeln, non links, von rechts…

Then pressing, wrong side, right side…

fertig genäht
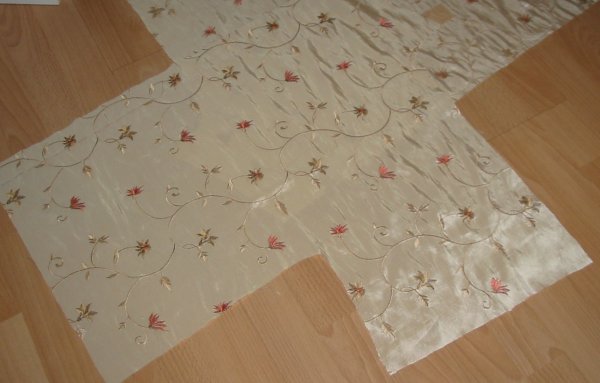
Ja und es hat fast geklappt…

*hüstel*

And it worked out… nearly….

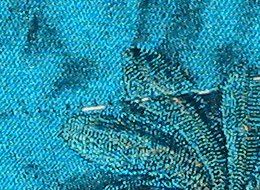
Ich habe die Technik zwar schon ein paar Mal angewandt, aber nocht nie auf Stickerei. Das muß ich wohl noch mal üben, dadurch daß der Stickereistoff etwas steif ist, war es schwierig zu heften.

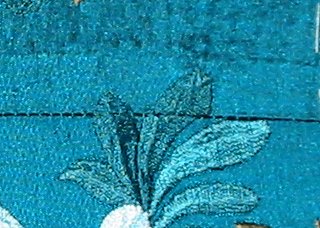
Aber dadurch daß die Stickerei an dieser Stelle Ton in Ton ist, sieht man es aus der Entfernung nicht mehr. Denn wie ich schon sagte… richtiges Auflegen ist die halbe Miete… 🙂

It’s not the first time I used this technique, but never on embroidered fabric. Some more practice will be good… The embroidery is a bit stiff so basting wasn’t that easy.

But since the embroidery has the same color as the fabric this little mistake is only visible from very close. As I said, placement while cutting is important. 🙂

Was keiner mehr sehen wird

What will not be seen later

EinlageViel Zeit war die letzten Tage nicht, aber ich habe immerhin die Einlage aufgebracht.

Vogue sieht in der Anleitung ja gar keine Einlage vor, aber der Kragen steht ohne Hilfe sicher nicht. Und die Knöpfe kann man auch besser annähen, wenn alles etwas stabiler ist.

Deswegen habe ich den Kragen und die vordere Kante mit Seidenorganza verstärkt, der einfach aufgeheftet ist. Später wird er in den Nähten mitgefasst, bei der kurzen Jacke sollte das reichen.

Jedenfalls gibt es so heute mal einen Blick auf die linke Stoffseite.

There was not much sewing time the last days, but I managed at least to do the interfacing.

The Vogue instruction do not show any interfacing, but the collar cannot stand as on the pic of the envelope without that. And for the sew on snaps it will also be better if there is a bit more stability.

So I stabilized the collar and the front with silk organza that I just basted within the seamline. When closing the seams the organza will be attached also. Since the jacket is rather shirt this should be enough.

So you get to see the wrong side of the fabric today.

Kleinarbeit…

Small steps were what I did today.

… stand erst mal an.

GürtelWas immerhin schon mal fertig ist, ist der Gürtel.

Die Ecken könnten schöner rausgebracht sein und in der hinteren Mitte habe ich die Handstiche ziemlich geschludert. Ersteres werde ich bei der anderen Jacke besser machen, letzteres ist egal, weil das im Tunnel verschwindet.

Die Anleitung sieht keinerleich Verstärkung vor. Ich dachte zuerst, daß ich den Gürtel an der Seidenjacke unbedingt verstärken muß, bin mir aber inzwischen nicht mehr so sicher. Der Gürtel muß ja nicht viel Zug aushalten und ist wohl eher dekorativ zu verstehen. Und je dicker…. desto mehr trägt er auf.

The tie is done. The edges could be sharper and the slipstitches after turning were done for quick, not for quality. The first thing I will make better on the silk jacket, the latter… well this part will always be inside the channel and never visible. So one possibility to save time.

The instructions show no interfacing for the tie. First I was sure that I would change that for the silk but now I am less sure, because the tie is more decorative and a well padded tie is not what I need around my waist…

RückennahtFür eine Alltagsjacke okay ist die Musterpassung auf der hinteren Rückennaht (Im oberen Teil kann das Muster nicht passe, da ist die Naht gerundet.)

Ich habe eine Technik ausprobiert, die mir das Handnähen ersparen soll. Aber für das edle Stück ist mir das Ergebnis doch nicht schön genug. Da werde ich wohl doch hohl von Hand nähen. *seufz*

I tried a quicker technique to match the pattern on the back seam. The result is okay for a everyday jacket, but for the silk one the result isn’t good enough. So I will end up handstitching that seam, I guess…

PaspelöffnungUnd ich habe die Paspeln am Gürtelauslass. Ein schnödes Knopfloch kommt da nicht in Frage.

Das Ergebnis befriedigt mich hier auch nicht wirklich, meine Technik funktioniert auf Wolle prima, auf andere Materialien offensichtlich nicht.

Dann werde ich wohl doch die Technik ausprobieren, die Capricorna im Forum vorgeschlagen hat. Ich habe das Threads-Exemplar zwar nicht, aber in einem anderen Blog habe ich vor nicht allzulanger Zeit mal ein Tutorial dazu gesehen. Muß ich nur noch wiederfinden…

And I made the welts where the tie will come out. Just large buttonholes are out of question.

The result here also this technique works well in woolen fabrics but in nothing else, so I will try another technique which Capricorna proposed in the forum. I don’t have the mentioned issue of Threads, but I know I’ve seen a tutorial in another blog not too long ago. I’ll just have to find it.

Im Prinzip wären es jetzt noch vier Nähte bis die Jacke selber fertig ist. Allerdings soll sie ja eine Wattierung bekommen, die noch nicht mal zugeschnitten ist und die ich größtenteils von Hand zusammen nähen muß. Und außerdem muß ich den Tunnel für den Gürtel aufnähen, denn ich will nicht, daß die Wattierung am Ende durch die Öffnungen guckt.

Die Anpassungssitzung morgen klappt also leider eh nicht. 🙁

Theoretically there are only four seams until the outer shell is done. Practically I’ll have to cut and assemble (mostly by hand) the batting and I need a extra tunnel for the tie so nothing of the batting can show thruogh the openings.

So no fitting session tomorrow anyhow. 🙁

Under Pressure…

… arbeite ich vermutlich doch am Besten. Oder zumindest am Effizientesten. Hoffe ich wenigstens.

… seems that I am working best. Or at least most efficient. At least I hope I will…

Wir sind Ende des Monats (ja, diesen Monats) zu einem Hochzeitsempfang eingeladen. Da alles was ich so an festligen Sachen habe irgendwie schwarz als Basisfarbe hat und somit weder zur Hochzeit paßt noch zum Frühling muß ich mir also was neues nähen. (Gut, man kann auch sagen, es war eine Ausrede, teueren Stoff zu kaufen… *hüstel*)

Stoff Da die Zeit wirklich knapp ist, habe ich meine Pläne schon auf etwas hoffentlich durchführbares eingekocht.

Als Kleid werde ich mir ein schlichtes Etuikleid mit etwa dreiviertel Ärmeln oder kurzen Ärmeln nähen, nach meinem bewährten Schnitt mit Prinzessnähten. Alle Dekoideen habe ich konsequent gestrichen und mir dafür 2,50m von einen Seiden-Wollstoff bei De Gilles in Paris geleistet. Er hat eine etwas körnige Struktur, so dass auch ein schlichtes Kleid gut aussehen wird. (Falls noch Zeit sein sollte kann ich immer noch Perlenstickerei am Ausschnitt anbringen oder so was.)

End of the month we are invited on a wedding reception. Since all my clothes for festive events are more or less black and this is neither suitable for a wedding nor matches springtime I have to sew something new. (One could say it’s a pretence to buy expensive fabric…)

Since the time I have is short I discarded all time consuming ideas and brought it down to simple. So I’ll make a simple straight dress with princess seams (TNT pattern) and purchased I nicely structured silk-wool blend at De Gilles in Paris. The texture should make it suitable for a very simple dress. (If I should have time left I can always add some beading to the neckline. But that won’t happen.)

Wirklich anfangen kann ich damit aber noch nicht, denn ich habe zwar den Stoff und passendes Nähgarn, den Reißverschluss (der als Nachtreißverschluss ziemlich am Anfang eingenäht wird) und das Futter mußte ich aber bestellen. Mal sehen, wann das kommt.

I cannot really start the dress, because I have the fabric and the sewing thread, but lining and the zip (which will be a in seam zip and therefore will have to be installed first) I had to mailorder. So let’s see, when it arrives.

bestickte Seide und Vogue SchnittDas ist jedoch nicht so schlimm, denn ich will aus dieser schönen bestickten Seide von Sacré Coupons auch eine Jacke nähen. Der Schnitt ist ein “Very Easy, Very Vogue” und wird den Stoff durch die wenigen Teilungsnähte gut zur Geltung bringen.

Allerdings muß ich den Schnitt erst mal testen, denn Kimonoärmel und keine Teilungsnähte sind nicht so leicht anzupassen. Außerdem will ich die Verarbeitung etwas sauberer machen als in der Anleitung, ich will die Jacke mit Watteline doppeln, Kragen und Vorderteil mit Belegen arbeiten statt nur mit Futter zu verstürzen (so meine 3m Stoff dafür genügen) und außerdem Kragen und Kanten mit Seidenorganza verstärken.

Hier kam immerhin heute schon mein Freitag Nacht bestelltes Nähgarn von Alterfil (weil man kann so viele Farben haben wie man will… es fehlt dann doch eine – und petrol ist keine Farbe, die ich häufig vernähe), die waren wirklich wieder megafix! (Und als Beifang ist noch ein Röllchen “moonglow” in den Warenkorb gehüpft, leuchtendes Garn muß ich doch mal ausprobieren und es war gerade im Sonderangebot…)

Das Futter hingegen ist im gleichen Paket wie das für das Kleid. Und Watteline sowie Seidenorganza… kann ich erst Freitag kaufen.

Well, no problem, because there is also a jacket to sew. Since the embroidered silk (from Sacré Coupons in Paris) won’t need any further embellishement I’ve choosen a “Very Easy Very Vogue” Pattern that has only few seams. On the other hand this pattern is not tested yet and I don’t know how complicated it will be to fit, since it has no darts, kimono sleeves and few seams.

Plus the instructions are to simple for that nice fabric. They just tell you to double the jacket with lining. I intend to make facings for front and collar (if the 3m of fabric I have are enough for that), interface collar and front with silk organza and to interface the whole jacket with “Watteline” (a kind of batting, I’m not sure what it might be called in English).

The sewing thread I ordered from Alterfil Friday night already arrived today (you can have as many threads you want, you’ll be able to find a colour you do not have matching thread…), but the lining was ordered from the same dealer as the lining for the dress. And Watteline and silk organza will only be purchased on Friday.

Auch das ist nicht wirklich ein Problem, denn der Schnitt muß ja erst mal getestet werden. Kurz bevor ich in ein altes Bettuch schnitt fiel mir ein, daß ich eigentlich auch dringend eine Übergangsjacke brauche. Also tauchte ich erst mal in die Stoffkiste ab und kam mit einem bestickten Polyestertaft wieder. (Entsetzter Blick des Ehemannes wie immer göttlich, er (der Blick) sagte so was wie “… aber…. das hat ein MUSTER!”) Und den… habe ich jetzt schon mal zugeschnitten. (Ja, natürlich habe ich einen Weg gefunden, mehr Arbeit zu machen. Denn eine Jacke die auch tragbar ist muß ausgearbeitet werden, ein Testteil aus Bettlaken nicht.)

Vorderteile zugeschnittenDer Stoff (er könnte jemandem bekannt vorkommen… 😉 ) ist allerdings wirklich blitzdünn und beinahe durchsichtig, deswegen wird er mit einem Polyestervlies verstärkt (so ich noch genug habe…)

Optimalerweise sollte ich meine “tragbare Testjacke” bis Donnerstag fertig haben, damit Frau mhs mal auf den Sitz gucken kann.

Allerdings kann ich bis dahin kein Futter einnähen, weil das kann ich auch frühstens Freitag besorgen….

Ich glaube, allmählich wird es ein Problem. Drei Kleidungsstücke und so am 25. März sollten sie alle fertig sein. *schluck*

No Problem either, the pattern of the jacket hasn’t been tested yet. Just before cutting in an old bed sheet I realised that I could need a every day spring jacket. (Mine is so old and rotten that I’m hardly wearing it if I can avoid it..) So I picked an embroidered simple polyester fabric from my stash and cut it. (When my husband saw it he sopped and got that funny look that says “…but… that is not a plain fabric… there is a PATTERN!”) Yes, I’ve found a way to make more work. Because sewing a wearable muslin means a good deal more work than just putting together something without lining or proper closure from an old sheet.

Since the fabric is nearly see through thin I’m wanting to interface it with some polyester batting I still have. (At least I hope I still have enough.) It would be perfect having finished the wearable muslin on Thursday so Frau mhs can check the fit. Only.. I have no lining and will only be able to purchase that.. on Friday.

I think I am in trouble… three pieces and due day is around the 25th. Of this month… Good time to start panicking…?

Wir haben eine Hose! (Schnittanpassung mit System, Teil 10)

We have pants! (Pants fitting shell, part 10)

Berechtigterweise tauchte kürzlich auch mal die Frage auf, was denn aus der Hose von Frau mhs geworden ist.

Erste HoseNun, eine Hose!

Der Schnitt wurde das erste Mal auf einen tragbaren Stoff übertragen. Dabei hat Frau mhs die Beine von der Hüfte bis zum Knöchel etwas erweitert, weil die Fitting Shell am Knöchel doch etwas arg schmal ist. Taschen hat die Hose noch keine, aber ein korrekter Hosenschlitz vorne ist schon dran. Auf dem Bild ist nur der Bund noch nicht endgültig, den haben wir angesteckt, um die Bundhöhe an der Hose zu bestimmen.

Someone wanted to know some time ago what happend to the pants fitting process of Frau mhs.

Well….. pants did happen!

She used the pattern now on a wearable fabric. She altered the fitting shell a bit, making the legs wider from hipline to the ankles (the fitting shell is quite narrow on the bottom). There are no pockets yet, but she constructed a front closure. On the pic the waistband isn’t sewn yet, only pinned, to determine the right heith on the pants.

Hose hintenWir sind uns beide einig, das ist die bisher bestpassendste Hose, die sie seit Jahren hatte!

Zumindest so lange sie sich nicht bewegt.

Beim Laufen spannt nämlich der Stoff am Oberschenkel und wirft Falten. Mal sehen, ob wir das durch zugeben am Vorderteil an der inneren Beinnaht beheben können. In den Büchern steht zu diesem Problem nämlich teilweise, daß man die Schrittnaht verändern müßte.

Was wir ganz sicher nicht tun werden, denn die muß so aussehen, damit sie an Frau mhs paßt.

Aber wenn noch jemand Vorschläge hat, wie man dem Problem beikommen kann OHNE die Schrittnaht zu verändern…. immer her damit!

(Und ein bißchen länger muß die Hose noch werden….)

We both agree that this is the best fitting pants she had in years!

At least as long as she does not move.

Because when she walks the pants are to tight on thigh-level and make ugly wrinkles. We hope this can be fixed by adding to the inner leg seam of the front pant. Some of the books suggest to alter the crotch seam, which is definitely not an option. Because is took us some time to find the right form of the crotch seam to fit the body of Frau mhs.

Any suggestions what to change WITHOUT touching the crotch seam? We’d love to hear it!

(And the legs will have to be lengthened again a bit… but that’s really a minor problem.)

Kleid… fertig?

Dress… finished?

Katharina fragte in einem Kommentar, ob mein rotes Kleid fertig ist. Ich nehme sehr an, es handelt sich um das Bussiness goes Africa Kleid, auch wenn das in Wirklichkeit braun ist. (Als ich den Stoff kaufte war die Farbe noch “rehbraun”, diesen Herbst heißt sie wohl “Zimt”) In der Tat, ich schulde noch ein Photo.

Kleid Bussiness goes AfricaAlso technisch gesehen ist es fertig, das Futter ist drin, das Kleid ist gesäumt, alles dran.

Katharina asked in a comment some time ago whether I had finished my red dress. As I am only working on a brown one (which looks a bit reddish on the pics) I have to admit that I haven’t shown a pic yet.

Well, technically it’s finished. Lining is attached, hem is sewn, everything done.

Ich weiß nur noch nicht, ob es so schon fertig ist. Der Batikstoff kommt beim Laufen am Saum gut zur Geltung, aber oben… scheint mir noc was zu fehlen. Es ist unbalanciert und auch… naja, langweilig.

Gut, zur Arbeit kann ich es ohne Probleme anziehen, da kommt es nicht auf Schönheit an, aber wenn jemand noch eine Idee hat…? Ich dachte schon an eine lange, auffällige Kette, aber da habe ich noch nichts passendes gesehen.

Only I’m not sure whether it’s really finished. The african batik fabric shows nicely on the bottom of the dress when I’m walking, but on the upper part… something seems to be missing. It’s not well balanced and… well, boring.

Kleid mit Jacke, Business goes AfricaNo problem wearing it to work, beauty is not the main issue there. But if someone has an idea….? I’ve thought about a long and somewhat outstanding necklace or something like that, but I couldn’t find anything matching so far.

With the jacket (which I already did show here) it looks better, though not on the pic. I think this is because it adds structure to the upper part of my body and also the button is quite a statement. (The structure of the fabric does not photograph well.)

So maybe I am just not used to see myself on so much brown? I haven’t decided yet, what to do.

Mit der Jacke (die ich hier schon gezeigt hatte) sieht es etwas besser aus, allerdings nicht auf dem Bild. Die Struktur des Jackenstoffes photographiert sich ganz schlecht, aber durch ebendiese Struktur bringt die Jacke wieder etwas Aufmerksamkeit auf den Oberkörper und auch der große Knopf spricht für sich.

Vielleicht ist mir so viel braun für mich auch nur sehr ungewohnt? Mal sehen, was ich tun werden, entschieden habe ich mich noch nicht.

… und wieder zurück. (Schnittanpassung mit System, Teil 9)

… and back we go. (Pants fitting shell, part 9)

Jetzt haben wir eine ganz gut angepasste Hosenbasis, aber das macht ja nun noch keine Hose. Also müssen die Änderungen wieder zurück auf das Schnittmuster.

Now we have a nicely fitting shell, but that doesn’t make a pair of pants. So all we altered had to go back to the pattern.

Änderungen übertragenDas letzte Mal haben wir uns bei Frau mhs getroffen, die hat einen größeren Tisch als ich . Das war praktisch.

Der Übertrag ist nicht schwierig. Ich habe zuerst die Nähte auf dem Stoff mit einem Filzstift nachgemalt, bevor Frau mhs die Hose wieder aufgetrennt hat.

Danach wird das Stoffteil auf den Tisch gelegt (eigentlich sollte man es vorher bügeln, aber das Bügeleisen war bei den Malerarbeiten wenige Tage vorher in einer Kiste gelandet und noch nicht wieder aufgetaucht) und der Folienschnitt kommt drüber.

Ich achte darauf, daß der Fadenlauf und die anderen Kennlinien, die ja auf dem Stoff und auf dem Schnitt eingezeichnet sind, genau übereinander liegen. Auf dem Bild zeichne ich gerade die Nahtlinien vom Stoff auf der Folie nach. Das geht mit Folie natürlich besser als mit Papier.

Last time we met at Frau mhs place, her table is bigger than mine, that is quite useful.

It’s not difficult to mark the changes back to the pattern. I used a felttip to mark along all seamlines on the fabric, then Frau mhs ripped all seams.

After that the fabric should be pressed, but Frau mhs had her flat repainted and the iron was somewhere in a box and not available yet. So we just laid the fabric flat on the table and but the pattern over it.

Now it’s important that the grain and all other marks and marked lines I have on the pattern and on the fabric are properly aligned. After that I just need a pencil for plastic sheets and I mark our new seamlines on the pattern. That is why I prefer transparent plastic foil.

Unterschied SchrittkurveKerstin, du wolltest die neue Schrittkurve sehen… hier ist sie. Rot sind die neuen, “richtigen” Linien.

Auffällig ist, daß die Kreuznaht viel tiefer legt, als der ursprüngliche Schritt, sogar unterhalb der geplanten Oberschenkellinie. Laut der Vogue- Anleitung hätten wir natürlich noch mehr Länge einfügen können, aber nur hinten und außerdem wäre die Taille dann irgendwann über den Busen gerutscht…

Also kam die Änderung nach Palmer/Pletsch zum Tragen, auch die Form der Schrittkurve hat sich deutlich verändert.

That is our new back center seam, the red line.

The crotch line now is way lower than the original one, even lower that the thigh line. According to the Vogue instructions we could have added more length to make the crotch lower, but the front was okay, it was only the back that was wrong.

So that was the moment when we used the Palmer/Pletsch method, that also changed the shape of the crotch seam.

Ein Stück Leinen wartet schon darauf, eine Hose zu werden. Wir sind beide gespannt…

A piece of linen is already waiting to become a pair of pants. We will see…

Business goes Africa

Es gibt noch ein Projekt, an dem ich schon lange arbeite, aber nicht mit hoher Priorität. Deswegen geht es nur langsam vorwärts und deswegen bin ich noch nicht dazu gekommen, darüber zu schreiben.

There is another project I’m working on for quite a while, but not with a very high priority. So progress is very slow and I never found the time to blog about.

Da ich die bunten afrikanischen Stoffe sehr gerne mag, suchte ich schon lange eine Möglichkeit, sie für mich tragbar zu machen. Und zwar, ich liebe ja Herausforderungen, in einem Business-Outfit….

I do love those colourful african fabrics so I’ve always wanted to make them work for me. And, I love challenges, in a business-outfit…

Scnnitt Vogue V7896

Es soll ein Kleid für’s Frühjahr werden, ich habe also noch Zeit…. Äh… vielleicht dann doch besser für den Herbst…  Außerdem habe ich nicht gesagt, für welches Jahr…

Grundlage wird dieser Vogue Schnitt (V7896) sein. Vorteil ist, daß ich ihn schon mal genäht habe, oder sagen wir schon mal als Grundlage einer Veränderung verwendet habe.

Der Nachteil ist, daß ich ein Kleid mit Teilungsnähten brauche, der Schnitt aber Abnäher hat. Also werde ich zeigen, wie ich den Schnitt so verändere.

I want to make a dress for spring, so I have plenty of time…. Let’s say it’s for autumn…And I didn’t say what year…

I’ll take this Vogue pattern (V7896) to start with. The advantage is, that I’ve made it once already. Or let’s say I took it as basis for a pattern modification.

Disadvantage is, that I need a pattern with princess seams and this pattern forms the dress with darts. So I’ll show how to turn darts into seams.

ProbestoffAlso wird dieser Stoff wieder eine wichtige Rolle spielen.

Nein, das wird nicht das Kleid… aber wenn ich so massive Schnittänderungen vornehme, dann ist ein Probekleid unabdingbar.

Den Stoff seht ihr noch oft genug, wenn es an die Verarbeitung geht. Da werde ich zeigen, wie man auffälligen Stoff unauffällig einarbeitet. Oder so. 😉

So this fabric will play an important role.

No, that will not be the dress… but if I make bigger pattern modifications nothing goes without a muslin…

You’ll get to see enough of the fabric when I’ll show what I do to incorporate a quite flashy fabric in a “respectable” outfit. 😉

Ich glaub, jetzt hat sie’s! (Schnittanpassung mit System, Teil 8)

I think she’s got it! (Pants fitting shell, part 8)

Hose angepasstNachdem wir noch kräftig mit der Form der Schrittnaht gespielt haben war es so weit, die Hose kann in Position gebracht werden, so daß die Hüftlinie auch über der Hüfte verläuft. Und schon sind die Falten hinten weg.

Da die Hose am Oberschenkel vorne noch etwas eng war (zumindest beim Bewegen) haben wir an der inneren Schrittnaht noch einiges zugegeben, mehr an der Vorderhose als an der Hinterhose. (Denn diese Änderung war dann schön in “Pants for any body” beschrieben.”

After we altered the shape of the back crotch line several times it is done: The pants can be pulled up into a position where the hipline matches the hip all around and voilà, the wrinkles are gone!

The pants then were still a bit tight on the front thighs so we added width on the inner leg seam, more on the front. (This alteration is described in “Pants for any body”)

Bleiben dann nur noch kleinere (?) Probleme: die endgültige Bundlinie bestimmen und eine Möglichkeit zu finden, den Bund so zu arbeiten, daß die Hose auch an dieser Stelle bleibt. (Falls es außer dem Gebrauch von Hosenträgern eine solche gibt…)

Frau mhs hat wohl recht, der entscheidende Punkt für diese Anpassung waren vermutlich nicht die aufwendigen Schritte aus der Vogue Fitting Shell (oder nicht nur), sondern daß die Probehose eine Markierung für die Hüftlinie hatte. So konnten wir immer überprüfen, wo die Hose hin muß. Und die letzten Schritte dann mit der “Pants for any body” Methode durchführen. Die wir früher schon erfolglos angewandt hatten, aber vermutlich einfach nicht an der richtigen Stelle.

So there remain minor (?) problems: finding the desired position for the waistband and finding a technique to make that waistband in a way that it keeps the pants actually there. (If that technique exists other than using suspenders…)

I think Frau mhs is right when she states that the crucial point was not (or not only) all the way through the vogue fitting shell, but to have the hip line marked on the musslin. So we always could see where the pants were supposed to sit on the body. And then the steps from “Pants for any body”, that we had tried on other patterns before and which had not worked then, could make the pattern work. Probably because we used those alterations then on the right spot this time.

Wir verlassen den Pfad der Tugend (Schnittanpassung mit System, Teil 7)

We are leaving the path of virtue (Pants fitting shell, part 7)

Hose hintenBevor wir uns wieder an die Hose machten, habe ich noch mal den Punkt kontrolliert, den ich beim letzten Mal etwas aus den Augen verloren hatte. Nämlich wo die Hüfte sitzt. Und da war das Ergebnis recht eindeutig, die Hose muß hinten tatsächlich noch weiter hoch, damit die Hüftlinie der Hose auch auf der Hüfte von Frau mhs sitzt.

Also haben wir die recht einmütigen Kommentare (vielen Dank noch einmal!) beherzigt und an der inneren Beinnaht oben noch einmal 2 cm zugegeben.

Wie das Bild zeigt, reicht das aber immer noch nicht.

Before we decided how to continue with the pant I checked something I had nearly lost out of sight the last time: the hip level. The result was quite clear, to get the pants on hip level we had to raise it even more in the back middle, to match the hipline of the pants with the hipline of Frau mhs.

The hints in the comment section (Thanks a lot!) were clear, so we did what was recommended, adding another 2cm to the back pants on crotch level.

This is still not enough, as the pic shows.

Doch jetzt habe die Falten eine gewisse Ähnlichkeit mit einer Abbildung aus Pants for any body. Da uns die Vogue Anleitung ja inzwischen völlig im Stich gelassen hat, habe ich Frau mhs überredet, doch in diese Richtung weiter zu machen. (Zugegebenermaßen einfach aus meiner Sicht, ich habe die Arbeit damit ja nicht.) Das bedeutet, die Schrittkurve am Hintern muß noch tiefer ausgeschnitten werden. Und eine etwas andere Form bekommen soll.

Jetzt kann ich auch nur die Daumen drücken, daß das funktioniert.

But now the wrinkles resemble those on one of the illustrations of Pants for any body. As the Vogue instructions are of no help any longer I convinced Frau mhs to go on with that. (I have to admit that it’s easy for me, because she will have to do the work.) This means the crotch curve has to be cut deeper again. And the shape should change also.

I really do hope, that this brings the desired result!