Fitting braid for free!
Nach der Strickerei und Häklerei geht es auch mal wieder ums Nähen…
Dekorative Elemente sind schön, aber eine genau passende Borte zu finden ist nicht immer einfach. Und wenn man endlich eine gefunden hat, dann ist sie meist teuer.
Neulich stand ich auch vor dem Problem, daß ich für ein Babykleid absolut nichts passendes in meinen Vorräten fand, aber unbedingt am Wochenende fertig werden wollte. Also habe ich mir aus den Stoffresten und etwas Stickgarn selber eine Borte gemacht.
After all that knitting and crocheting a bit of sewing again…
Decorative elements on garments are great, but finding the right braid can be complicated. And once you’ve found it, it’s expensive.
Some time ago I had that problem that I wanted to make a dress as a baby gift and didn’t find anything appropriate in my stash. Of course it was weekend and the shops were closed. So I made my own braid from fabric scraps an some embroidery thread.
Und so geht’s:
And that’s how I did it:
 Zuerst habe ich zwei Streifen Stoff geschnitten, einem aus dem Stoff des Kleides, einem Baumwoll-Leinen von BBG, im geraden Fadenlauf, den anderen aus einem Rest BBG Spinnaker im schrägen Fadenlauf. Bei dessen Breite habe ich mich nach dem Karomuster gerichtet und das einmal schräg durchgeschnitten. Er ist etwa 5mm breit.
Die Borte wird auf Vorder- und Rückteil aufgenäht, bevor die Seitennähte geschlossen werden, daher macht es nichts, wenn die Streifen unterschiedlich lang sind. Sie dürfen nur nicht zu kurz sein.
First I cut two stripes of fabric. The wider one is about 1.7 cm wide and cut on the straight grain. It’s a cotton-linen blend from the Dutch company BBG, the fabric I also made the dress from. The other one is BBG Spinnaker, a rather stiff fabric with a woven plaid. Here I cut on the bias, according to the plaid, which made it approximately 5 mm large.
I’ll be sewing on the braid on front and back before the side seams are closed, so I do not have to make the stripes the right length now. Only they shouldn’t be too short.
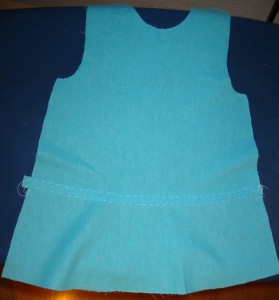 Der breitere Streifen wird jetzt von Hand aufgeheftet. Er dient dazu, eine Ansatznaht zu verdecken. Da die Naht abgerundet verläuft muß der gerade Streifen dazu schon beim Heften etwas in Form gedehnt und gestaucht werden.
Mit meinem Stoff geht das auch ganz gut, danach wird der Forumung noch mit Dampf und Hitze (spricht dem Bügeleisen) nachgeholfen, so daß der Streifen glatt aufliegt.
(Für eine größere Version des Photos einfach draufklicken.)
The larger band of fabric now gets handbasted to the front and the back of the dress. (The pic shows the back.) I want it to cover a rounded seam, so I have to shape it. Stretching it a bit on the botton an holding in a bit on the top of the band.
With my fabric that is not to complicated, it is soft enough to be formed. Then steam and heat (that is pressing) help it to lay flat over the seam.
(For a larger version of the pic just click.)
 Der zweite, dünnere Stoffstreifen wird jetzt genauf auf die Mitte des breiten gelegt. Um ihn zu fixieren benutze ich den Stoffklebestift von Gütermann. Der wäscht sich hinterher raus.
Da der Streifen schräg geschnitten ist, ist es nicht schwer, ihn der Kurve anzupassen.
Now I’m attaching the second stripe of fabric on the middle of the first one. To baste it I’m using a non permanent glue stick from „Goldzack“ (at least in Germany, probabely it exist under other brand names in other countries, too). This glue will wash out later.
As the second stripe was cut on the bias it is no problem to have it follow the curve.
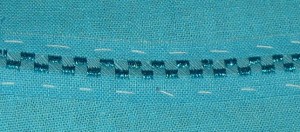 Jetzt kommt der lustige Teil: Einmal mit einem einfachen Zierstich über den schmalen Streifen nähen. Dadurch werden beide Stoffstreifen befestigt.
Ich habe ein Metallic Stickgarn von Mettler benutzt und natürlich eine 90er Maschinensticknadel. Eine spezielle Metallicnadel war nicht nötig, das Mettlergarn neigt zumindest bei mir nicht zu Fadenrissen.
Now comes the fun part: Setting the machine to a simple decorative stitch and stitching over the small fabric band. So both stripes are well attached.
I used a metallic machine embroidery thread from Mettler an a machine embroidery needle size 90. As (at least on my machine) Mettler threads are not prone to break I didn’t need the special needle for metallic thread.
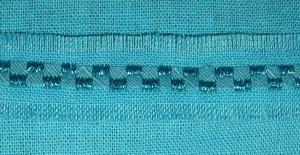 Vielleicht hat sich beim Lesen der eine oder andere gefragt, warum ich nicht beide Stoffstreifen im schrägen Fadenlauf zugeschnitten habe. Schließlich ist das bei einer Rundung doch einfacher. Aber hier kommt die Auflösung des Rätsels:
Die Borte bekommt einen fransigen Rand, ich ziehe also noch Gewebefäden aus dem breiteren Stoffstreifen heraus. Und das geht natürlich nur, wenn ich vorher gerade geschnitten habe…
Maybe some of you did ask themselves, why I did not cut both fabrics on the bias, because that makes following a curve much easier. Well… here’s the reason:
I wanted a braid with a frilly edge, so I pulled some threads from the larger fabric band. And this is only possible if it’s cut straight on the grain…
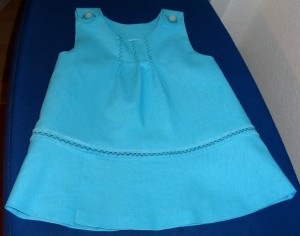 Natürlich gibt es auch ein Bild von dem fertigen Kleid.
Der Schnitt ist übrigens ein alter Bekannter, aus der Oktoberburda 2005: Hier habe ich es schon einmal genäht.
Of course there is also a pic of the finished dress.
The pattern is from BWOF, october 2005, Here I did it for another baby.
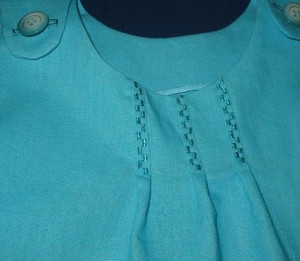 Und zu guter letzt auch noch ein Detailbild vom Ausschnitt.
Das Kleid hat vorne schmale Falten gelegt und diese habe ich mit dem gleichen Zierstich festgenäht.
Ganz einfach, aber ein chicer Effekt. Finde ich.
My last shot is a detail from the neckline.
The dress has inverted pleats on the front and instead of normal topstitching I used the same metallic thread an the same decorative stitch from my sewing machine to stitch them down.
Again easy and simple, but a chic effect. I think…
