
Erst mal hallo Gabi! Du bist die dritte, die ein Geschenk von mir bekommen wird! (Da es „Pay it forward“ und nicht „Pay back“ heißt, würde ich das so interpretieren, daß du auch wieder drei Leute beschenken darfst! :o) ) Schickst du mir auch deine Adresse?
Allmählich frage ich mich, ob das mit dem Pay it forward eine gute Idee war… ich nähe ja vor allem Kleidung, und das bietet sich bei Leuten die man nicht kennt ja nicht so an. Noch eine Herausforderung mehr… ich hoffe, ich enttäusche euch drei nicht. *hüstel*
 Trotz hinderlicher Umstände wie Arbeit habe ich an meinem Motivations-Outfit gearbeitet.
Der ursprüngliche Plan war, eine „BH-Schlinge“ einzuarbeiten, wie in Threads mal beschrieben. Da es dazu ein paar Hände mehr braucht (vier sind nicht verkehrt…) haben Frau mhs und Capricorna versucht, diese Konstrunktion an meinem Körper passend zu stecken. (Nein, keine Photos…) Das funktionierte auch halbwegs, aber da die Konstruktion keine Sicherung nach hinten vorsieht, bleibt das beim Bewegen nicht an seinem Platz.
My original Plan was to make a build in „bra-sling“ as described in Threads two years or so ago. This tasks needs some more hands (four are just a good idea…) so Frau mhs and Capricorna tried the pin fitting on my body. (No, no pics…) This worked out, somehow. But as this construcion has nothing to secure at the back it doen’t stay. At least not when I’m moving.
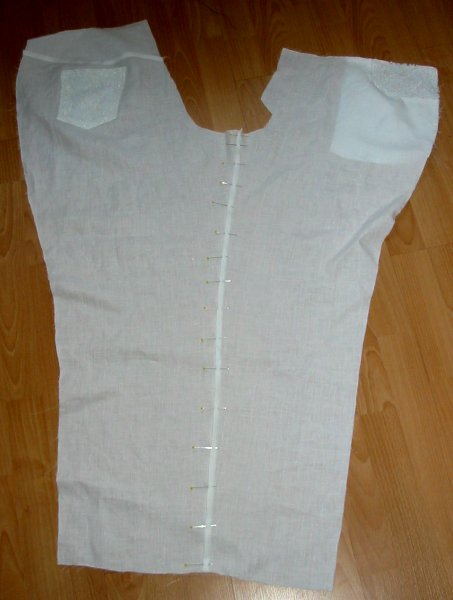
Eine Anprobe meines Probeteils über meinem „Normal-BH“ ergab, daß der Rücken des Neckholders hoch genug ist, um das Rückenteil zu verdecken. Also kann ich einfach einen „Standard-BH“ nähen und dem Neckholderträger verpassen. Und das ganze zwischen Oberstoff und Futter einnähen. So der Plan..
Den BH sieht man schon, die Körbchen sind aus festem Powernet, für die Rückenteile habe ich leichteres genommen. Fehlen noch Bügel und eben die Träger. Da weiß ich noch nicht genau, wie ich die schließen will. Bikini-Verschluß oder Haken und Ösen? Mal sehen… Das nette, wenn man einen „Einbau-BH“ näht ist, daß er nicht schön werden muß, funktional reicht…
Putting on the musslin over my „standard bra“ revealed that the back is high enough to cover the backof the bra. So I can just sew a normal bra with neckholders instead of normal straps. And sew in that between fabric and lining. That’s the plan.
The bra is nearly finished as the picture shows. For the cups I used firm powernet, for the back lighter one. So wire is missing and the straps of course. I’m not sure how I want to close them… bikini-closure? Hook and eye? We’ll see. What is nice about a „build-in bra“ is that it does not have to look nice, it just has to work…
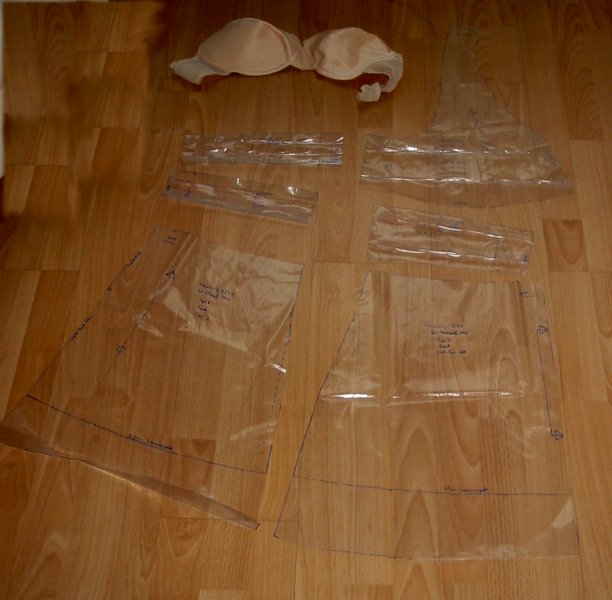
Den Schnitt für die Tunika mußte ich auch mal wieder gewaltig anpassen. Am Rücken habe ich drei Zentimeter in der Mitte gekürzt, zur Seite hin verlaufend auf einen Zentimeter. Den habe ich dann auch am oberen Vorderteil rausgenommen.
Vom Taillenteil ist nicht mehr viel übrig… vier Zentimeter, zwei an der Seite. Und die zwei Zentimeter müssen auch im vorderen Taillenteil raus. Bei so kurzen Teilen bleibt da nicht viel.
Die „Rockteile“ habe ich eine Nummer größer zugeschnitten. 22W und zur Hüfte hin auf 24W erweitert. Das an das Taillenteil in Größe 20W hinzubasteln wird noch interessant. Seide kann man ja nicht gut einhalten. Außerdem habe ich sie um zehn Zentimeter verlängert, das entspricht grob dem was ich im Ganzen oben weggenommen habe. Und ein bißchen Spielraum, kürzen geht ja immer…
After the fitting of the musslin I had to do a lot of alteration to the pattern. The back had to be shortened by 3cm in the middle, tapering to 1 cm on the side. This centimeter I’ve also taken out on the front.
 As far as the midriff is concerned…. there isn’t much left… shortened by 4cm in the middle back, tapering to two on the side. And also shortening the front midriff by 2cm. As the midriff isn’t two long anyhow there doesn’t rest much…
The „skirt“ (the pattern just calls these pieces „front“ and „back“ but I’ll refer to them as skirt, because it looks like that) I had to retrace in a bigger size 22W to 24W an the hips. I hope that‘ will be enough. How I’ll get that on the 20W mdriff I don’t know. Easing silk ist not so… doable… Also I’ve lengthened these pieces by 10cm, that is about what I’ve taken out on the upper part. If it sould be to much.. shortening is always possible…
Jetzt kann ich also eigentlich ans Zuschneiden gehen. Immerhin mit dem beruhigenden Gefühl, daß Silvia noch ein bißchen von dem Stoff hat. Wenn ich es versaubeutle, dann kann ich noch mal nachkaufen… (Pongeseide als Futter und Seidenchiffon um die Taille zu unterlegen habe ich heute auch gekauft. Das muß ich allerdings noch vorwaschen, denn die Tunika soll hinterher maschinenwaschbar sein.
Now I can start cutting. Knowing that there is still some of that fabric left in the shop. So if I mess it up I can at least „re-buy“… (I’ve also bought some ponge silk as lining and silk organza to underline the midriff.But that will have to be prewashed before. The finished garmnt is intended to be machine washable.
Und zum Schluß noch einen Blick auf die Hose. Die Seitennaht braucht die zweite Naht der Kappnaht, dann der Reißverschluß, Schrittnaht, Bund und dann war’s das schon. Oder so… Könnte noch klappen.
Die Jacke hingegen ist nur eine Idee in meinem Kopf..
Here’s a look at the pants. The flat felled inner leg seam needs the second stitching, after that it is the zipper, the croth seam and the waist. Just little nothings. More or less…
As far as the jacket is concerned… that is no more than an idea in my head…