Da ich dieses Jahr nichts mehr nähen werde, gibt es jetzt wenigstens mal einen Zwischenstand meines (November)Mantels:
As I wont sew anything for the rest of this year here the status of my (november)coat:
Erst einmal etwas, auf das ich wirklich sehr stolz bin.
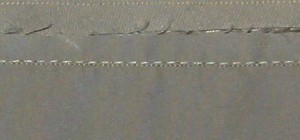
Ich habe in der Tasche eine schmale Paspel mitgefasst. Dazu habe ich zuerst meinen Paspelstreifen auf die Tasche genäht, mit langen Stichen und danach, damit die Paspel nicht schmaler wird, exakt eine Fadenbreite neben den langen Stichen die Taschenpatte auf den Mantel genäht.
Und das hat diesmal hundertprozentig funktioniert, nicht ein Stich ging daneben. (Ja, man sieht es auf dem Bild kaum, weil die Stiche wirklich ganz nahe beieinander sind. Draufklicken vergrößert es aber.) Ich strebe das immer an, aber daß es so gut klappt ist selten. Dazu kam, daß ich nicht hätte auftrennen können, weil das Paspelmaterial Löcher behalten hätte…
First something I am really proud of.
I made a very fine (2mm) piping when sewing the flap to the coat. First I machine basted my piping with a longer stitch to the flap, then I had to sew the flap to the coat exactely one thread width away from the first stitching with smaller stitches.
And it worked! Not one single stitch went wrong. That’s what I always try but rarely achive. (Yes, it is hardly visible on the pic because the stitches are so close. Clicking on the pic gives a version that is a bit larger.) Plus I couldn’t have ripped any stitches, because the material of my piping keeps the holes of stitching…
Dann habe ich eine schnelle und einfache Lösung für ein weiteres Problem gefunden.
Wie markiere ich den Abnäher? Mit Nähfaden geht im Prinzip, ist aber aufwendig und bei meiner dicht gewebten und glatten Popeline gar nicht so einfach. Kreide hält nicht und ist kaum sichtbar und Trickmarker hat die Tendenz, etwas durchzufärben.
Die Lösung ist ganz einfach: Quilters Tape. Im Prinzip ist das ein schmales Kreppband wie aus dem Baumarkt. Da meine Brustabnäher in diesem Fall gerade sind, markiere ich Abnäherspitze und den Anfang des Abnähers und klebe den geraden Streifen des Klebebandes auf. Genau entlang nähen, dann wieder abziehen. Fertig.
Then I found a quick and easy solution for a problem:
How do I make the markings for the stiching line for my darts? Threadtracing is an option but time consuming and on my densly woven and a bit slippery popeline not the best one. Chalk does not last long enough even to finish the line and trickmarker bleeds through.
So I remembered the quilters tape I’ve had for some time in my notions stash and that is just perfect. My darts are straight, so I only had to fold the dart, mark beginning and end and put a straight piece of taper from one to the other. Then machinestitch along the tape, removing the tape and you’re there!
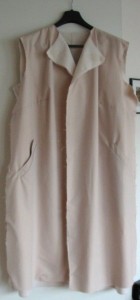
Das ist also der Mantel bisher: Die rückwärtige Mittelnaht ist genäht, im Vorderteil sind Leistentaschen eingearbeitet, die Brustabnäher geschlossen und die Schulternähte sind genäht. Auch die Windstoppermembran ist schon mit eingearbeitet.
Damit konnte der Mantel auf einem Kleiderbügel verstaut werden, ein Moment, den ich immer sehr zu schätzen weiß. Ab da wirkt es doch wie ein Kleidungsstück. Und alles Kappnähte, die auch ganz ordentlich geworden sind.
Die Falten sind größtenteils auf mangelndes Bügeln zurückzuführen, allerdings läßt sich der Stoff mit dem hohen Polyesteranteil nicht gut bügeln und die Membran ist ebenfalls hitzeempfindlich. Da werde ich noch etwas Geduld brauchen. (Die restlichen Falten kommen leider von den Taschen, die habe ich nicht ganz kräuselfrei hinbekommen.)
This is the coat so far. Middle back is done (flat felled seam), pockets and darts in the fronts and the shoulder seams (again flat felled) are done. the windstop membrane is already assembled with the fabric.
I always love the moment when I can store it away on a hanger and not folded somwhere, because it gives me the feeling to have more a garment than just fabric.
The wrinkles you see are mostly due to poor ironing. My polyester fabric does not like to be ironed and the membrane is not very heat resistant either. So this will need some patience. (The rest of the wrinkles come from inserting the pocket. Evidently I did not get them in perfectly.)
Tut mir leid, daß das erste Bild etwas unscharf ist, denn ich habe es ohne Blitz gemacht.
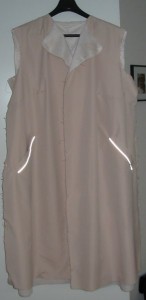
Der Blitz verrät nämlich noch eine Besonderheit: Die Paspel, die ich an den Taschen eingesetzt habe, ist aus Reflexband. Das habe ich irgendwann mal bei Scherzkeks-Stoffe gekauft und es war noch was übrig. Da ich doch auch oft nach Einbruch der Dunkelheit unterwegs bin fand ich ein bißchen mehr Sicherheit ganz gut.
Obwohl wirklich nur 2mm breite Streifen des Bandes sichtbar sind, ist der Effekt doch mehr als deutlich…
Sorry for the other pic to be a bit blurry. But I had to take it without a flash.
Because the flash shows another special feature of the coat: The „piping“ I inserted to the pockets is made from reflective material I purchased quite some time ago at Scherzkeks-Stoffe and had some of it left. I’m often outside when it’s dark so I tought a bit more of security might be a good thing.
And even though the visible part of the piping isn’t larger than 2mm the effect is more than visible…
Positiv ist die Bilanz an der Kleinteilefront.
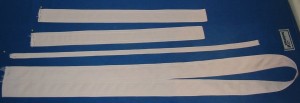
Gürtel, Gürtelschlaufen und die Riemen für die Ärmel sind genäht, gewendet und zweimal abgesteppt. Wenn der Mantel also mal so weit ist, dann müssen sie nur noch angenäht werden.
Positive the view to the small parts: Belt, beltloops and the „belts“ for the sleeves are sewn and topstiched (twice). So once the coat is nearly finished they will just have to be attached.
Bis ich so weit bin, müssen allerdings erst noch einige größere Teile verarbeitet werden.
Die Ärmel sind zusammengenäht (Kappnähte) und dabei die Membran mitgefasst. Ich will versuchen sie auch als Kappnähte zu arbeiten, im Buch Shirtmaking von David Coffin habe ich eine Technik dazu gefunden, die vielleicht auch an dem Mantel funktionieren könnte.
Kragen und Kragensteg sind jeweils zusammengenäht, wo bei der Kragensteg des Unterkragens auch Reflexband aufgenäht hat. (Die Idee ist, daß ich den Kragen hochschlagen kann und dann eben im Dunkeln das Reflexband sichtbar wird.
Die Belege sind immerhin mit Vlieseline bebügelt.
Before I can attach the small parts there are other bigger works to do.
The sleeves have one seam that is done (flat felled), the windstop-membrane is caught in that seam. I’ll try to attach them to the coat with a flat felled seam, in David Coffins Shirtmaking I’ve found instructions that might also work with my coat.
The collarstands are sewn to the collars and as you can see on the pic I’ve used more from that reflective material. The stripes are on the stand of the undercollar and the idea is, that I can put up my collar when it’s dark and the stripes appear.
About the facings there is nothing interesting to say, they are cut and the iron on interfacing is on.
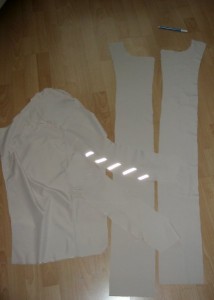
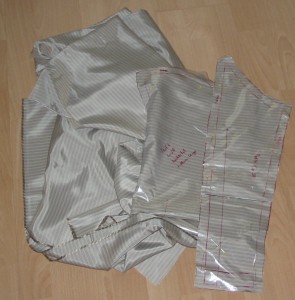
Und das Futter… tja, das ist gekauft.
Den Rücken und den Unterärmel habe ich auch schon zugeschnitten, aber ich bin allmählich etwas knapp an Stecknadeln. Teilweise, weil in den anderen Teilen des Mantels noch recht viele drin stecken, die die Windstoppmembrane festhalten.
Das Fehlen der anderen verrät etwas über die Anzahl der Ufos bei mir, die auf die Fertigstellung warten… Meine Motivation im Januar wird wohl weiter „fertig nähen“ sein.
The lining… well… I have it.
Back and one part of the sleeve are cut, too, but I’m running out of pins. Partially because there are quite a amount of them left in the already sewn part of the coat, to hold the windstop in place.
The other part of pins I can not use now tells a lot about the number of unfinished sewing projects I have here… My „Motivationsmonat“ for January should be more finishing…

