CompAkTa, die neue Tasche fürs Büro

My new bag for the office

Tasche fürs BüroDa sich mein Rücksack verstärkt auflöst, habe ich mich mal wieder an einer Tasche versucht, diesmal fürs Büro.

My bagpack is decomposing more and more, so I wanted a new bag I could use to go to the office.

Ziel war, daß mein Computer reinpasst, die Mappe mit den Akten, Handy, Strickzeug, eine Notration,… sie sollte aber auch nicht viel größer sein als nötig. Und das ist das Ergebnis: Der Außenstoff ist aus den Resten des grauen Rocks gepatched, für das Innenleben habe ich Seide (von Tissus Reine in Paris) gewählt, weil die den Computer gleich schön sauber hält. In der Mitte eine gepolsterte Innentasche mit Reißverschluß für den Computer. Eine nach unten beutelige Außentasche fasst wenig wertvolle Objekte wie Taschentücher oder einen Müslirigel.

The idea was that my laptop and the paperwork fit in, also the cell phone, knitting stuff, emergency rations… but it should not be bigger than necessary. And this is the result: the outer fabric is created from remnants of a skirt project, the lining is silk from Tissus Reine in Paris because silk cleans the computer automatically while it is carried. So the laptop is in a quilted compartment with zip in the middle. The pocket on the outside it flat on top and deeper on the bottom and holds not so valuable stuff like a muesli bar or some kleenex.

InnentaschenInnen gibt es eine große Tasche mit Reißverschluß sowie zwei offenen Taschen für das Handy und flachen Kleinkram.

On the inside there is one big packet with a zip on the one side and two smaller ones to hold the cell phone and flat items.

bezogene DruckknöpfeObwohl die Tasche leider nicht perfekt genäht ist (ich habe die Abläufe teilweise erst beim Nähen entwickelt und nicht alles war optimal), habe ich mir trotzdem den Spaß gemacht, in Details zu investieren. So dient etwa Band von Kafka als Stopper für den Reißverschluss. Und der Druckknopf für die Außentasche wurde bezogen. Das eine Teil grau, das andere, das auf dem schwarzen Futterstoff sitzt, mit schwarz.

I developed the sewing steps partially while constructing the bag and found out that not all of my solution were really good ideas. I managed everything, but the bag is far from being perfect. Still I liked to invest in some details. Like using ribbon from Kafka as zipper stops or covering the snap that closes the pocket on the outside. The part that sits on the gray fabric is covered in gray, the part that sits on black fabric is covered in black.

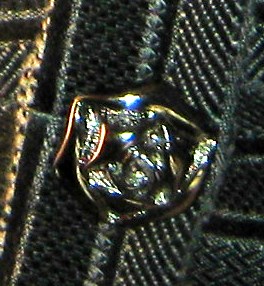
KnopfUnd weil mir dann immer noch nach verspielt war, habe ich diese Rosenknöpfe noch angebracht. (Das Photo ist leider nicht so gut.) Die sind allerdings nicht nur Deko, sondern stabilisieren die Trägernaht, weil sie durch alle Lagen genäht sind.

In the end I still felt somewhat playful so I added those rose buttons (sorry for the blurred pic). Though they also serve a purpose. They are sewn through all layers so the stabilize the seam that attaches the strap.

Mit dem Endergebnis bin ich aber weitgehend zufrieden, nur ein bißchen größer hätte sie doch sein dürfen. Es passt alles rein, aber knapp. Und nur so lange das Strickzeug nicht zu groß ist. Ich fürchte, so wird sie nicht lange halten. Aber dann nähe ich halt eine andere… 😉

I am mostly happy with the result. Only the size is a bit on the small side. I can fit everything in, but very tight. And only if my knitting isn’t to big. So I’m afraid it will not last to long. But that will be an excuse to sew another one… 😉

Zickentasche

Little Bag Pattern

ZickentascheDiese Tasche(n) für zwei Mädels im besten “Zickenalter” entstanden schon im Mai/Juni (und wurden auch mit Freude aufgenommen), aber die Anleitung zusammenzustellen hat ein bißchen gedauert.

I made those little bags/purses already earlier this summer (and they were received with joy) but it took my a while to make the pattern.

Der Schnitt ist super um auch Reste zu verwenden oder mit Bänder, Spitzen und Stickereien zu spielen (wenn man das mag). Die Taschen sind gefüttert und werden mit einem stoffbezogenen Druckknopf geschlossen.

Der Schnitt kommt mit einer Kurzanleitung und ist nicht unbedingt für komplette Anfänger geeignet, weil man doch so einiges in Kurven  einpassen muß.

Wer es trotzdem versuchen mag: Hier geht es zum Schnitt für die Zickentasche. 😉

The pattern is nice to use remnants and scraps of fabric and if you want you can decorate with buttons, beads, lace, embroidery,… as heavy as you like or not. The bags have lining and are closed with a fabric covered snap.

The pattern has only German instructions, but if you have questions just ask. If you want to try anyhow: Here’s the pattern for “Zickentasche” .

Wie immer ist der Schnitt für den privaten und nicht kommerziellen Gebrauch kostenlos und wenn ihr ihn weitergeben wollt, dann bitte als Link auf den Blog und nicht als Datei. (Vervielfältigung und Verkauf des Schnittes, seine Verwendung in Kursen oder die Herstellung von Artikeln zum Verkauf nach diesem Schnitt sind kein privater Gebrauch mehr. Danke für das Verständnis.)

Like always the pattern is free for private an non-commercial use and I appreciate it a lot if you pass it on as a link to this blog instead of copying the file. (Copying and selling the pattern, using it for classes or selling items made after this pattern are not supposed to be private use. Thanks for your understanding.)

Geschenke für andere I

Gifts for others I

Wenn’s sein muß, dann kann ich auch “mal schnell” was nähen.

StrickbeutelSometimes I can make something quick…

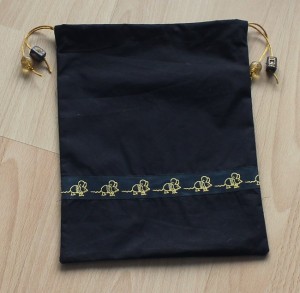
Aus einem Rest von meinem schwarzen Kleid wurde dieses Strickbeutelchen (neudeutsch “Projectbag”). Dazu etwas Webband von Kafka und die Zugbänder habe ich nicht mit einem Knoten zusammengebunden sondern mit dicken Perlen gesichert. (Die dunklen sind Schellackperlen aus Indien.)

Some remnants of my black dress made a project bag for a knitter. I just added some trim from Kafka and the drawstrings are not secured by knotting them together, but with thick beads. (The dark ones are shellac beads from India.)

Wobei das eigentliche Geschenk noch rein kommt… Ein Strang Colinette von Jitterbug. Stricken darf meine Freundin dann selber. *g*

The real gift will be in the bag… a strand of Colinette from Jitterbug. My friend can knit it herself. *g*

Phototasche mit Selbstreinigung

Selfcleaning camera sleeve

PhototascheEine neue kleinere Digicam ist bei uns eingezogen. Und da ich mir nicht noch mal das Display zerkratzen will wie bei der letzten brauchte sie eine Hülle.

We have a new digicam and since I do not want scratches on the display as it happen with the last one I made a sleeve.

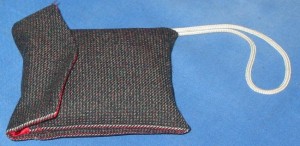
Genäht ganz simpel aus einem Rest Anzugstoff aus Wolle, der schön stabil ist und eine unempfindliche Farbe hat.

Den schmalen hellen Rand von der Nahtzugabe habe ich absichtlich sichtbar stehen gelassen, weil ich das nett fand.

Sewing was very simple, I*ve used a remenant of a woolen suit fabric that is stabile and has a color that will not get dirty easily.

The fine clear stripe on the edge is a part of the selvage which I liked to be visible since the whole design is so simple.

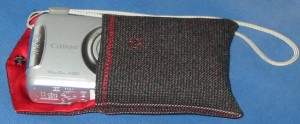
Innenleben der PhototascheAber der wirklich interessante Teil ist eigentlich das Innenleben.

Hier habe ich weiche Seide von einer Bluse verwendet.

Und Seide… reinigt Display und Gehäuse gleich automatisch von Fingertapsern wenn man die Camera reinschiebt und rausholt. 🙂

But the really interesting part is the lining.

I’ve used soft silk from a blouse.

And silk…. cleans away fingerprints from display and body of the camera automaticly when you put the camera in or pull it out. 😉

Verliernix, die Tasche

Verliernix, the purse

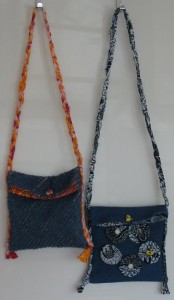
Verliernix-TaschenEin Geburtstag, zwei Mädchen, zwei Taschen.

Und damit die jungen Damen ihre Handys, Labellos und Taschentücher nicht so leicht verlieren gibt es für jede ein Verliernix.

Warum Verliernix? Selbst wenn man vergisst, den Knopf an der Tasche zu schließen, klappt die obere Kante automatisch um und die Tasche ist zu. (Auch nützlich für nicht ganz so junge Damen, die manchmal etwas geistesabwesend sind. Ich glaube, ich sollte mir auch eine nähen… 😉 )

One birthday, two girls, two purses.

And to prevent the young ladies to loose their mobiles, lipgloss or other stuff they got a “Verliernix” (“Loosenothing”) each.

Why that name? Well, if you forget to close the button the upper part will just turn on its own and automatically close the bag. (This is also useful for not so young ladies who are sometimes absentmindedly. Should make one for myself also…)

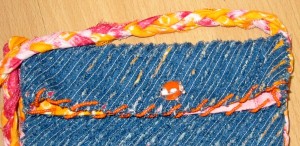
PerlendetailDie Taschen kann man aus ganz beliebigen Stoffen nähen und auch gut alle möglichen Dekotechniken ausprobieren, betüddeln, besticken,… oder eben einfach nur einen bunten Stoff verwenden.

Die eine Version habe ich aus Jeans und einem afrikanischen Batikstoff genäht. Chenilletechnik kam hier zum Einsatz. Und die obere Kante ist mit Roccailles und einer großen gläsernen Fischperle verziert.

You can use any material for that bag. Just a colorful print or try embroidery, application, any surface design you ever wanted to try. It’s small scale, so great for trying something new.

One version was made from jeans and african batik fabric. I use my chenille cutter and decorated the border with seed beads and a big glass bead in fish shape.

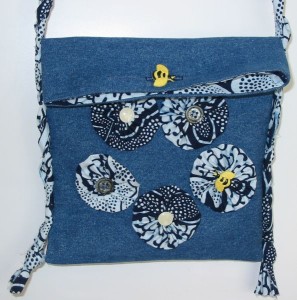
Tasche mit YoyosDie zweite Tasche ist ebenfalls aus Jeans, diesmal ist das Futter aus afrikanischem WAX-Stoff und außerdem habe ich mal mit Yoyos rumgespielt. eine tolle Technik, sie verbraucht außerdem viel Stoff. Und dann dürfen sich noch zwei Bienen-Knöpfe drauf tummeln. 🙂

The second bag uses another scrap of jeans and african WAX fabric for the lining. And I tried yoyos. That was a fun technique which also uses a lot of fabric. Two bee buttons join the yoyos.

Die Tasche ist supereinfach zu nähen und wenn man sie nicht betüddelt, sondern aus einem bunten Stoff näht, dann ist sie in einer guten Stunde fertig. Und kann auch von Anfängern genäht werden.

Es gibt nämlich eine superausführliche und reich bebilderte Anleitung für Verliernix für alle, die sie auch gerne nachnähen  wollen. 🙂

(Wie immer, Copyright bei mir, Verwendung für persönlichen und nicht-kommerziellen Gebrauch erlaubt, alles andere nur nach schriftlicher Genehmigung.)

Bär-ta, die Anleitung zur Wunschbärentasche

In aller Kürze diesmal, hier ist die Anleitung für die Tasche (in zwei Teilen, damit die Datei nicht zu groß ist, man braucht unbedingt beide Teile):

anleitungbaerta1

anleitungbaerta2

Die Anleitung selber ist sehr ausführlich und hat viele, viele Bilder, auch Anfänger sollten damit zurecht kommen.

This time only in German, the pdfs are the pattern and instructions for the bear-bag. There are many, many pics in it, but it’s all in German, sorry. But I’m quite sure there is a similar pattern somewhere in the web in English…

Wunschbärentasche

Bearbag

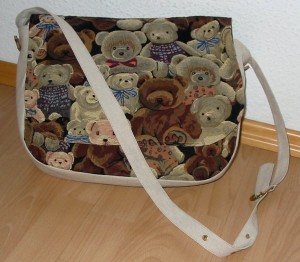
Es gibt ja gelegentlich Leute, die meine Taschen bewundern und es gibt auch Leute, die meine Werke zu schätzen wissen. Und so hatte eine Freundin einen “Auftrag” für mich zu ihrem Geburtstag. Sie wollte schon immer eine Tasche aus Bärenstoff, nur so wie sie will gibt es sie nicht zu kaufen. Also hat sie vier Einkaufsbeutel aus dem Stoff gekauft und mir gegeben.

Und dann gewartet, bis zu ihrem Geburtstag… und noch etwas länger… *hüstel*

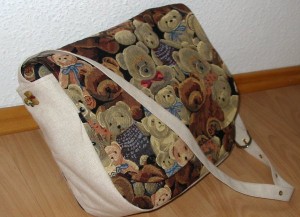
BärentascheAber jetzt ist sie endlich fertig, die Bärentasche nach Wunsch! (Und bei ihrer neuen Besitzerin angekommen.)

A friend of mine likes the bags I am making and since I know that she values things that are “made” I was very willing to grant her birthday gift.

She had always wanted a bag with cute teddy bears, but not of the kind you can buy but after her specifications. So she purchased four shopping bags with teddy bear motive and handed them to me.

Bärentasche von der SeiteThen she waited until her birthday. Then she waited some more… and some more… but now finally the bag is finished! (And in the hands of its new owner.)

An der Seite gibt es noch niedliche Bärenknöpfe, die gleichzeitig den Umhängeriemen stabilisieren.

Innenleben TascheAt the sides there are cute teddy bear buttons that also strengthen the attachment of the strap.

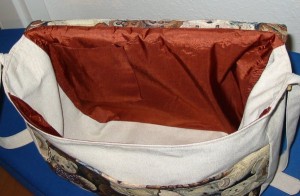
Und innen ist die Tasche natürlich gefüttert und sie hat eine Handytasche an der gewünschten Position. Hoffentlich paßt die Größe der Innentasche, denn meine Freundin bekommt ein neues Handy und konnten dessen Format nur abschätzen…

Of course the bag is lined inside and it has a pocket for the cell phone at the desired position. I hope the cell phone fits in because she is getting a new one and therefor could only guess how much space it would need…

Autopolitur….

… gehört natürlich ins Nähkästchen.

(Falls sich jemand wundert, daß so lange Pause war, mich hat ein Virus kräftig flachgelegt. Zum Nähen bin ich immer noch nicht fit genug, aber ich kann immerhin über ein paar Sachen posten, die ich vorher gemacht habe.)

Car polish belongs to the sewing equipment…

(In case you were wondering why I didn’t post anything for quite a long time: I cought a virus and lay flat for a good week. I’m not fit enough to work or sew but I can at least post about the thinks I did before I was knocked out.)

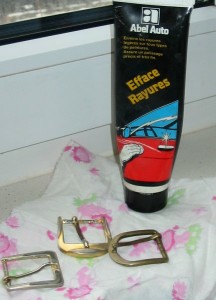
Politur und alte GürtelschnallenJa doch, ich nähe noch. Nur in kleinen Schritten.

Aber ich bin gerade an einer Tasche für den bereits verflossenen Geburtstag einer lieben Freundin. ‘hüstel*

Und natürlich braucht die Tasche einen Schulterriemen und der sollte verstellbar sein. Perfekt dazu eigenen sich Gürtelschnallen. Da in der Regel die Gürtel kaputt gehen, die Schnallen aber nicht, habe ich da auch einige in meinem Vorrat. Nur sehen die nicht mehr so schön aus, sie sind ja gebraucht.

Yes, I’m still sewing a bit. I’m making a bag for a dear friend for her birthday which was some time in january…

The bag needs a strap and she wants it adjustable. A belt buckle is perfect for that task. And since the buckles tend to last much longer than the belts I do have a nice collection of buckles. Only they do not look so great after years of use.

Nun gut, Metall kann man problemlos polieren, Chrom, Messing, Silber… für alles gibt es die passenden Politur. Der Haken ist nur, daß man zum einen in der Regel nicht weiß, aus was die Schnallen sind und vor allem, daß diese in der Regel auf der Oberfläche irgendwie beschichtet sind. Und die Beschichtung oder auch Lacke will man in der Regel nicht abrubbeln.

Also hilft statt Metallpolitur die Autopolitur und dazu natürlich ein weicher Baumwollappen.

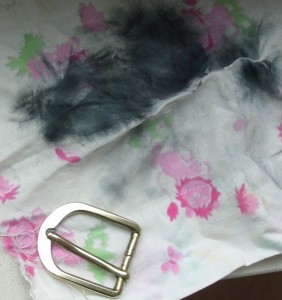
Schnalle sauberMan muß trotzdem vorsichtig polieren und immer gucken, ob nicht was abgeht, was man behalten will. Aber nach ein bißchen rubbeln habe ich jetzt eine glänzende Gürtelschnalle, die ich wieder verwenden kann.

Gut für die Umwelt, weil sie nicht weggeworfen wird und gut für den Geldbeutel, weil ich keine neue kaufen muß. 🙂 Und meine Vorräte haben sich etwas verringert…

Of course it’s not a problem to polish metal, there are all kinds of polishes for all kinds of metal. The problem is only that you normally don’t know what material you have and, even more important, usually the metal is coated in some way and you do normally not want to rub that of.

So car polish, a soft piece of cloth and a bit of time… (And care, because even car polish can take away something you want to keep, so always check what you are doing.)

And I have a shiny buckle that can be used again. God for the environment because I don’t have to throw it on the garbage and good for my money also, because I don’t have to buy something new. 🙂 Plus stash reduction..,

Navi-Ta (Teil 2)

Navi-Ta (part 2)

Einfassung flach bügelnDann wird das angenähte Schrägband flachgebügelt und um den Rand herum gelegt.

Auf der Innenseite habe ich es dann gemütlich vor der Glotze von Hand angenäht. Dabei wird auf der Innenkante die Schnittkante des Streifes auch nach innen eingefaltet.

After sewing the bias strip to the quilted piece I*ve ironed it flat.

Then I turned ist to the lining side and sewed it buy hand. Folding the cut edge of the strip also to the inside.

Rand eingefasstSo sieht das ganz dann fertig angenäht aus.

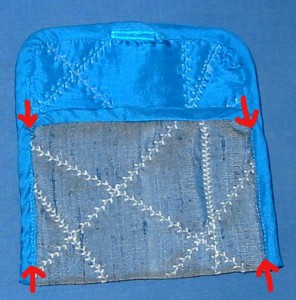
Man erkennt auch an der rechten Seite, daß die Ecken stärker abgerundet sind. Das wird später die Klappe der Tasche und ich habe sie nach dem Quilten einfach freihändig abgerundet.

That’s what it looks once the binding is sewn.

On the right side you can see that the edges are a bit more rounded. That will be the flap once the case is finished. I just cut that back on the quilted piece before sewing the binding.

Seitennähte nähenAnschließend werden die Seitennähte genäht.

Ich klappe mein gequiltetes Stück zusammen und nähe etwa in der Ansatznaht des Einfassbandes. Wenn man die Tasche so knapp konstruiert, sollte man vorher mal stecken und testen, ob das Navi noch reinpasst.

Oben quer kommt dann noch das Knopfloch. Ich wollte zuerst Druckknöpfe verwenden, aber zum einen sind normale Knöpfe flacher und zum anderen haben Einschlagdrücker hinten einen Metallring und der würde dem Navi-Display nicht gut tun.

Then I fold up my piece of fabric and made side seams. Since my case is supposed to be very tight I first pinned and tested whether it would still fit in.

As closure I had first thought about snaps, but a button is the flattest solution and non sew snaps have a metall ring at the back. Which somehow is not the best idea if you want the case to protect the monitor of the device… So you see the buttonhole on top.

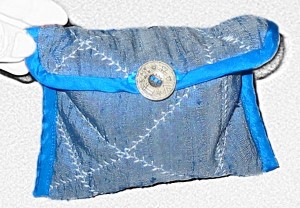
fertiges Navi-TaUnd das ist das fertige Täschchen.

Das Navi paßt mit Halterung genau rein, ohne Halterung sitzt es lockerer.

Und der Knopf war mal an einer gekauften Jacke von meinem Herzblatt. Es war der flachste, den ich finden konnte.

That’s the finished case.

The navigation system fits in like in a glove if I put it in with the attaching clamp and a bit more loosely without.

The button once was on a purchased jacket of my sweetheart, it was simply the flattest I could find.

Navi-Ta oder Challengenachwehen

Navi-Ta or Challenge aftermath

Nach der Challenge war von den beiden Seidenkleidern noch so einiges an Stoff übrig. Das wollte ich natürlich nicht “verderben” lassen und habe mir überlegt, was ich noch damit machen könnte.

Da ich seit kurzem ein Navi fürs Auto habe und mir auch schon das eine oder andere Display in der Handtasche kaputt gemacht habe, lag es irgendwie nahe, dem Navi auch eine Hülle zu machen. Denn im Auto läßt man es ungern liegen (Einladung für Diebe).

There was still fabric left after my Challenge bag and I am very bad at throwing away silk. So I thought about another project I could be doing with it. Since I recently bought a navigation system for our car this called for a protective sleeve or purse (or whatever you want to call it). Since you don’t want to leave it in the car (invitation for thieves) and if you put it in your handbag the display can get ugly scratches. (To be more precise: all my displays have ugly scratches but I’ve learned my lesson.)

Da ich dran gedacht habe, Photos zu machen, gibt es mal wieder eine Anleitung. Es ist ein sehr einfaches Projekt, auch geeignet für Anfänger und man könnte es sogar komplett von Hand nähen, wenn man keine Nähmaschine hat. Und man kann nach dem gleichen Schema natürlich auch eine Tasche für ein Handy oder ein anderes kleines Gerät machen.

I remembered to take pics while I was making the case, so here’s the tutorial. It’s an easy project, suitable for beginners and you could even do it entirely by hand. Of course you could also make a case for a mobile phone or any other small device the same way.

MeßschemaErst mal muß das Gerät vermessen werden.

Hierbei ist einmal wichtig, sich zu überlegen, ob man die Halterung mitnehmen will oder ob die später im Handschuhfach bleiben soll. So wie man das Gerät später tragen will, vermisst man es auch. Meine Halterung ist flach, ich werde sie eher mitnehmen, messe sie also mit.

Zwei Maße braucht man, den Querumfang (rot) und den Längsumfang (grün).

First you have to measure your device. And you have to decide whether you intend to leave the fixture on the navigation system and take it with you or if you prefere to leave it in the glove box. If you want to take the fixture with you, you measure with the fixture on the navigation system, otherwise you take it of. My fixing system is flat and light weight so I’ll just leave it on the navigation system and measure with the fixture on the system.

You only need to measures: the circumference cross the device (red line) and the circumference lengthwise (green line).

Dann schneiden wir die Teile zu, einmal aus Oberstoff (links), zwei mal aus dünnem Volumenvlies (Mitte) und einmal aus Futter (rechts).

ZuschnittDie Maße für den Oberstoff und das Volumenvlies sind 1x Umfang grün plus 3,5 cm in der Länge und 1/2 Umfang rot + 2 cm in der Breite. Das ergibt dann ein sehr knappes Täschchen. Wer es weniger knapp möchte, gibt noch 1 cm – 2 cm in jeder Richtung zu.

Der Futterstoff wird großzügiger zugeschnitten, denn durchs nachfolgende Quilten wird er auf alle Fälle schrumpfen.

Noch einfacher ist es, wenn man alle Materialien noch etwas größer zuschneidet und dann nach dem Quilten auf die endgültige Größe zurückschneidet. Dafür hatte ich nur nicht genug Stoff…

You cut fabric, two layers of thin batting and lining fabric. The measurement of the fabric and batting pieces are: 1x green circumference + 3,5 cm lengthwise and 1/2 red circumference + 2 cm crosswise. That makes a very tight fitting case. If you want it less tight add another 1 cm – 2 cm on every dimension.

The lining fabric has to be cut larger because quilting will take some of the fabric.

Normally I would have cut all pieces a good deal larger and cut it to the right dimension after quilting, but I didn’t have enough fabric for that…

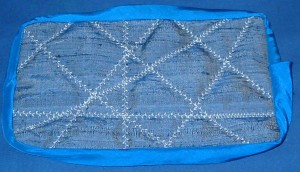
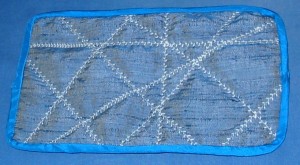
DurchgestepptDann werden die Schichten aufeinandergelegt: Futter, zwei Schichten Volumenvlies und Oberstoff. Das ganze kommt unter die Nähmaschine und wird willkürlich mit geraden Linien durchgesteppt.

Ich habe Baumwollstickgarn und einen einfachen Zierstich gewählt, Steppstich oder ein Handheftstich gehen genauso.

Then you pile the layers: lining, two layers of batting and the outer fabric on top. All this goes under the sewing machine and I’ve sewn straight lines at random.

I used cotton machine embroidery yarn and a simple decorative stitch of my sewing machine, but straight stitch or a short basting stitch if you do it by hand are fine as well.

Jetzt noch mal nachmessen, ggf auf die oben genannten Werte zurückschneiden und entlang der Kante mit einer Runde Steppstuch befestigen.

Anschließend brauchen wir ein Einfassband. Dazu schneide ich einen Schrägstreifen aus meinem Futterstoff zu. So als Faustregel nimmt man 4 mal die Breite des eingefassten Randes plus etwa 1 cm. Ich habe einen Rand von 0,7 cm, also schneide ich den Schrägstreifen 3,8 cm breit zu. (Oder vier, auf Genauigkeit kommt es mir bei dem Projekt nicht so an.)

Schrägband aufnähenDas Schrägband wird dann gebügelt und dabei etwas gedehnt. (Nicht zu stark.)

Anschließend einfach rechts auf rechts auf das gesteppte Teil gelegt, die Kanten bündig, und mit 0,7 cm Abstand von der Kante festgenäht.

After quilting I’m cutting all layers back to the measurements that were mentioned above and staystitch close to the cut border.

Then I need binding from my lining fabric. I’m using a bias cut strip of fabric, the width is 4 times the width of the bind edge plus 1 cm. In my case the width of the finished binding is 0,7 cm, so I’m cutting my fabric 3,8cm wide. Or 4 cm, precision isn’t important to me in this case. (The case will mostly live inside my bag and no one will see it.)

I iron my binding stretching it lightly (but not to much).

Then I put the bias strip on my quilted piece, right sides facing and the cut edges aligned. And I’m sewing it down with a 0,7 cm seam allowance.

(Und damit dieses Post nicht so fürchterlich lang wir, gibt es die Fortsetzung beim nächsten Mal.)

(To be continued, I am sincerely trying to make my posts shorter…)