Negativapplikation: Drunter statt drauf (Teil 2)

zurückschneidenNachdem ich gestern auf einem gemütlichen Mininähtreffen bei Silvia in Aachen war (fünf Leute passen gerade perfekt um den Nähtisch… *g*) geht es erst heute mit der Applikation weiter. (Was ich bei dem Treffen genäht habe kommt auch noch… irgendwann später. Ein paar Handstiche sind noch nötig.)

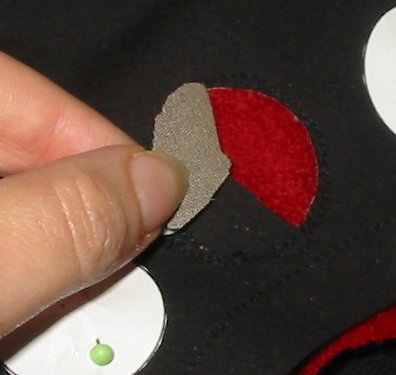
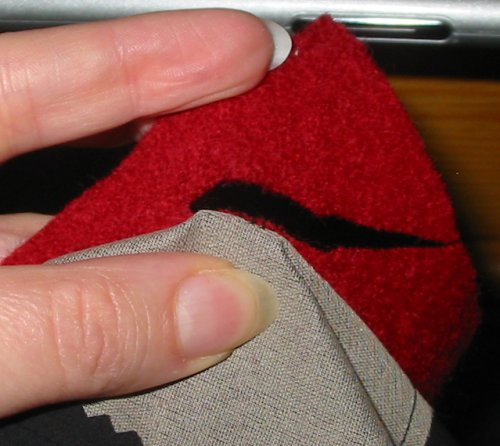
Oben ist aufgeschnitten, jetzt muß natürlich auch unten der überstehende Stoff weg.

Hier benutze ich meine große Nähschere. Ich halte das Werkstück ziemlich genau wie das Bild zeigt, die Jacke liegt in meinem Schoß und mit zwei Fingern der linken Hand spanne ich den Applikationsstoff etwas.

Dann kann ich knapp an den Stichen schneiden, ohne unbeabsichtigt in etwas anderes hineinzuschneiden. Und wenn ich den gespannten Stoff loslasse, zieht er sich noch näher an die Stichreihen zurück.

Yesterday we had a very relaxed and productive (I finished something, except some hand-stitches. I hope to finde the time to show it that week…) sewing-meeting at Silvias shop in Aachen. (Five is the perfect number to fit the table…) So my explications about the negative applique had to wait for today.

Okay, the main fabric has been cut out, next thing is to cat away the “seam allowances” of the applique-fabric.

Again I’m using my big, sharp scissors. (BTW… shears, scissors… I never know what to use… anybody who can explain what applies when?) The picture shows quite well how I’m holding the fabric while cutting. The jacket rests in my lap and two fingers of my left hand hold the applique-fabric taunt.

Ansicht der RückseiteSo I can cut close to the stitches, avoiding to cut at unwanted places and when I release the red fabric it retracts a bit and comes again a little closer to the stitching.

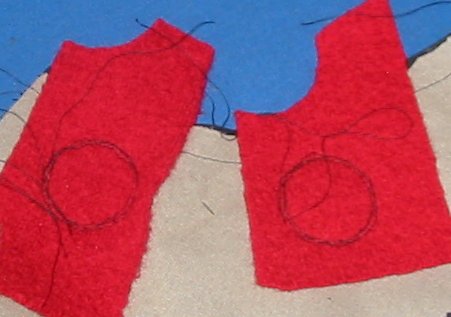
So that is what it looks like from the back after beeing cut back.

Und so sieht das ganze von der Rückseite aus, nachdem der Stoff zurückgeschnitten ist.

Negativapplikation Vorderseite
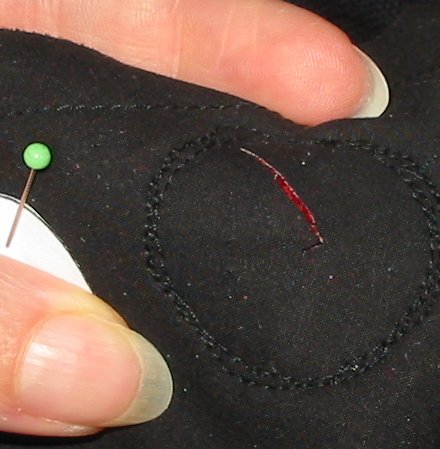
Und so sieht die Applikation von der rechten Seite aus.

Man sieht (trotz Bearbeitung in gimp), daß schwarze Stiche auf schwarzen Stoff kaum zu sehen sind.

Wenn der Oberstoff nicht sehr ausfranst könnte man die Applikation jetzt sogar so lassen, man hätte dann eine offenkantige Applikation. Allerdings hätte ich mir in dem Fall mit den Steppstichreihen etwas mehr Mühe geben müssen…

And that’s the right side view.

Even after some work with gimp you see, that black stitches in black fabric are not very well do see…

If you have a fabric that does not ravel much, you can finish here. (And if you like the look of a raw edge applique, of course.) In this case, of course, I would have worked the rows of stitching with a little (lot) more care…

Applikation umranden So my application gets a satin stitched border, as a “traditional” applique would get, too.

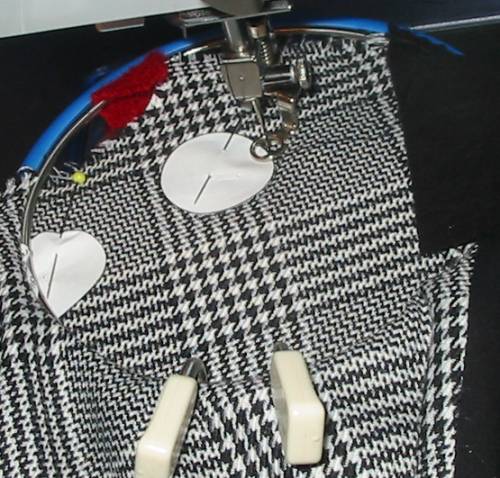
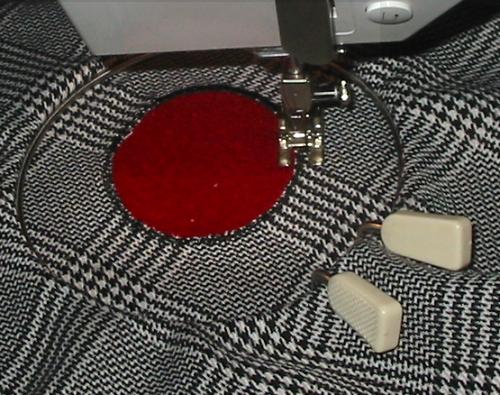
In case you may wonder… yes, I’m using a hoop together with a “normal” pressure foot and the feed dogs working. There is no law against that… :o) The Prince de Gaulle fabric had a strong tendency to stretch under the pressure foot. I didn’t want to use tear-away stabilizer, because that leaves a bit of residue under the satin stitches, and didn’t want to use water soluble stabilizer (e.g. Soluvlies) because I didn’t want to wash the jacket before the presentation. Neither had I wanted to use iron on stabiliser, because I wanted the fabric to remain soft without influencing the drape…

If all that is the case… hooping is the perfect solution. (And if you are sewing circles it becomes even easier to guide the fabric with the round hoop…)

To become a close border without building to much stitches I had to sew over the border twice. The first round I used my usual satinstitch length plus two units on my sewing machine. The second round was in normal stitch lengths for satin stitch. For a shiney and smooth appearance ‘ve used embroidery thread, Gütermann-Sulky it was.

Da ich keine offenkantige Applikation wollte, bekamen meine Kreise als Randabschluß einen ganz normalen Satinstich (auch Raupenstich oder Knopflochstich genannt).

Und, ja, man kann einen normalen Nähfuß und den Transporteur mit einem Stickrahmen zusammen benutzen. Mein Problem war, daß der Karostoff und die gekochte Wolle beide sehr weich sind und daher beim übernähen mit dem dichten Satinstich eine deutliche Neigung zur Wellenbildung hatten. Stabilisieren wollte ich nicht. Aufgebügelte Vlieseline hätte den Stoff an der Stelle etwas steifer gemacht, was ich nicht wollte. Stickvlies zum Abreißen bleibt unter Satinstichen auch immer etwas drin. Oder/und ist unendlich mühsam rauszupopeln. Wollte ich auch nicht. Und Soluvlies zu verwenden hätte bedeutet, daß ich die Jacke vor der Challengevorführung noch mal hätte waschen müssen. Wollte ich auch nicht.

Also war der Stickring die perfekte Lösung. (Mit dem netten Nebeneffekt, daß man den Stoff dank des runden Stickrings sogar leichter kreisförmig führen kann….)

Um eine glatten Kante zu bekommen, brauchte ich in diesem Fall zwei Runden Satinstich übereinander. Damit es nicht zu dick wird, habe ich für die erste Runde die Stichlänge zwei Einheiten länger gestellt als für den normalen Satinstich. Das hielt die kleinen Faserchen des fransenden Glenchecks ganz gut im Zaum. Und dann noch eine Runde normal enger Satinstich, für das glatte Finisch. Deswegen auch Stickgarn dafür. Gütermann-Sulky in diesem Fall.

Negativapplikation fertig
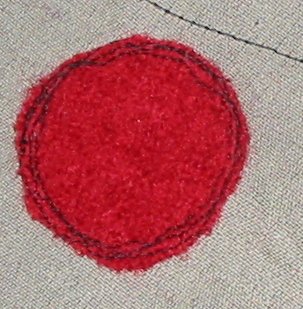
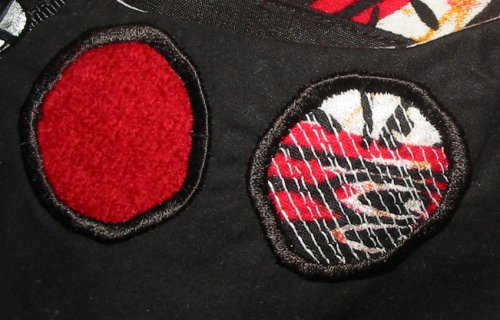
Und so sieht die negative Applikation fertig aus. (Nein, nicht perfekt rund, aber rund genug…. 😉

Stellt sich vielleicht die Frage: warum eigentlich “negativ” applizieren?

Ein Vorteil ist, daß man nur eine Stoffschicht hat, die Applikation ist also dünner und weicher, je nach Stoff wirkt sich das natürlich unterschiedlich aus.

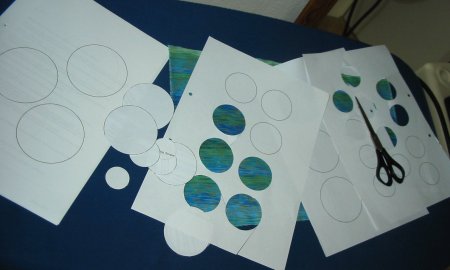
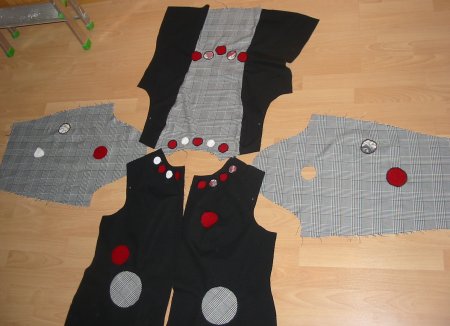
Der zweite Grund war, daß ich den afrikanischen Stoff (rechts auf dem zweiten Bild) durch die Biesen etwas gerippt hatte. Diese Rippen wären durch die Satinstiche nicht gut glatt zu bekommen, der Rand wäre beim aufapplizieren also immer ungleichmäßig geblieben.

Und das dritte Anwendungsgebiet (was hier keine Rolle spielte) ist, daß man damit ein Loch bearbeite kann, ohne es vorher stopfen zu müssen. 😉

Vielleicht hat ja jemand Lust bekommen, es auch einmal mit einer negativen Applikation zu versuchen?

The last picture shows the finished circles. No, they are not perfect circles, but good enough to be circles.

Remains the question, of course, why one should do reverse appliques?

One advantage is, that they remain softer, influence the drape of the fabric less than a “normal” applique. How strong the effect is depends on the fabric and the garment, of course.

Another reason to use that technique was, that I had created a kind of “ribbing” on the african print fabric. If you try to make satin stitch over such a structure you will find out, that the stitches cannont “press” the ribbing flat, therefore will not lie smooth and flat.

And a third reason (in general, not for me in this case) is you can repair holes without having to mend them first… 😉

Maybe now you are motivated, to try a negative applique, too?

Negativapplikation: Drunter statt drauf (Teil 1)

In Aachen habe ich einigen Leuten versprochen, zu erklären, wie ich die Applikationen auf meiner Jacke gemacht habe. Mir war bis dahin nicht recht bewußt gewesen, daß diese Technik irgendjemandem unbekannt sein könnte, weil sie wirklich sehr einfach ist. Aber dann habe ich mal in meinen Büchern geblättert und festgestellt, daß sie nur in englischprachigen Büchern beschrieben wird. (Gut, ich habe inzwischen deutlich mehr englische Bücher als deutsche zum Thema Nähen, daran kann es auch liegen.) Sie firmiert dort unter dem Titel “negative application”, ich habe keinen besseren deutschen Begriff gefunden, also bezeichne ich es jetzt auch mal als “Negativapplikation”.

At the big sewing party an Aachen some weeks ago I was asked about the appliques on my jacket. They were negative applications, something very easy to do, so I was a little surprised, that not everybody knew it. But then I started digging into my sewing books and found, that the technique indeed is only described in english ones. (Okay, most of my sewing books are in English, so that is not representative…) So I promised a tutorial…

Stoff feststecken Zuerst legt man ein Stück des Applikationsstoffes unter den Oberstoff und steckt oder heftet es fest. Die rechte Seite des Applikationsstoffes liegt dabei auf der linken Seite des Oberstoffes In meinem Fall ist das der rote Wollstoff, den man ein wenig hervorspitzen sieht.

Das Stoffstück muß ein Stück größer sein, als die Applikation hinterher, damit man es außerhalb der späteren Kontur feststecken oder -heften kann.

Die Form, die die Applikations hinterher haben soll, zeichnet man auf den Oberstoff. Ich bin faul und benutze in diesem Fall meinen Papierschablone, mit der ich die Position der Kreise auf der Jacke bestimmt hatte.

Anschließend näht man die Kontur drei mal mit eher kleinen Steppstichen ab. Die Stepplinien sollten dabei nebeneinandern verlaufen, nicht übereinander.

Je nach Form kann man das auch mit Transporteur und normalem Nähfuß machen, ich habe Stickring und Stopffuß benutzt und den Transporteur versenkt.

First I took a scrap of the red boiled wool and pinned it on the back of my jacket, right side of scrap on left side of jacketfabric. Depending on the fabric you can baste it, too, if it’s to small or to big or the fabric to delicate for the pins.

Then you have to transfer your motive on the right side of the fabric. I was very lazy and used the paper templates I had made to test the placement of my design. I just let them on and did sew around.

You stitch the contour of your motive three times with tiny stitches. One row of stitiching next to the other, not stitching the same line three times.

Kontur nachgestepptI was lazy again and decided to do this with hoop, darning foot and feed dogs down, but you can as well sew with your feed dogs working. For motives with straight lines I would recommend that.

The picture from the reverse side shows the three rows of stitching better. They don’t have to be very regular, as you can see…

You will also notice, that the pictures do not show always the same applique, due to availability of the camera during working on the jacket I couldn’t photograph all steps on the same part of the jacket. But the technique is always the same…

The second pic shows my work on the black fabric, and there regular stitching was impossible, because I simply couldn’t see the black thread on the blacj fabric well enough… I was kind of stitching blind…

Das Bild von der Rückseite zeigt die drei Stichreihen deutlicher. Es zeigt auch, das sie keineswegs gleichmäßig sein müssen.

Und falls sich jemand wundert: Ja die Bilder stammen nicht von der gleichen Applikation, sondern von verschiedenen Teilen der Jacke. Die Kamera war nicht immer passend verfügbar, aber da es ja einige Applikationen waren, habe ich es geschafft, jeden Arbeitsschritt irgendwann einmal zu erwischen…

Ab dem zweiten Bild geht es nämlich mit dem schwarzen Jackenstoff weiter. Der ist auch der Grund dafür, warum die Stichreihen gar so ungleichmäßig sind. Der schwarze Nähfaden war auf dem schwarzen Stoff so schlecht zu sehen, daß ich mehr oder weniger blind genäht habe und die meiste Zeit nicht wirklich gesehen habe, wo schon Stiche sind und wo nicht…

Oberstoff aufschneiden Beim nächsten Schritt ist große Sorgfalt gefragt. Der Oberstoff muß jetzt eingeschnitten werden.

Ich benutze dazu meine scharfe Nähschere und mache erst einen kleinen Schnitt in die Mitte des kreises. Dabei ziehe ich die untere Stoffschicht, also den roten Stoff, ein Stück nach unten, damit ich das Risiko minimiere, ihn mit durchzutrennen.

Den kleinen Schlitz erweitere ich anschließend mit der Stickschere zu einem langen Schlitz bis an meinen Rand aus Stichen.

(Als ich das erste Mal Negativapplikationen gemacht habe, wußte ich übrigens noch gar nicht, daß das eine bestimmte Dekorationstechnik ist. Ich hatte den Trick mit dem Unterlegen und Aufschneiden in einem Nähbuch zum Thema Flicken gefunden und dachte, das könnte man doch auch dekorativ nutzen. Tja, wieder nichts neues erdacht, die Idee hatten andere auch schon gehabt… 😉 )

The next step isn’t difficult either, you jast have to be veeery carefully… You have to cut from the right side in the upper layer of fabric without damaging the lower layer…

I’m using my big, sharp sewing scissors to snip in the middle of the circle. To avoid dammage to the other layer of fabric I’m pulling it a bit away from the reverse side.

After that I’m taking my small embroidery scissors to cut, still with extreme caution, from the snip to the stitches.

(When I made my first negative applique I dind’t know it was a special technique. I got the inspiration from a German sewing book that described ways to repair dammaged clothes. One of the was underlaying with a scrap of the same fabric. And I had thought this a good idea for decorative use, even on a non dammaged garment. I think I was a little disappointed, when I much later detected “my” idea in an English sewing book… not my invention, but not a big surprise, that others had had the idea before me. 😉 )

Oberstoff wegschneidenAnd on it goes with carefull cutting.

To avoid dammage in the red fabric I have inserted a finger of my left hand in the long slit, to separate the two layers of fabric. And I have been cutting slowly and carefully with my small embroidery scissors, as close to the stitching as possible. Without cutting through them of course!

Weiter geht es mit sehr vorsichtigem Schneiden.

Um den unteren Stoff vor Schaden zu bewahren schiebe ich einen Finger meiner linken Hand in den Schlitz im Oberstoff und trenne so die beiden Stoffschichten. Und dann ganz langsam und vorsichtig mit der Stickschere so eng wie möglich an den Konturstichen entlang schneiden.

Ohne diese durchzuschneiden, versteht sich!

Die größte Überraschung war für mich, daß ich tatsächlich alle Kreise korrekt ausgeschnitten habe. Nicht einmal habe ich falsch geschnitten oder den Unterstoff beschädigt.

Eigentlich gegen jede Wahrscheinlichkeit. :o)

Aber ich glaube, Konzentration und eine scharfe Schere waren hilfreich.

Biggest surprise was, that I did all that circles without any “miscutting”! Not even once did I cut at an unwanted place or dammage the wrong fabric layer.

Against all odds, isn’t it? :o)

Well… I think strong concentration and sharp scissors did help.

P-A-Challenge: Die Jacke und aktueller Stand

PapiervorlagenUnd schon wieder sieht es so aus, als ob ich alles mögliche täte, aber nicht nähen.

So ganz stimmt das aber nicht.

Auch wenn erst mal eine große Portion Papierarbeit angesagt war.

Ich habe mit dem Computer ganz viele Kreise in verschiedenen Durchmessern ausgedruckt und ausgeschnitten.

Again it may look as if I wasn’t sewing.

But this time it’s not true. I am sewing on my jacket. Still not sure, whether it will be finished on time…

But before sewing there was a lot of paperwork to do.

From the Computer I printed may circles in different diameters and cut them out.

The task: There are still two fabrics I haven’t used yet, the red boiled wool and the african print. Also left some of the Prince-de-Gaulle fabric. And luckily a lot of the black fabric I purchased in addition to the Challenge fabrics.

Designentscheidung As the jacket is supposed to match the skirt, I wanted to use the Prince de Gaulle as far as possible. I absolutely wanted to do the sleeves in that pattern, for the simple reason, that it is soft and will be much easier to ease it in the armhole than the black fabric that is very dense and relatively stiff.

This left me enough fabric for the middle back also. I think I wanted to do it in the back, because I remembered what Kathleen Fasanella said about coffin clothes and what Summerset said about the “wow-factor” of the back. (No, I’m far away from comparing to her! She’s doing real artwork, I’m just sewing.) Allright, my “derriere” is probably enough “wow” by itself, but so nothing can make it worse… :o)

Die Aufgabe: zwei Stoffe müssen noch untergebracht werden: Die “gekochte Wolle” und der afrikanische Druck. Außerdem hatte ich noch einiges von dem Glencheck übrig sowie glücklicherweise jede Menge von meinem schwarzen Zusatzstoff.

Da die Jacke zum Rock passen soll, wollte ich so viel wie möglich von dem Karo verwenden. Die Ärmel mußten aus dem karierten Stoff werden, denn nur der würde sich halbwegs vernünftige einhalten lassen. Mit dem sehr fest gewebten schwarzen…. keine Chance. (Manchmal ist die richtige Stoffwahl die halbe Miete.)

Außerdem blieb noch genug Karo für die rückwärtige Mitte übrig. Ich glaube ich wollte den karierten Stoff deswegen hinten, weil ich im Kopf hatte, was Kathleen Fasanella über “Sargkleidung” schreibt, bei der das Design an der Vorderseite aufhört und weil ich mich an Summersets Statement erinnerte, an der Rückseite sollte ein “Wow-Effekt” sein. (Nein, ich vergleiche mich nicht mit Summerset, sie spielt in einer anderen Liga, weit weg von meiner Näherei.) Gut, mein Hinterteil ist wahrscheinlich an sich schon genug “wow”, aber schlimmer kann es eigentlich nicht werden, nur interessanter.

Und dann begann ich mit meinen Papierkreisen auf dem Stoff zu spielen.

Bis zu dem Ergebnis.

Die Idee, die sich dabei herauskristallisierte: Die Position der Kreise, entspricht Elementen des klassischen Jackets: Die Taschen, die Brusttasche, ein Riegel im Rücken, um den Hals herum ein Kragen, vielleicht auch eine Perlenkette. Wie man es sehen möchte…

Next thing was, that I started to play around with my paper circles on the fabric.

Design umgesetzt Until I had the result above. The idea that happend while playing was, that the circles kind of “mimic” elements of a classical tailored jacket. So the Placement of the pockets, breast pocket, a belt in the back and a collar around the neckline. Or maybe a collier. As you want to see it.

Some of the circles are funktional, as pockets, other just decorative.

The last picture shows the state of the jacket as it is this very moment. You see that I used the circles to show the two missing fabrics. But there are still some white paper circles.

I’m still not sure whether I will make it on time, the jacket isn’t sewn, lining and facings are not even cut… but I’ve checked how much black Venezia lining I still have and went to town today, to buy more at the Stofferia. Also I bought the zipper. Or the zippers, because I’m not sure which lenght I will need….

Friday I’m going to Aachen, so I should finish Wednesday… because Thursday there is too much work, like wokr for earning money to sew.

I keep hoping…

Einige der Kreise haben eine Funktion bekommen, als Taschen, andere sind rein dekorativ.

Das letzte Bild zeigt den aktuellen Stand der Jacke, so kurz vor dem Bettgehen…. Man sieht daß ich die Kreise benutze, um die beiden noch verbleibenden Stoffe einzubringen. Wie man ebenfalls sieht, es liegen auch noch einige Papierkreise auf dem Stoff…

Ich bin immer noch nicht sicher, ob ich rechtzeitig fertig werde. Die Jacke ist noch nicht genäht, Futter und Besätze nicht mal zugeschnitten. Immerhin habe ich heute meine Venezia-Vorräte überprüft und bin daraufhin in die Stofferia gedackelt um nachzukaufen. Und den Reißverschluss habe ich auch gekauft. Die Reißverschlüsse, um genau zu sein. Da ich mir über die Länge noch nicht so ganz klar bin, habe ich mal zwei gekauft…

Freitag werdeich nach Aachen aufbrechen, das heißt, ich sollte Mittwoch fertig werden. Donnerstag steht mal wieder Geld verdienen auf dem Programm und so wie es derzeit aussieht, ein eher langer Tag.

Aber die Hoffnung stirbt zuletzt…