Jersey ohne Overlock: Nähte mit offener Nahtzugabe

Knits without a serger: seams with open seam allowances

Von gekauften Shirts sind wir es gewöhnt, daß sie mit der Overlock genäht sind und die Nahtzugaben infolgedessen zusammengenommen versäubert sind. Das erzeugt allerdings recht dicke Nähte und die mag ich persönlich nicht an allen Stellen.

Ganz besonders mag ich sie nicht an der Schulter und auch nicht unbedingt an der Ärmelnaht. Aber das Nette am selbermachen ist: Ich kann es anders machen.

Nahtzugabe flach gebügelt

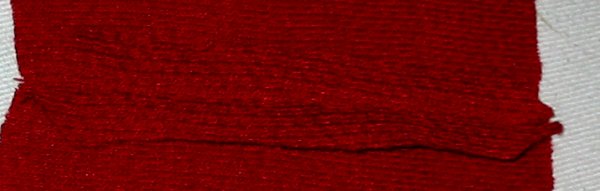
An diesem Shirt arbeite ich an drei Stellen mit flachgebügelter Nahtzugabe: Die Schultern, die Ärmelnähte und die Teilungsnaht des Einfassbandes für den Ausschnitt. (Das ist die, die das Bild hier zeigt.)

When we look into a purchased shirt we are used to seams where the seam allowances are overcast together with a serger. This of course creates quite bulgy seams, something I do not like everywhere on a shirt.

I hate them on shoulder seams and I do not like them to much on the sleeveseams (depending on fabric and cut). But the nice thing about DIY: I can do it in a different way.

At this shirt I’m using flat seams (seam allowances ironed flat to both sides) on the shoulder seams, the sleeve seams and the seam that connects the two pieces of the band along the neckline. (That’s the seam shown on the pic above.)

Ein Vorteil ein Overlocknaht ist natürlich, daß sie sehr dehnbar ist. Eine normale Steppnaht der Nähmaschine ist das hingegen nicht.

Allerdings… selbst an einem Shirt will man gar nicht bei allen Nähten, daß sie dehnbar sind. Das Paradebeispiel dafür ist die Schulternaht. Hier näht man oft sogar einen Streifen Nahtband oder Stoff mit ein, um der Dehnung entgegen zu wirken. Also könnte man einfach eine gerade Steppnaht nähen und das Problem ist erledigt. Allerdings bleibt der Stoff dehnbar und durch die Steppnaht wird er an der Stelle relativ stark belastet, so daß die Gefahr besteht, daß auf Dauer der Stoff Schaden nimmt.

Schulternaht
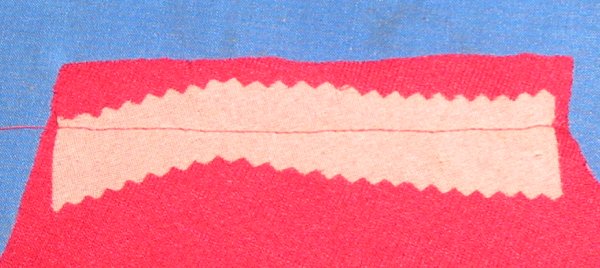
Also verstärke ich den Stoff an einer Seite mit Vlieseline. Normalerweise würde ich da Formband nehmen, ich könnte auch schwören, daß ich da noch 5m von habe, aber irgendwie… finde ich das gerade nicht. Also muß G785 herhalten. Mit der Zackenschere geschnitten, damit sich keine Ränder abzeichnen. Und… äh… fürchterlich schief geschnitten. Aber die Naht trifft die Einlage überall. Also egal.

Darüber nähe ich dann nicht mit einer Steppnaht, sondern mit einem minimalen Zickzackstich. Stichlänge 2,3, Stichbreite knapp 1. Das sieht aus wie eine “wackelige” Steppnaht, ist aber tatsächlich schon etwas elastisch. Gerade genug, um etwas Belastung vom Stoff wegzunehmen.

One big advantage of a serger is that the seams are elastic. A normal straight stitched seam with your sewing machine is not.

But even on a shirt we do not want all of the seams to have to much elasticity. The shoulder seams normally are sewn with some none elastic woven ribbon. So you could just straight stitch with your sewing maschine and that’s it. Okay, nearly. You can do this and you will get along with it on may fabrics, but there remains a risk that sooner or later the fabric will break, because the seam holds the still elastic fabric too much.

To prevent that I’m using some light fusible, usually on the back piece of my pattern. Normally I’d use Vlieseline Iron On Bias Tape and I am so sure I still have quite a lot of it but I cannot find it at the moment. So Vlieseline G785 had to do. Cut with my pinking shear to make sure no edge will show on the right side. And… yes… the cutting is quite not so straight at all. But the seam hits the interfacing, so it’s okay.

For sewing I change my straight stitch to a minimal zigzag, like stitch length 2.3, stitch width a tad less than one. The result looks like a wonky straight stitch, but has minimal stretch, enough to take away the stress from my fabric.

Nahtbild

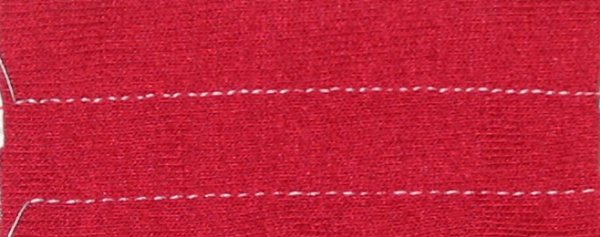
Um den Unterschied zu zeigen habe ich hier noch mal eine Probenaht mit hellem Faden genäht: Die untere Naht ist der normale Steppstich, die obere, etwas ungleichmäßg aussehende, ist in Wirklichkeit ein Zickzackstich. (Klick aufs Photo bringt ein größeres Bild.)

Here the difference: the lower stitching line is the normal straight stitch. The upper one, that looks a bit irregular, is a zigzag stitch. (Klicking on the pic brings the bigger version.)

Auch die Ärmelnaht nähe ich mit diesem Stich. Zumal mein Stoff in Längsrichtung ohnehin nicht sehr elastisch ist.

Braucht man eine elastischer Naht, etwa bei Kindern die unsanft am Ärmel ziehen oder bei Sportbekleidung die stärker dehnbar sein muß, dann muß man den Zickzackstich “steiler” machen. Kürzer und ggf. etwas breiter. Meine Maschine hat dafür eine Art “Sägezahnstich” für hochelastische Stoffe (Blick ins Handbuch der Maschine lohnt immer), man kann diesen aber durch einen Zickzackstich mit Länge 1-1,2 und einer Breite von 1,2-1,5 ersetzen. Einfach ausprobieren, was die gewünschte Wirkung hat. Solche Nähte kann man auch noch gut auseinanderbügeln, auch wenn sie nicht ganz so flach werden, wie eine normale Steppnaht.

For my sleeve seams I am using the same stitch. My fabric doesn’t have much stretch in the lengthwise direction anyhow.

If you need more elasticity in the seam (clothing for children who may pull on their sleeves or on garments for sport) you make the stitch steeper. Shorter stitch length, maybe a bit longer stitch width. My machine has a kind of “saw tooth” stitch for highly elastic fabrics build in (check the manual of your machine). Elseway you can set your zigzag stitch to length 1-1.2 and width 1.2-1.5. Just try what creates the stretch you need. Seams like that can not be ironed as flat as a straight stitched seam, but they are small enough to iron the seam allowances to both sides.

Das sind aber noch nicht alle Möglichkeiten für Säume in Jersey, die kommen in einem eigenen Beitrag.

That are not all possibilities to make seams in knits, more are to come yet.

Keine Angst vor Jersey und Strick: Dehnbarkeit und Zuschnitt

Don’t be afraid of knits: Stretch and cutting

Immer wieder ist im Forum die Frage zu lesen, wie man denn mit Strickstoffen und Jersey umgeht, ob man das nur mit einer Overlock nähen könnte,… und nicht nur Anfänger, auch manche Näherin mit Erfahrung schreckt davor zurück. Deswegen beschreibe ich an meinem Motivationsshirt vom September ein bißchen genauer, wie es genäht habe. Ganz ohne Overlock.

Aber da gute Vorbereitung der Schlüssel zum Erfolg ist, erzähle ich erst mal noch ein paar Grundlagen.

Questions about how to sew knits are not so rare in the Forum. And not only beginners but also sewers with quite a bit experience with wovens are afraid when it comes to knits. But there is no reason for fear, and to prove that I’ll describe some of the steps of the construction of my “September motivation” in detail. No serger required.

But as often good preparation is the key, so I’ll start with some basics.

Stoffdehnbarkeit

Die erste Frage die sich bei Strickstoffen stellt ist, wie dehnbar muß er sein? Hier sollte der Schnitt Hinweise geben. Ich habe Glück, denn mein Schnitt von Vogue liefert an der Kante der Schnittüte sogar eine Lehre zum Testen mit.

Der Stoff wird quer gefaltet, an die Kante gelegt und an den beiden Pfeilen (auf das Bild klicken öffnet eine größere Abbildung) mit je einer Hand festgehalten. Die linke Hand bleibt wo sie ist, die rechte dehnt den Stoff bis zu dem zweiten angezeichneten Pfeil. Kann ich den Stoff ohne brutale Gewalt so weit dehnen, stimmt die Dehnbarkeit. Die geforderte Dehnbarkeit hier ist eher moderat.

One of the first questions when working with knits is the question: How much stretch do I need? Here the pattern should tell you something about. My vogue pattern has the most comfortable way to test the amount of stretch.

There are marks on the edge of the pattern envelope. You fold the fabric crosswise, align it with the marks and hold the fabric. Left hand on one mark, right hand on the other. The left hand remains, the right hand stretches the fabric to the second mark. (Clicking on the pic will show a bigger version.) If you can do so without overstretching the fabric, the amount of stretch is just right. (My pattern needs only a moderate amount of stretch.)

In der Regel geht es um die Dehnbarkeit quer zur Stoffbahn, den Gestricktes ist in erster Linie quer dehnbar. Geht es um die Längsdehnung, sollte das explizit beim Schnitt vermerkt sein. Manchmal ist auch gefordert, daß Stoff bi-elastisch ist, also in beide Richtungen dehnbar. Dann können auch zwei unterschiedliche Angaben vorhanden sein.

Leider machen es einem nicht alle Schnitte so komfortabel. Gelegentlich sind Prozentangaben vermerkt, so wie “10 Prozent Dehnung” oder auch mal (bei Stoffen für Sportbekleidung) 100 Prozent Dehnung. Dann macht man den Dehntest wie geschildert mit einem Maßband oder malt sich diese Lehre selber. (10 Prozent Dehnung bedeutet, daß man den Stoff im Abstand von 10 cm anfasst und auf 11 cm dehnt. Bei 100 Prozent Dehnung müssen sich 10 cm auf 20 cm dehnen lassen.)

Unangenehm wird es erst, wenn der Schnitt nur von “moderater Dehnung” oder “starker Dehnung” spricht. Dann hilft leider nur raten und Erfahrung.

Usually the stretch is across the fabric, that is where knits naturally stretch. If lengthwise stretch is needed, then it should be indicated with the instructions. If the fabric has to stretch lenghtwise and crosswise this also should be indicated. Here you might also find a different amount of stretch needed for each of the directions.

Not all patterns make testing the stretch so easy. Sometimes you will find something like “10 % stretch needed” or even “100 % stretch needed” (some patterns for swim- or sportwear require that). Then you can test your fabric with tape measure or ruler in hand. Or you make those marks yourself on a piece of paper. (10 % stretch means that 10cm of fabric have to be stretched to 11cm, 100% would mean stretching the 10 cm of fabric to 20 cm)

And sometimes indication will just say something like “moderate stretch”, the you have to guess.

Bei mir stimmte die Dehnbarkeit übrigens perfekt, also der ideale Stoff für den Schnitt.

(Kann ein Stoff eigentlich auch zu stark dehnbar sein? Intuitiv würde man sagen, nein, kann nicht. Das stimmt aber nicht ganz. Denn nicht jede Stelle an einem Kleidungsstück soll sich gleichermaßen dehnen. Und wenn der Stoff sich stärker dehnt als benötigt, kann der Sitz ebenfalls verändert werden. Man denke nur an Schulternähte, die sich auf einmal bis auf den Ellenbogen dehnen. Es muß nicht immer negativ sein, aber man sollte im Kopf behalten, daß es anders wird.)

In my case the stretch just fits perfectly the requirements of the pattern.

(Can a fabric have to much stretch? First thought might be “no”. But that is not the whole truth. Not everything on a garment is supposed to stretch the same amount. And if the fabric has more stretch than needed, then this can alter the fit of the garment. Just think about the shoulder seam. If a garment has to much stretch there, the shoulder of the garment ends up halfway down the arm… More stretch does not have to be bad, but keep in mind that it will be different.)

Stoff faltenDer nächste Punkt an dem sich Jerseys und Strickstoffe von Webstoffen unterscheiden ist die Ermittlung des Fadenlaufes. Zum einen hat ein Strickstoff streng genommen keinen Fadenlauf sondern einen Maschenlauf.

Falte ich einen Webstoff für den Zuschnitt, kann ich die Webekanten aufeinanderlegen und den Stoff glatt streichen. Ist er nicht in sich verzogen, dann liegt er auch gerade.

Bei einem Strickstoff ist das nicht der Fall. Dazu muß man wissen, daß Strickstoffe in der Runde gestrickt werden (quasi wie gigantische Schläuche) und dann aufgeschnitten. Durch das Stricken in der Runde läuft die Stoffbahn aber automatisch etwas schräg. Will ich also sauber im Maschenlauf zuschneiden, muß ich auch genau im Maschenlauf falten. Und muß dazu gucken, wie meine Maschen laufen. (Man kann natürlich auch einlagig zuschneiden, aber auch dann muß man den Maschenlauf finden, und zwar für jedes Schnitteil.)

Da mein Stoff interlockartig gearbeitet ist, verlaufen auf der Rückseite rechte Maschen als Längslinien. Ich suche mir so eine Maschenreihe und falte genau daran entlang. (Ich habe versucht, das Bild etwas zu bearbeiten, daß man das so halbwegs erkennt.)

Before you can cut a knit fabric you have to find the grain. That is a bit different from wovens.

For a woven you can fold it, bringing the selvedges together, then you straighten the two layers and if the fabric is straight in itself, the your fold will be on the grain. For knit fabric this cannot work. Knit fabrics are normally knit in rounds, like a giant tube. Then they are cut open, so they can lay flat. But this also means, the stitches do not run straight but are a pit slanted. Therefor, to fold exactely on the grain, you have to search the grain and fold along it. (Another option is of course, to cut the fabric in one layer, but then you will have to search the grain for each piece of the pattern.)

My fabric is a bit like interlock, so there are knit stitches on the wrong side of fabric. I just have to identify one “column” of stitches and fold along that. (I’ve changed the picture a bit, hoping that this makes the way the stitches run a bit more visible.)

gefalteter Strickstoff

Das letzte Bild zeigt den gefalteten Stoff.

Hier sieht man (mehr oder weniger) den Unterschied zu einem Webstoff. Das was den Schnittkanten entspricht liegt nicht gerade aufeinander, wenn der Stoff sauber im Maschenlauf liegt.

Der schwarze Strich an der linken Seite zeigt die obere Stofflage, der rote Rand ist die untere Stofflage.

The last picture shows the fabric folded on the grain.

Here you can see (more or less…) the difference to a woven fabric: that what is equivalent to the selvedges of a woven fabric is not aligned, when the fabric is fold correctly on the grain.

The black line on the left side shows the upper layer of the fabric, the red part that reaches a bit beyond that is the lower layer of the fabric.