Kappnaht und Reißverschluss (Teil 2)

Reißverschluss einnähenSo, weiter geht’s…

Der zugesteckte Schlitz wird jetzt umgedreht, die linke Seite lingt jetzt oben.

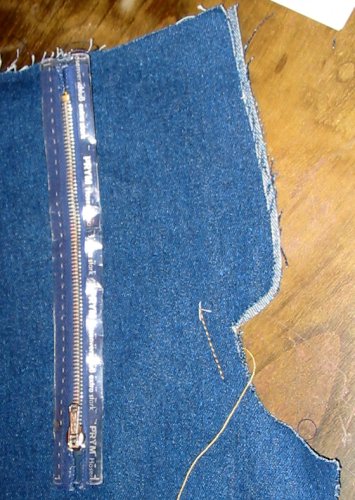
Nun wird das noch lose Reißverschlußband am Schlitzbesatz festgesteckt. Aber wirklich nur am angeschnittenen Besatz, nicht an der Hose selber! (Versäubert sollte man die Schnittkante vorher haben…)

On we go…

The opening is pinned closed and now you turn everything around. Wrong side of fabric is on top.

Now you pin the still loose zippertape to the cut on facing. But only to the facing, not through all layers and to the pants! (It’s a very good idea to zigzag or serge the edge of the fabric before…)

Reißverschluss einnähen
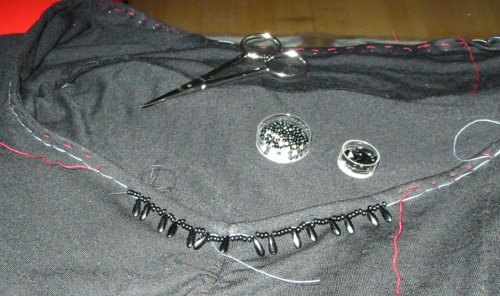
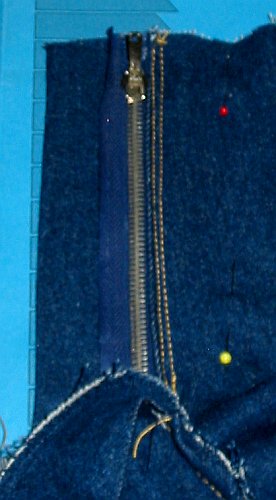
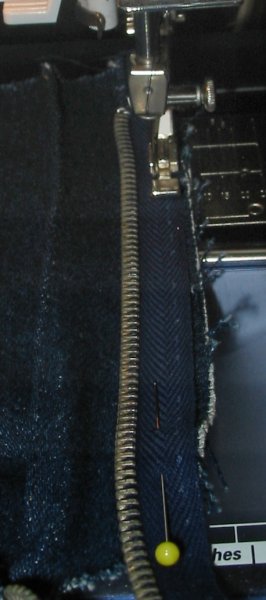
Jetzt den Besatz mit dem draufgestecketen Reißverschluß wieder aufklappen und auf dem Reißverschlußband entlang nähen.

Wo genau auf dem Reißverschlußband ist ziemlich egal. Aber nur auf dem Besatz, nicht auf der Hose! Mit dem Reißverschlußfuß geht es einfacher.

Wie man hier noch mal sieht ist mein Besatz etwas schmal, der Reißverschluß paßt gerade drauf. Aber wie ich schon sagte… der Besatz sollte wenigstens einen Zentimeter breiter sein, wenn man Kappnähte macht.

Now you unfold the facing with the zipper tape pinned to it and stitch on the zipper tape.

Where exactely you stitch doesn’t matter. It’s only important, that you sew the tape only to the facing, not to the pant! And it’S easier when you use the zipper foot.

As you can see here ist my facing not really large, it’s not much larger than the zippertape. As I’ve said before… for flat felled seams the facing should be at least 1cm larger…

Schrittnaht nähenNach der ganzen Fiselarbeit kommt endlich wieder eine vernünftige Naht: Die Schrittnaht.

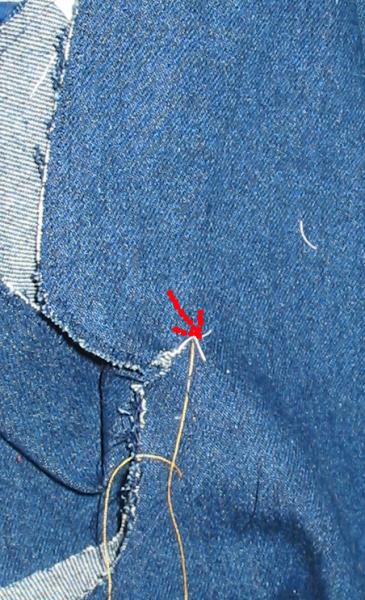
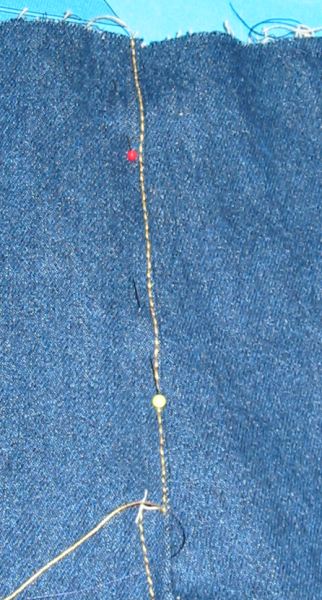
Die Hose im Schritt links auf links zusammenstecken und dann die Seite nach oben legen, wo bereits die Stiche unterhalb des Reißverschlußschlitzes genäht sind.

Die Naht muß genau in dem letzten Stich des kleinen Nahtstückes enden bzw. anfangen.

Danach werden die Fäden beide auf die Seite des Unterfadens gezogen, dort verknotet und abgeschnitten. Ein paar Tropfen Frauycheck vorher schaden nicht.

After all those tiny steps a real seam, at last! The crotch seam.

Pin the pant pieces together, wrong sides facing. The side where the thicker thread of that tiny seam under the opening is visible has to be up. Then stitch.

Here is it important to start or end exactely in the last stitch of that mini seam. Then it loos like one continous seam.

The thread ends are brought to the side of the bobbin thread, then knotted and cut. Some drops of Fraycheck on the knots are nice for those who like security. (Like me…)

Reißverschluss verriegelnTja, und dann geht es wieder mit einem winzigen, aber sehr entscheidenden Schritt weiter:

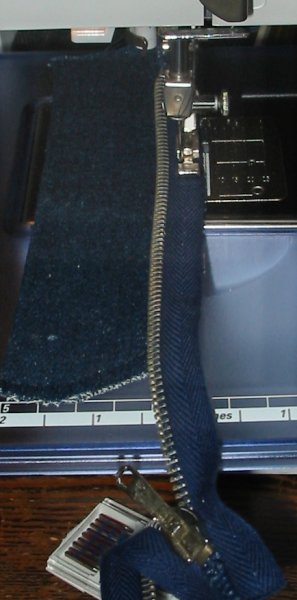
Ich habe ja einen Reißverschluss verwendet, der deutlich länger ist als der Schlitz. Dadurch kann man den Schieber während des Nähens komplett aus dem Weg schieben und einfacher nähen.

Nun ist der Zeitpunkt gekommen, ihn zu kürzen. Aber vorher sollte man auf alle Fälle das Ende verriegeln.

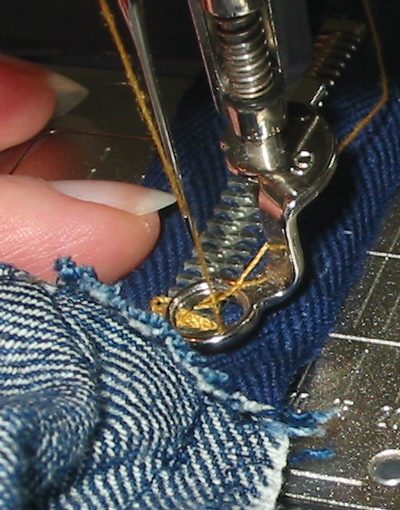
Normalerweise genügt es dazu, einen Zickzackstich einzustellen, die Stichbreite auf etwas breiter als die Reißverschlusszähnchen stellen und die Stichlänge auf null.

Einige Stiche nähen, dann vernähen und den überstehenden Reißverschluss abschneiden.

Hier habe ich allerdings das Problem, daß meine Zähnchen sehr breit sind, breiter als der Zickzackstich. Also benutze ich meinen Stopffuß, stelle Stichlänge und Stichbreite auf null und bewege den Stoff von links nach rechts…. in meine extra starken Metallzähne sollte man nicht reinnähen, sonst ist die Nadel hin…

Again a small but very important step: I prefere zippers that are much longer than the opening, because then I can bring the slider part down while sewing and it is not in my way when I’m stitching.

So now is a good moment to cut what is too long. But not without securing the end first.

Normally you would just put the zipper under your pressure foot, choosing a zigzag stitch that is larger than the zipper teeth, set the stitch length to zero and make some stitches. Then secure the stitches and cutting the to much of the zipper.

Only in this case the zipper teeth are larger than my largest zigzag… :o) So back to my darning foot, setting stitch length and stitch width to zero and movin the zipper from left to right. And avoiding the extra strong metall teeth… because this would mean needle break…

Innere Beinnaht
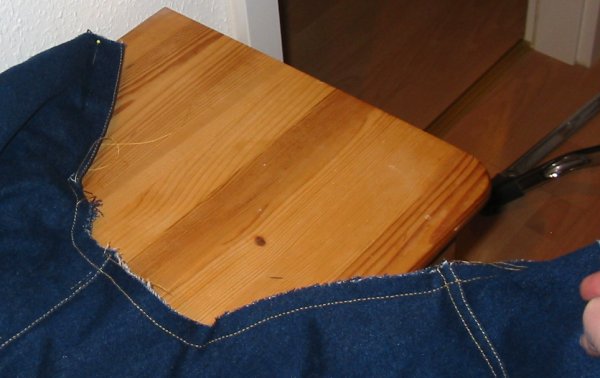
Und wenn das gemacht ist, kann man die Kappnaht im Schritt auch endlich fertig nähen.

Dabei habe ich dann auch bemerkt, daß hier die 1,5cm Nahtzugabe wirklich nicht reichen. Schon nach dem ersten Tragen und erst recht nach dem ersten Waschen waren einige Fransen unauffällig mit Fraycheck zurückzuschieben und mit einigen dunkelblauen Handstichen durch die Kante zu befestigen.

Aber mit 2xm Nahtzugabe dürfte es prima gehen.

Und weil Aud meinte, es sei viel Mühe… liebe Aud, eine Kappnaht macht letztlich weniger Mühe als eine normale Naht, die man zwei Mal absteppt. Bei der Kappnaht muß ich nämlich nur zwei Mal drübersteppen, wenn ich eine normale Naht absteppe, dann sind es drei Durchgänge pro Naht. 😉

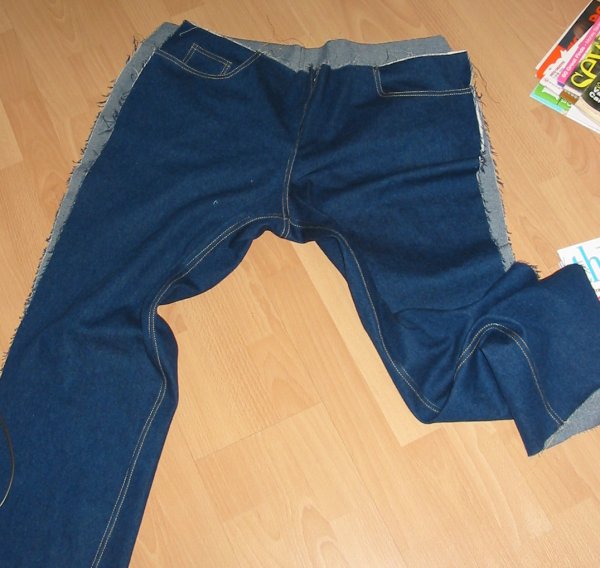
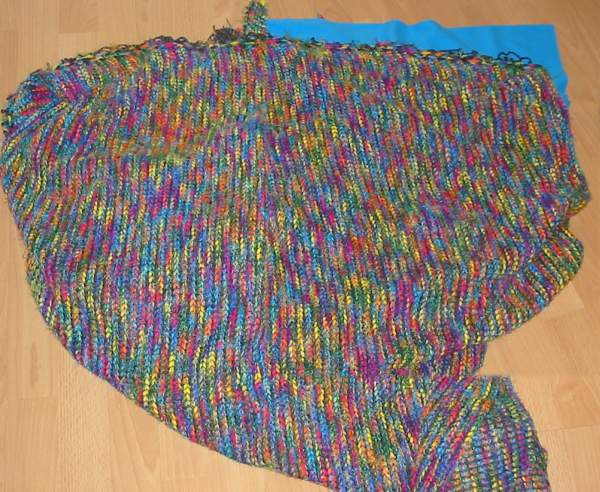
Jedenfalls sieht die Hose dann so aus wie auf dem Photo. Als nächstes kann man dann noch den Schlitz absteppen, bevor man den Bund annäht und die Seitennähte schließt.

After securing the zipper you can finally finish the flat felled crotch seam.

That also was the moment when I found out that here 1,5cm seam allowance are definitively not enough. After first wearing and again after first washing the seam allowances startet do come out at some places. Fraycheck and some handstitching with a thin dark blue thread could fix it, at least so far.

Next time I will make the seam allowance 2cm large and then it should be no problem at all.

Aud mentionned in the comment that this means a lot of work. Well… actually a real flat felled seam is done quicker than a “normal” seam and then topstitched twice. For the flat felled seam I only have to stitch twice. For the “simple” seam plus two rows of topstitching it means stitching three times…

The picture shows the moment after the flat felled seam crotch seam is finished.

After that it was only topstitching the opening and then adding the front waistband and stitching the side seams.

Easy, if you know how… (and adapt the pattern…)

Kappnaht und Reißverschluss (Teil 1)

Bei meiner Motivationsjeans wollte ich ja die innere Beinnaht und die Schrittnaht als Kappnaht machen. Das erfordert aber etwas andere Arbeitsschritte für den Reißverschluß, als die Anleitung von Sandra Betzina vorgibt, hier ist meine Anleitung. (Die ähnlich auch für andere Jeans mit Kappnaht gilt.)

For my jeans I couldn’t use the instructions coming with ist, because I wanted flat felled seams on the inner leg seam and the crotch seam. So also the way to sew in the zipper had to be changed. Here is my tutorial. (That of course can be used for similar patterns, too.)

SchlitzbelegFolgende Schritte sind schon gemacht: Die hinteren Hosenteile sind an die jeweilige Sattel genäht, auch die Taschen habe ich aufgenäht. An den vorderen Hosenbeinen sind die Hüftpassentaschen fertig gearbeitet.

Dann werden die beiden vorderen Hosenteile links auf links aufeinender gelegt und die Schrittnaht von der Markierung für das Ende der Reißverschlußöffnung aus etwa 7 cm weit zugenäht.

Da ich nur im Oberfaden das dicke Nähgarn hatte, mußte ich auch darauf achten, daß die Seite mit dem Übertritt oben liegt.

Before I started the following things were already done: Sewing the yoke pieces to the back pant pieces, sewing on the pockets.At the front pant pieces the pocktes were finished before with all topstitching etc.

The front pants lay wrong sides together and I sew a short (5-7cm long) seam on the crotch seam, starting from the end of the front opening.

I used the thick decorative thread only in the needle, not in the bobbin, so it was important to sew from the right side. That is the side of the opening that will be on top of the other after the zipper is sewn in.

einschneidenDanach ist ein kleiner Schnitt nötig.

Auf der Seite des Untertritts genau bis zum Beginn des Schlitzes einschneiden.

Außerdem auf dieser Seite die Nahtzugabe auf 3cm Länge auf etwa 5mm Breite zurüchschneiden und die Kappnaht auf dieser kleinen Strecke vorläufig einfalten und stecken

Then a small cut is needed. You cut on the side of the zipper that will be not on top once the opeining will be finished. You cut exactely to the point where the opening starts.

Also you cut the seam allowance back to 5mm on a length of 3cm and fold this little bit of flat felled seam provisory down.

Reißverschluss an Untertritt nähenJetzt kommt endlich mal der Reißverschluß an die Reihe,

Der Schlitzbeleg wird links auf links gefaltet und mit den offenen Kanten aufeinander genäht.

Ich habe dazu einen Overlockstich benutzt, denn versäubert muß die Kante auch werden.

Dann wird der Reißverschluss geöffnet und auf den Schlitzbeleg genäht. (Bei mir ist es das rechte Reißverschlußband, weil ich einen “Frauenschlitz” genäht habe. Bei Jeans kann man natürlich auch den Schlitz auf der “männlichen Seite” nähen.

Da sowohl Stoff als auch Reißverschlußband recht fest sind, ist es eigentlich kein Problem, das Reißverschlußband bündig an die zusammengenähte Kante zu legen und einmal festnähen. Natürlich nur bis zur Rundung, das Reißverschlußband wird nict gebogen, das bleibt grade. Dieses Festnähen ist eigentlich mehr ein heften, weil ja später noch mal festgenäht wird. Aber die Stiche müssen nicht wieder raus, keine Sorge. *g*

(Man tut sich übrigens leichter, wenn man den Reißverschluß ein paar Zentimeter länger kauft als benötigt und hinterher abschneidet.)

Next step is sewing the zipper to the fly (is it that in English?). For the fly you fold the piece left sides together and sew along the open sides. I used an overlockstitch of my machine to prevent fraying the edge. If you have a serger that’s fine, too. Of course.

I made my opening on the “female” side, for jeans you can also make it on the “male” side.

So I’ve opened my zipper, aligned the right zipper band with the sewn side of the fly and stitched A long stitch is okay, because this serves more like basting. (But you won’t have to rip it out later…)

(You’ve probabely noticed on the pic that my zipper is a good deal longer than needed. That makes sewing in easier and it will be cut to the right length later.)

Reißverschluss annähenNachdem der Reißveschluss auf dem Schlitzbeleg befestigt ist, kann er auch an die Hose.

Vorher sollte man allerdings die andere Seite des Schlitzes, also den Übertritt, an der Kante absteppen. wieder genau bis zur Markierung. Dabei ist die Kappnaht darunter noch nicht genäht, aber eingefaltet, damit man sieht, wo man den Schltzbeleg einfalten muß.

Achtung: Wenn man diesen Vogueschnitt mit Kappnähten arbeitet, ist es eine sehr gute Idee, den angeschnittenen Schlitzbesatz am Übertritt einen Zentimeter breiter zuzuschneiden! Sonst kann er beim Absteppen nicht oder nicht gut mitgefaßt werden. (Ich habe es hinterher rausgefunden… Noch ein paar Handstiche mehr…)

Danach wird auf der Untertrittseite das “Sandwich aus Reißverschluss und Schlitzbeleg einfach unter die umgeklappte Kante des Untertritts gelegt, so daß die Zähnchen rausschauen und neben den Zähnchen festgesteppt.

Ich habe zwei Reihen mit dem dicken Garn gesteppt, auch dem Design gekaufter Jeans abgeguckt.

Now zip and fly become part of the pants.

Before you do that you fold the facing of the other side of the opening to the wrong side of the fabric and topstitch the edge. You stitch ftom top to the notch for the end of the opening. The flat felled seam will start below that point and folding it in for some centimeters helps you to see, where the fold has to be.

Attention! When you are sewing these Vogue pants with flat felled seams as I did it is an excellent idea to make the cut on facing about 1 cm wider! Elseway the topstitching of the opening will nocht or hardly cathc teh facing. I found out too late… some more handstitching to fix…

Okay, back to attatching the zip to the pants.

Super easy, you fold the facing of the other side oft the opening, take the “sandwich” of ziper and fly and lay it under the fold. The metal part of the zipper aligned with teh fold line.

Then stitch. I did two rows of stitching with my decorative thread, but that is matter of taste. Do the design you like!

DoppelnahtSo sieht das dann aus, mit den zwei Steppnähten.

Danach wird der Reißverschluß geschlossen, der angeschnittene Beleg der Schlitzkante wird mir einigen Stecknadeln gestgesteckt. Das sind die Nadeln rechts vom Reißverschluß.

An dieser Stelle noch mal Achtung! So wie ich genäht habe, wird der Untertritt offensichtlich breiter als in der Anleitung vorgesehen. Das macht die Hose nun keineswegs anangenehmer zu tragen, aber man muß natürlich auch den Bund entsprechend länger zuschneiden, gut einen Zentimeter länger. Und den Besatz des Bundes auch. (Ich hatte zum Glück reichlich Stoff um neu zuzuschneiden…)

That’s what it looks like, two rows of stitching with the thicker thread.

After that you pull the zipper close and secure the cut on facing with some pins. Those are the pins on the right of the zipper.

Here again attention! The way I’ve sewn the zipper to the fly makes tis side of the pants wider than it was meant to be. As this is the side that is below this doesn’t change the size neither makes it the pants less comfortable. But you have to add the length (a bit more than 1 cm) to the waistband also. And the facing of the waistband. (Luckily I had enough fabric to cut it again….)

Schlitz absteppenJetzt wird das andere Hosenteil einfach gerade draufgelegt und knapp neben der Kante durch alle Lagen festgesteckt.

Dabei sollte natürlich die vordere Mitte der beiden Hosenteile aufeinander liegen.

Statt sich daran sklavisch zu halten, achte ich lieber darauf, daß der Schlitz gerade zugesteckt ist, der Stoff also keine Beulen und Wellen hat.

Now you close the zipper opening and pin through all layers.

Of course the front middle of left and right front pant should match.

But if not… it’s better to make sure the fabric layers lay smooth and flat, without bumps.

Enough for today… elseway this post will never be finished. :o) The rest in the next post.

So, für heute erst mal genung, sonst wird dieser Beitrag nie fertig… :o) den Rest gibt es dann beim nächsten Beitrag.

Stoffeffekte

So, die letzten Tage habe ich für meine Verhältnisse sehr viel genäht. Deswegen hatte ich auch so wenig Zeit zum Bloggen. Aber dafür ist mein Motivationsteil tatsächlich recht weit gediehen. Allerdings sind noch einige Stunden handsticheln nötig, das kann ich aber am Samstag bei Mami auf dem Sofa machen. Ohne Nähmaschine.

StoffAllerdings kann ich noch kein Bild zeigen, deswegen zeige ich euch wenigsens Mal den Stoff.

The last days I have been sewing wuite a lot. At least compared to my normal sewing habits. So I didn’t have much time to blog. But it was worth it, all machine sewing is done, only some hours of handstitching are missing. But this can be done Saturday on my mothers sofa. Without sewing machine.

So I have no picture yet, but I can show you the amazing fabric.

Des Stoff hatte ich, wie schon erzählt, im Oktober letzten Jahres bei einem Nähtreff bei, Scherzkeks gesehen und er hat mich sofort in seinen Bann gezogen.

Es ist eine Art Strick, denke ich zumindest. In eine dunkelgraue sehr löchrige Strickstruktur (allerdings sieht es irgendwie aus, als sei er quer gestrickt… irgendwie seltsam…) sind dicke, bunte Fäden quer eingezogen. Und durch diese Fäden sieht es aus, als hätte der Stoff dicke, quer verlaufende Masschen.

In sehr bunten Fäden. Ein wunderbarer Kontrast, viel Gelb, leuchtendes Orange, Rot und Blau.

Mit dem kleinen Nachteil, daß mir der Stoff leider gar nicht steht.

The fabric had caught my eye in october when we had a sewing meeting at the Scherzkeks-Store.

It’s a kind of a knit fabric, a very dark, nearly black basis knit (though it looks as if it had been knit horizontally… strange), very loose. And woven into the knit are soft fibres that make the fabric look as if it hat big, lofty stitches running horizontally to the normal knit direction.

Contrasting fibres in wonderfull bright colors, screaming yellow, bright orange, red, blue…

That have one disadvantage: they are not my colours… the fabric does not look good on me.

Aber eine Farbe in dem Stoff… eine steht mir. Das Blau wäre schön. Aber der Stoff im Ganzen… einfach schade…

Bis mich ein Freund auf eine gute Idee brachte: Der Stoff ist ja recht lose gearbeitet, also obwohl er so dick ist etwas transparent. Und wenn man ihn mit einer anderen Farbe unterlegt… ändert sich tatsächlich der Gesamteindruck.

Ich habe den Stoff einmal direkt und einmal mit dem blauen Interlock unterlegt photographiert und dann aufeinander montiert. Tatsächlich sieht man sogar auf dem Bild den Unterschied, rechts ist der unterlegte Stoff, links der “nackte” Stoff. An den Blenden werde ich den blauen Interlock nach außen schlagen, so daß die “gute” Farbe nahe an meinem Gesicht sein wird. Und schon… ist dieser wundervolle Stoff “mein” Stoff. 🙂

Of all that colours af the fabric, there is one that normally looks good in me: the blue. But one good colour is not enough… what a pity…

But then a friend of mine had an excellent idea: The knit fabric is thick, but very loose and therefor kind of sheer. So underlined with another colour… the fabric changes as a whole.

I photographed the fabric as is and underlined with a blue interlock and then merged both pictures into one. And you can see the difference even on the picture: left is the “pure” fabric, on the right side it is layered over the blue fabric. Aditionally I will make the outward facings also from the blue interlock, so the “good” colour will be close to my face. So easy… now this amazing fabric is made “my” fabric. 😉

Große Pläne

Das Thema des Motivationsmonats April ist “Oberteile mit Kapuze”. Und da geht mir schon lange der Schnitt aus der Burda Mode November 2007 im Kopf herum, der Catwork Schnitt 126.

Catwork Schnitt
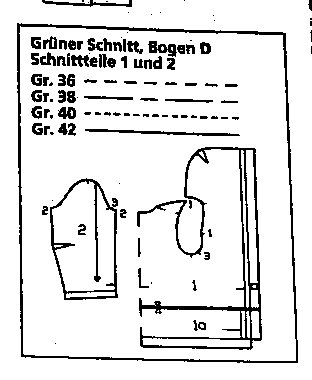
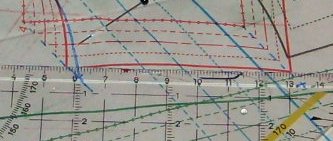
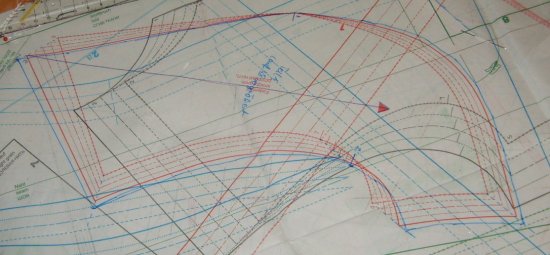
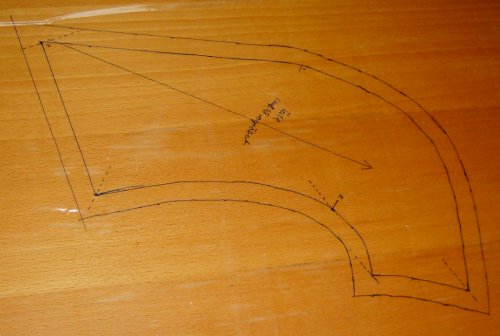
Der Schnitt schwebt mir schon länger im Kopf herum, weil er zwar ganz schlicht ist, aber doch was besonderes hat. Außerdem hatte ich im Oktober beim Scherzkeks einen Stoff gesehen, der aber definitiv zu teuer ist, um ihn einfach mal auf Vorrat mitzunehmen. Und zu dick auch, um ihn zu lagern.

Die Herausforderung? Der Schnitt ist bis Größe 42 auf dem Bogen. Ich brauche Größe 48. Vergrößern über drei Größen ist zumindest…gewagt.

It’s April, so there is a new topic of the month, this time its “Tops with hood”. My project will be a pattern from the BWOF november 2007, Number 126, the Catwork pattern of a young designer.

I liked the pattern instantly when I saw it, because it es very simple and basic, but has a special something. Also I had seen in october a fabric at Scherzkeks-Stoffe, I also liked very much. Only it is much to expensive to just buy it and stash it. Also the fabric is too thick to store…

The challenge? Burda brings the pattern up to size 42. I need 48. Sizing up three sizes. That’s… well.. challenging…

Schemazeichnung Bei so einem schlichten Schnitt sieht das eigentlich nicht so schwierig aus.

Ein Blick auf die Schnittzeichnung hingegen… das wird spannend. Ein Schnitteil. Und das bei meiner Figur und den normalerweise nötigen Anpassungen.,

The pattern looks simple, so this seems easy.

But a look on the pattern itself shows what makes it special: Everything (except the sleeves) is one piece. And normaly I need a lot of seams to make all the alterations to my figure.

Warum ich denke, daß es trotzdem klappt?

Nun, ich denke nicht, ich hoffe. Denn andererseits ist der Schnitt sehr lässig, nicht paßformsensibel. Und ich verwende einen Strickstoff, der ja etwas elastisch ist.

Why I think it will work out?

Well, I don’t rhink, but I hope. At least the jacket has a very loose form, so it does not have to fit precicely. And I plan to use a knit, that has some stretch.

Aber das ist noch nicht genug… Ich habe am 13. April Jubelkonfirmation und würde es da gerne tragen. Die Zeit ist also knapp. Und das bei meinem Nähtempo… Spannung ist garantiert… 😉

But this is not all the challenge in the plan… on the 13th of april I will have the 25th anniversary of my confirmation and I’d like to wear it for that occasion. So time is short. And that for me, the slow sewer. So stay tuned…


Runde 4 – ein Solo

Der Monat nähert sich ja dem Ende, also ist es spannend, ob ich meine Jeans fertig bekommen werde…

Am Mittwoch hatten wir wieder Nähkränzchen und eigentlich wollte ich die Jeans vorher fertig bekommen. Nun ja… wir hatten ja geplant, uns bei Plissee Becker zu treffen, ich hatte dort einen Reißverschluß bestellt der fertig war und Capricorna wollte diesen geheimnisvollen Ort endlich mal kennen lernen. Und Frau mhs findet einen Besuch dort eigentlich immer gut. Nur nähen… können wir dort natürlich nicht.

Zuerst viel Frau mhs aus, einmal wegen des Wetters und dann wegen einer aus dem Urlaub zurückgekehrten Vorgesetzten, die ihren Schreibtisch abarbeitete, indem sie die Aufträge weiter verteilte. (Wenn ich das richtig verstanden habe… naja, delegieren ist der Job eines Chefs. 😉 )

Also stiefelten Capricorna und ich im leisen Nieselregen alleine los.

Danach wollte ich eigentlich zügig nach Hause, um an der Hose weiterzuarbeiten… aber bei dem Regen… ein schneller Kaffee sollte drin sein. :o) Naja, ich war noch ein bißchen vor 20 Uhr Zuhause… *g*

End of the month is coming closer so will I finish my jeans?

Two days ago we had our “Nähkränzechen” and my intention was to finish the jeans before. We had planned to meet at Plissee Becker, because I wanted to fetch a custom made zipper that was ready for me and Capricorna wanted finally see this secret place, full of buttons, ribbons and other kind of notions. Frau mhs knows the shop, so she thought it would always be a good place to go. But of course we cannot sew there…

Well… Frau mhs couldn’t come. First she doubted because of the weather, but then the decision was taken from her hands by a boss coming from holiday and cleaning her desk by distributing the urgent tasks to others. (If I got that right. But that’s what a boss is supposed to do, distribute the work…. 😉 )

So it were only two of us, walking in the rain.

My plan was to go home after that, to finish the pants. But there was so much rain… and one small coffee can do no harm…? :o) At least I was home before eight…

Aber heute habe ich an der Hose weitergemacht und jetzt fehlen wirklich nur noch der Knopf, die Nieten und der Saum. Und das Knopfoch muß aufgeschnitten werden. Das Knopfloch brauchte einige Tests, bis mit dem dicken Absteppgarn was brauchbares zustande kam. Aber der Knopf wird eingeschlagen. Morgen sollte es also fertig werden. Oder so.

But today I worked again on the pants. Now the sewing is done (except for the hems), only the button and the rivets are missing. But I cannot do that at night, poor neighbours… But tomorrow… I should finish it. I hope…

Runde 2

Weiter geht es mit dem Motivationsmonat. (Ich weiß eh schon gar nicht mehr, wo ich die Zeit zum Berichten hernehmen soll… es stapeln sich auch diverse Zeitschriften, die besprochen werden wollen, von meinen Socken habe ich schon lang nicht mehr geschrieben und ein anderes Projekt habe ich auch angefangen, während ich auf den Schnitt für die Jeans wartete…) Diesmal leider ohne Bilder, die sind noch in der Kamera von Frau mhs. Aber macht nix…

Capricorna hat es in ihrem Blog ja geschrieben, sie ist ausgestiegen. Die Probehose anzupassen wäre mehr Arbeit, als aus ihrem bereits passenden Hosenschnitt  einen Five-Pocket-Schnitt zu machen. Kann ich nachvollziehen. Ich finde ja auch, das Designänderungen wesentlich einfacher sind, als das Anpassen an die Figur.

And on we go with the “Motivation of the Month”. (I don’t know where to take the time, I have so  many untold things. Threads and ottobre woman are waiting for a review, I didn’t write about my sock knitting and I’ve started another project, while I was without the pattern for the jeans… ) This time a pictureless entry, because the pictures are still on the camera of Frau mhs. But it’ll do…

Capricorna announced it in her blog: she’s out. She made a musslin and found out, that fitting that would be much more worik than just altering a fitted pants pattern to make it a five pocket jeans. I understand her very well, I also think that design changes are much easier to do than fitting a pattern.

Frau mhs ist mal wieder am weitesten. Sie hat eine Probehose genäht, aus richtigem Stoff, nur Reißverschluss, Knopf und Saum fehlten noch. Leider war die Paßform gar nicht gut. Am Po paßt die Hose, aber unterhalb steht der Stoff tütig ab. Ungefähr sechs Zentimeter kann man an die Seitennaht und die innere Beinnaht anschieben, dadurch sollte die Hose tragbar werden, aber wir haben beide im Moment keine geniale Idee, was man am Schnitt ändern sollte und könnte, damit die “richtige” Hose auch schön sitzt?

Frau mhs is ahead of everybody. She had finished a test garment (real garment, not only a muslin) except for zip, button and hems. Only the pattern doesn’t fit at all. Around the hip it’s okay, but under it there is just way to much fabric which stands out… (it’s a rather stiff fabric, but it’s a jeans pattern, no?) About six centimeters can be taken out at the side seam and the inner leg seam to make the trowser “wearable”, but “good fit” is something else. And none of us has a good idea how to alter the pattern to make it a really good fitting jeans?

Ich selber habe in einer Eilaktion am Donnerstag den Schnitt auskopiert (ich muß meist viel ändern, daher kopiere ich auch Fertigschnitte, weil es besser ist, das Original als “Sicherungskopie” zu haben) und eine Testhose aus einem alten “Kellerstoff” genäht. (Eher getackert mit größter Stichlänge) Obwohl laut Maßtabelle G eher knapp wäre (mein Hüftumfang liegt noch 2cm über dem Wert in der Tabelle) habe ich mich nach Lektüre einiger Berichte auf Pattern Review dazu entschlossen, die Hose in F zu kopieren und zuzuschneiden.

Was soll ich sagen, der Hüftumfang ist genau so, wie ich das gerne hätte bei einer Jeans. Knackeng. Überraschend war allerdings die Höhe. Von wegen der Bund endet vorne 2,5 cm unterhalb der Taille… bei mir lag er deutlich drüber, was ungewöhnlich ist. Normalerweise sind Hosen bei mir unfreiwillig tief sitzend. Bei dieser hingegen mußte ich rundum drei Zentimeter Länge rausnehmen und vorne am Bund noch mal zwei Zentimeter in der Mitte, zu den Seitennähten hin auslaufend.

Jetzt sitzt die Hose immerhin auf der Taille, drunter nicht wirklich. (Die Schrittlänge ist in der Maßtabelle für die Today’s Fit Größen leider nicht angegeben, wär vielleicht nützlich….)

I couldn’t work on the project until Thursday. Then I’ve traced the pattern on plastic (Usually I have to alter a lot to make things fit, so I prefere to keep the original pattern as “backup” so I can always turn back, if I’ve messed up my copy) and sewn a muslin of a very old fabric. Following the mesaurment chart G shold have provided a close fit (my hip measurements are 2cm beyond “G”), but after checking Pattern review I decided to try F.

Well… regarding the hips this was perfect! They are very tight (compressing…) at hip level, what is exactly what I want from jeans. (Not for other pants…) but there was another surprise. The waistband did not (as indicated) end 2,5cm (or one inch) below waist level, but went up to bust level. Often I have to lengthen there…. Here I had to take out 3cm (1 1/4 inch) between crotch line and the pocket (I didn’t want to alter the pocket pattern… ) and another 2cm (6/8 inch) in the middle of the waistband, tapering to the side seams.

So the waistband now ends on waistlevel. Still not beyond as indicated. (The chart of measurement for the Today’s Fit patterns doesn’t indicate a crotch length… would have been helpfull…)

Runde 1

SchnittmusterDiese Woche hat sich unsere kleine Nährunde zum ersten Mal zum Thema “Motivationsjeans” getroffen. Ich hatte damit auch endlich die Möglichkeit, mal einen Blick auf den Schnitt zu werfen.

Das gab auch schon mal einige Überraschungen. Der Schnitt im Ganzen sieht irgendwie seltsam aus… hinten gibt es keinen Bund, sondern der Sattel dient quasi als Formbund und wird gedoppelt. Hier ergibt sich für mich schon die erste Änderung: Ich habe ja sehr dicken Jeansstoff und wenn ich den doppelt nehme, wird es sehr unbequem… deswegen werde ich mit einem dünneren Stoff doppeln. Mal sehen, was die Restekiste hergibt.

Außerdem habe ich inzwischen auf Pattern review ein bißchen zu dem Schnitt gelesen und dabei festgestellt, daß ich wohl besser die kleinere Größe nehme, wenn ich den Schnitt wirklich “jeanseng” haben will. So ähnlich steht das auch in der Anleitung… wenn man einen typischen Denim-Sitz haben will, der ein bißchen komprimiert, dann enger nähen. Auch das jetzt ein wenig überraschend, bei einem Jeans-Schnitt. An Schantung Seide als Stoff hätte ich jetzt nicht primär gedacht… Ach ja, die Beine werde ich verlängern müssen, wenn ich Pattern Review glaube.

Jedenfalls habe ich, was den Schnitt betrifft, jetzt die Wahl. Frau mhs hat mir ihren in Größe F überlassen und zudem fand am Düsseldorfer Hauptbahnhof mal wieder ein konspiratives Treffen statt, bei dem ein Schnitt in Größe G übergeben wurde. (Danke!)

This week our small sewing cycle did meet about the Five-Pocket-Jeans for the first time. My first chance, to get a glance on the pattern.

An the first surprises. The pattern or at least some parts of it, looks a bit strange. There is no waistband in the back, but instead the yoke is yoke and waistband in one and it’s self-faced. Which I will definitely not do with my very strong denim. I consider that to be quite uncomfortable. So I’ll go and look in my scraps for something thiner.

As I couldn’t work on the trouser so far I’ve been reading on Pattern Review about it. And this, together with measuring the pattern, brings me to the conclusion, that it might be the better choice to take the smaller size (F) if I want a typical close fitting jeans. Well, that’s also what the instructions say, more or less. Again a bit unexpected on a jeans pattern. I wouldn’T have thought about shantung silk (one of the fabrics mentioned in the intruction) as first choice of fabric for this pattern… Oh, and I will have to lengthen the trowsers from what I can tell so far.

Anyhow, I have the full choice of sizes now, because not only Frau mhs left me her pattern in F, there was also a conspirative meeting on Duesseldorf Main Station where a pattern was exchanged… (Thanks again!)

Capricorna und der SchnittEin paar Überraschungen gab es auch für Capricorna. Sie stellte fest, daß sie den Schnitt wohl schon mal auskopiert hatte und es stand auch “angepaßt” auf der Kopie.

Leider hatte sie keine Ahnung mehr, wann sie ihn wohl angepaßt haben mag und wie gut das Ergebnis war.

So schob sie ihren Burda-Maßschnitt, der gut paßt, auf dem Betzina Schnitt hin und her, nur um festzustellen, daß der irgendwie ganz anders ist… Mal sehen, ob sie uns in ihrem Blog noch irgenwann verrät, für welche Variante sie sich entschieden hat…

There were also surprises for Capricorna. She evidently had copied the pattern long ago and it was also marked as “fitting done”.

Only she doesn’t remember the least bit when she might have done that and how good the result really was…

So she spent a lot of time comparing her burda custom made pattern to the Betzina pattern, just to find out that they have no similarities at all. Maybe she’ll tell us in her blog, what she’ll be going to do about it…

Am weitesten ist schon Frau mhs, die hat nicht nur den Schnitt ausgeschnitten und an ein paar Stellen angepaßt, ihrer war auch schon auf dem Stoff festgesteckt und wartet da nur noch aufs Ausschneiden.

Most results could be seen at Frau mhs work. Her pattern is copied, some alterations were done and the pattern pieces were pinned to the fabric, just waiting to be cut.

Mein Weg hingegen ist noch lang. Ich muß den Schnitt abkopieren und dann erst mal schnell eine Probehose nähen, um zu sehen, ob Größe F reicht und ob es sonst noch grobe Abweichungen gibt. Einen Schnitt nach Sandra Betzina habe ich noch nie genäht, daher kann ich nicht mal ungefähr abschätzen, ob er passen könnte.

On the contrary I sill have a very long way to go. I’ll have to copy the pattern and then quickly do a muslin to check, whether size F ist the good decision and whether there are other major problems. I’ve never used a Betzina pattern before, so I cannot even guess.

Jeans-Motivation mal drei

Nach dem meine letzten Jeans inzwischen trotz aller Stopfbemühungen nicht besser wird, ist dieser Motivationsmonat quasi perfekt für mich. Die klassische 5-Pocket Jeans ist genau was fehlt.

Doch diesmal werkle ich nicht alleine, Capricorna und Frau mhs (aka masan) wollen auch mitmachen. Und zwar möchten wir alle den gleichen Schnitt verwenden, V7608 von Vogue. Ganz sicher einen spannende Erfahrung, denn wir brauchen jede eine andere Größe und wir haben jeweils ganz unterschiedliche Proportionen. Sozusagen ein systematischer Schnittvergleich… das liegt uns glaube ich allen dreien. *g*

The “Motivation of the Month” in march ist 5-Pocket-Jeans. And since my last jeans cannot be saved much longer (and I’m trying hard…) this is more than perfect for me.

But this month I’ll be working along with Capricorna and Frau mhs. And we want to make the same pattern, all three of us, V7608 from Vogue. I think this will be a very interesting experience, since we all three need three different sizes and have very different proportions. A systematical comparison… I’ve always wanted to do that.

Und genau diesen Schnitt wollte ich auch schon immer mal ausprobieren. Ich hatte auch schon mal versucht, ihn zu bekommen, war aber damit gescheitert. Und genau das ist jetzt auch mein Problem: Capricorna und Frau mhs haben ihr Expemplar schon, einmal in “ABC” und einmal in “DEF”. Und, ihr werdet es euch denken können… ich brauche G. (Wenn ich halbwegs ehrlich messe… bei der Taille bin ich etwas näher an F, aber bei der Hüfte definitiv näher an G.) Und natürlich hat in Köln kein Geschäft den Schnitt in G vorrätig. Stofferia und Stoff Müller haben nur die kleinen Größen da, Alfatex muß alles bestellen. (Falls jemand noch eine Adresse in oder um Köln weiß, wo der Schnitt in Größe G vorrätig ist… her damit!)

Und damit kommen wir zum Problem: Ich hätte die erste Hälfte dieser Woche gut Zeit, dann bin ich erst mal viel unterwegs (mit guter Chance dabei dann an einem Geschäft vorbei zu kommen, die den Schnitt vorrätig haben) und habe bis Mitte nächster Woche dann keine Zeit. (Zumal ich ja auch noch auf die Creativa wollte…). Ein bestellter Schnitt käme dann genau pünktlich zur “ich habe keine Zeit” Phase. Und Ostern ist diesen Monat auch noch. Auch da brauche ich Zeit für Vorbereitungen und Aufräumen (wir bekommen Besuch), die zum Nähen nicht zur Verfügung steht.

Das wird also so richtig spannend…

And I’ve always wanted to test that pattern. I remember that I’ve tried to buy it quite some time ago but didn’t succeed. And that is my Problem now. Capricorna and Frau mhs have one copy each, in size “ABC” and in size “DEF”. And, guess what… I need “G”. (If I’m taking my measures honestly. My waist is a tad closer to “F”, but my hips are definitely very close to “G”.) And of course here no shop has it in Stock. Two shops have them, but only in the small size, the third one can only order it.

And that’s the big problem. The beginning of this week I’ll have time to sew, then I’ll be traveling a lot and won’t be able to sew until mid/end of next week. (Chances are well that I’ll be able to buy the pattern while traveling.) Especially as I’m intendig to visit the “Creativa” show next week. So if I sould order the pattern it would arrive perfectely in time for the “I have no time to sew” phase. Not to forget that Easter also is in march. And there’s also quite some stuff to do related to that. Including a lot of decluttering, as we are getting visitors.

So I’m really curious whether I’ll be making it this month…

Jeansstoff und AbsteppgarnDoch immerhin habe ich bei meiner Suche nach dem Schnitt schon mal den Stoff gefunden: In der Stofferia gibt es einen dunklen, festen, dicken Jeansstoff ohne Elasthan. Genau wie ich ihne haben wollte.

Der Preis hat mich leicht geschockt… 15 EUR/m… für Jeans, die für mich ja nicht wirklich Hosen für “gut” sind… aber.. nun ja. (Ich hatte auch günstigeren gesehen, aber der entsprach eben nur zu 80 Prozent meinen Vorstellungen… mein Perfektionismus hat mal wieder gewonnen. *g*)

Zum Absteppen habe ich ein messingfarbenes Gütermann “extrastark” Garn gekauft. Mal sehen, wie sich das macht.

Dann werde ich meinen Stoff mal waschen und außerdem in meinen Heften einen Jeans-Schnitt suchen. Ein Plan B ist immer gut…

But all my searching for the pattern brought me at least the fabric needed. At “Stofferia” I found this dark, thick, sturdy Denim, exactely what I wanted. And no elastic fibres in it. I hate that in Jeans…

I’m still a bit shocked by the price of 15 EUR/m, especially as jeans are no “elegant” trousers for me, but something to hang around at home, but… well… okay. (I had seen cheaper ones, but they were only up to 80% what I wanted, so perfectionism took over. *g*)

Also I purchased some Gutermann “extra strong” in a brass-like colour for the topstitching. That sould give the typical jeans look.

So I’ll wash my fabric and I’ll go and search my sewing magazines for another 5-Pocket-Pattern. In case I don’t get the desired one it’s always good to have a plan B…

Immer wieder das gleiche…

… ich finde doch einfach immer eine Möglichkeit, meine Projekte etwas komplizierter zu gestalten…

Ein Shirt für den Motivationsmonat sollte ja nicht so kompliziert sein und daher schnell zu nähen.

Perlen am AusschnittJetzt ist der Monat zu zwei Dritteln vorbei und ich bin natürlich noch nicht fertig.

Ist mir doch noch eine gute Idee gekommen, wie ich mir etwas mehr Arbeit machen könnte…

It’s always the same… sewing a top for the “Motivation of the Month” shouldn’t be complicated and therefor quick to do.

The month is 2/3 over and I’m not finished yet. What happened?

I had a great idea, what I could do to make things more complicated…

Mein Stoff ist ja sehr weich und flutschig und mir war klar, daß es nicht reichen würde, den Besatz auf der Nahtzugaben festzusteppen.

Von außen Absteppen wollte ich auch nicht… also habe ich mir überlegt, ich könnte ja noch ein paar schwarze Perlen auf das schwarze Shirt nähen und damit auch gleichzeitig die Besätze befestigen.

Ich bin ja nicht gerede Meisterin der Perle, aber das hier ist noch komplizierter als befürchtet. Es geht schon mal damit los, daß man auf dem schwarzen Stoff die Linie nicht wirklich anzeichen kann. Weiß ist die einzige Farbe die man sieht, aber Kreide hält nicht lange genug, wenn man das Teil ständig in die Hand nehmen muß. Also habe ich mit dem Kreiderädchen und dem Handmaß vorgezeichnet und die Linie dann mit dem hellblauen Faden nachgenäht.

Die Perlen sind waschbare Perlen von Gütermann (waschbar ist wichtig, ein Shirt muß die Waschmaschine aushalten). Diese sind offensichtlich nicht aus Glas, sondern aus Kunststoff und dadurch haben sie so gut wie kein Gewicht. Und ich vermute daß es daran liegt, sie “legen” sich nicht in Form. Ich habe es schon ein paar Mal aufgetrennt, gleichmäßiger als so wird es nicht. 🙁

Ich werde es jetzt mal so fertig machen und dann gucken, wie es aussieht, wenn ich es trage. Und ob mir noch eine bessere Idee kommt, was ich damit machen könnte. (Oder ich hinter das Geheimnis komme, wie man diese Perlen gleichmäßig auf einem Strickstoff befestigen kann…

My fabric ist ultra soft so it was clear that I would have to do something to prevent tha facoings from showing. Just understitching as the instructions say qould not do it. Also I didn’t want a decorative row of stitching from the right side. So I decided that some black beads would look nice on the otherwise plain top and would attatch the facings.

I am not a master beader, but this was worse than expected. First problem is, that the possibilities to mark the fabric are more than limited. White is the only visible colour, but any chalk does not resist multiple touches while beading. So I marked it with a roller chalk tool from Prym and thread traced the line with blue sewing thread.

The beads are from Guetermann, they have some that can be machine washed. (Which was important, a thing that will often be washed has to go to the washing machine without further thinking.) And those beads are evidently made from plastic not from glas and therefore they have practically no weight. I think it’s due to that, that I’m not able to get them really regulary. They have not enough weight to pull themselves into the right position. I’ve ripped it severals times, but it doesn’t get better than this.

Well… I’ll finish it like that and see how it will look when it’s worn. And I will wear it until I come up with a better idea. (Or lern the secret, how to get those beads even on a knit fabric…)

Mehrgrößenschnitt vergrößern (Teil 2)

Nachdem Frau mhs so sehnlich darauf wartet, geht es nun weiter…

Schnitt gradierenNachdem man alle wichtigen Punkte markiert hat, muß man sie jetzt nur noch verbinden und hat das neue Schnitteil.

Äh ja, richtig… die Punkte liegen doch arg weit auseinander, wie soll das denn sauber gehen? Ich nehme an, wenn man ein passendes Kurvenlineal hat, könnte das sogar reichen, aber ich habe keines, ich male mir noch mehr Hilfspunkte. Das ist nicht schwer, an verschiedenen Stellen messe ich den Abstand zwischen Größe 44 und Größe 46 und mache außerhalb der Größe 46 einen Punkt. Die Hilfspunkte mache ich so alle 2 – 5 cm, je nach dem, wie ich denke es zu brauchen.

Wer mal an eine gebogene Linie das Lineal anlegt, der merkt schnell, je nach dem, wie man das Lineal dreht, ändert sich der Abstand. Deswegen benutze ich ein Geodreieck, das ich jeweils so anlege, daß die Längslinien auf dem Dreieck möglichst lange auf der roten Linie verläuft. Je nach Krümmung der Kurve können das mehrere Zentimeter sein oder nur ein halber. (Ich entschuldige mich für das Photo… ich hatte meine Kamera vergessen und Frau mhs hat mir ihre geliehen, die prima ist, mit der ich aber nicht so gut umgehen kann. :-/ Die schwarzen Punkte zeigen, wo die Längslinie des Geodreiecks verläuft.)

As Frau mhs urgently wants to see the rest,, here it is….

After the new edges and marks are identified you just have to connect them to get your new pattern.

All right… those points are quite far from each other, so it’s not easy to do this maintaining the correct shape. So I’m drawing more dots around my pattern, every 2 -5 cm (1-2 inch). The method is the same: measuring the difference between size 44 and 46 and make a dot on the other side of size 46 in the same distance.

When you measure along a curved line you’ll find out quickly that depending on the angle you measure the distance, the distance will not be the same. To get a “true” distance I’m using a transparent gridded ruler (if you have a quilter’s grid, that’s perfect). I put it that way, that the vertical grid line on the ruler runs on my 46 size line for the longest distance possible. On a very curvy part this can be only 0,5cm or so, if the curve is flatter it can be up to several centimeters. (I really apologize for the phots. I had forgotten my camera and Frau mhs lent me hers. It’s a good camera, only I know not well how to handle it. :-/ The black dots show the vertical grid line that runs on the red line of the original pattern.)

SchnittlinienDa wo die Linie zwischen zwei Ecken gerade ist kann man natürlich einfach das Lineal an die neuen Ecken anlegen und die Linie mit dem Lineal ziehen.

Aber man muß auf alle Fälle sicher sein, daß dieursprüngliche Linie gerade ist! Am besten man legt sein Lineal zum Testen an, denn viele Linien, die auf den ersten Blick gerade aussehen, sind dann doch gebogen. Und das würde die Paßform beeinträchtigen.

Where the original pattern has straight lines you can of course just connect your new edges with the ruler.

But make sure, that what looks straight also is straight! That’s easily done trying to align the ruler to the original line. Very often a contour that seems to be straight at first sight is a slighly curvy one an making it straight would spoil the fit.
neues SchnitteilJa, dann einfach noch die Hilfspunkte verbinden und das neue Schnitteil ist fertig.

Man sollte es beschriften, auch mit der neuen Größe.

So that’s it. just connecting all the edges, marks, dots… and the new pattern is ready.

Be sure to write the new size on it and any other relevant information.

Mit dieser Methode kann man Schnitte natürlich nicht nur größer, sondern auch kleiner machen.

Trotzdem hat sie ihre Grenzen: Im Prinzip kann man damit beliebig viele Größen nach oben oder nach unten gehen. In der Praxis ist gutes Gradieren dann doch komplizierter und je mehr Größen man damit verändert, desto ungenauer wird es.

Aber man bekommt trotzdem fast immer eine gute Grundlage für ein Probeteil. Und an dem paßt man dann den Rest an.

Mein Probestück paßte schon ganz gut, ich mußte an der vorderen Mitte (pro Schnitteil) noch 0,7cm zugeben, die Schultern um 1,5 cm schmaler machen und den Ausschnitt habe ich um 3cm erhöht. Das Mittelstück meines BHs muß ich nicht dringend vorzeigen.

fertiges Schnitteil mit NZGJa und so sieht das fertige Schnitteil aus, ich habe noch 1,5 cm Nahtzugabe zugefügt und ausgeschnitten.

With this method you can not only size up, but also size down.

Theoretically you can use this method to size up or down as many sizes as you wish. Practically it has limits. Real grading is something different and more complicated. And the more sizes you make a pattern larger or smaller, the less likely it will fit exactly.

But you can be quite sure to have a good basis to sew a muslin. (You always should of an altered pattern!) the rest of the fit can be done on the muslin then.

My muslin did fit quite well for a first try, I added 0,7cm to the front middle seam, decreased the shoulder seams by 1,5 cm and raised the decollte by 3cm. I don’t like to show my bra…

The last picture shows the new pattern ready to use. I’ve added 1,5cm for the seams and I’ve cut it out, of course.