Archiv der Kategorie: Weihnachten
Oh wie hübsch…
Oh, how pretty…
… dachte ich, als ich diese Topflappen im Blog von Bloomsbury sah.
… I’d thought when I saw those potholders in Bloomsbury’s blog.
 Und dann stand heute ein weihnachtliches Päckchen vor meiner Haustür, als ich vom Einkauen zurück kam. Mit schönen Topflappen, meinen geliebten Weihnachtsmandeln von Lindt, selbergemachter Rosenmarmelade und noch einem kleinen Täschchen für Münzen.
And then when I came home today from the weekly grocery shopping a nice parcel was waiting in front if my door. And inside there were beautiful potholders, yummy rose confiture, the Lindt christmas almonds which are my favorite christmas treat and a small coin purse.
Vielen Dank, liebe Bloomsbury! (Ich habe nur keine Ahnung, womit ich mir das verdient habe? Ich habe doch gar nichts besonderes gemacht…?? Ich freu mich aber einfach mal trotzdem! 😉 )
Dear Bloomsbury, I thank you so much! (I just have no idea what I did to get that wonderfull stuff? I didn’t do anything special…? So… I’m just happy about it! 😉 )
Textile Schnellkarten
Quick Textile Christmas Cards
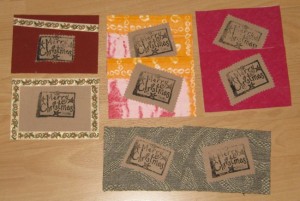 Dieses Jahr habe ich es endlich mal geschafft, Weihnachtskarten zu machen, die schnell gehen und gleichzeitig Stoff aufbrauchen. Und so geht es…
This year I finally reached my goal to make christmas cards that do not take ages to make and use up some of my fabric. And that’s how it goes…
Zuerst läd man mal Bärbel ein. Bärbel ist nämlich die ungekrönte Königin des Stempelns und kann einem alles verraten, was man darüber wissen will und noch ein wenig mehr. Daß sie außerdem Stempel und Stoffmalfarbe mitbringt ist ein praktischer Nebeneffekt. (Also Bärbel ist bei mir auch ohne Stempel willkommen, aber wenn sie Stempel mitbringen darf vergisst sie den Termin nicht so leicht. 😉 )
First you invite Bärbel. Bärbel is the queen of stamping and she can tell you anything about that subject you want to know and some more. That she brings the material is a nice add on. (Bärbel in generally very welcome, but she is also a very busy lady and if you promise her that stamping will on the schedule it is more likely that she will not forget the day or the time. 😉 )
Gestempelt habe ich dann auf einen schlichten Baumwoll-Canvas mit schwarzer Stoffarbe. Danach habe ich fertige Karten genommen, habe da doppelseitige Klebefolie aufgebracht und einen Basisstoff aufgeklebt. Die beiden Karten unten sind mit einem festeren Deco-Stoff „grundiert“, das dunkelrote ist ein ungefaltetes gekauftes Schrägband, das ich mal geerbt habe und das Stoß an Stoß geklebt wurde. In der Mitte eine poppigere Variante mit afrikanischem Batik Stoff. Danach wird mein gut getrockneter bestempelter Stoff ebenfalls mit der Folie beklebt, dann mit der Zackenschere ausgeschnitten und nach Lust und Laune aufgeklebt. Alles gut angedrückt hält das einfach bombig und man holt sich keine klebrigen Finger.
As base fabric for stamping I used some beige cotton canvas fabric. Stamped with colors for fabric, of course. Next step is using plastic sheet that is adhesive from both sides to bring one layer of fabric to the cards. For the two cards on the bottom I used a heavy decorators fabric, the red one on the right is cotton bias tape I’d inherited from somebodys grandmother and never used. I just stuck it edge to edge. And in the middle a more „jazzy“ version with African batic fabric. After that I applied the same double sided plastic foil to my stamped fabric, cut it with pinking shears and fixed it on top. Pressing well with fingers and it will last forever. (Okay, some years… but enough for Christmas cards. And unlike glue it doesn’t give you sticky fingers.
Die beiden Karten links sind ein bißchen anders gemacht. Bei der unteren habe ich einfach nur den bedruckten Stoff aufgeklebt und dafür noch ein bißchen Bänder von Kafka dazu geklebt, bei dem oberen habe ich den bedruckten Stoff auf den Basisstoff gelegt und beides gemeinsam geschnitten, so daß der bedruckte Stoff als „Intarsie“ eingefügt wird. Und auch da noch etwas Kafka-Band dazu. Geht ja immer.
The cards on the left were made a little differently. The one on the bottom has only the stamped fabric glued to the card and then got some more decoration with ribbons by Kafka. And for the top one I layered base fabrick and stamped fabric before cutting. So the printed fabric is not on top, but fits precicely in the cut out of the base fabric. Again some Kafka ribbon added. You never can go wrong with that.
Und jetzt habe ich Zeit, mir für meine restlichen Karten wieder was umständliches auszudenken… 😮
And now I have the time to figure out something complicated for the rest of my cards… 😮
Christmas on my mind
 Irgendwie merkt man dann doch, daß Weihnachten naht.
Somehow I can’t deny to feel Christmas coming near.
Als ich überlegte, was ich mit den Resten von Drachenwolle Sockenwolle mit Bambus und Seide machen sollte fiel mir diesmal ganz spontan wieder das Muster Stjärna von Karolina Eckerdal ein. Und diesmal habe ich endlich verstanden, wie das mit der Anschlagreihe gemeint ist, deswegen ist der zweite Stern auch etwas größer…
I was thinking what to do with the remnants of Drachenwolle Sockenwolle mit Bambus und Seide and Stjärna by Karolina Eckerdal popped up in my mind. And this time I finally understood how I was supposed to work the cast on row, this is why the second star is a bit bigger…
Krinkel-Stern-Karten, Teil 3
Crash-Star-Cards, part 3
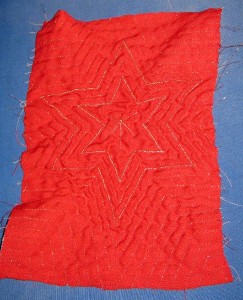 Was jetzt passiert ist, daß das Soluvlies sich unter dem Dampf anfängt zusammen zu ziehen.
What happens now is that the Soluvlies starts to retract under the hot steam.
Und man bekommt einen leichten Krinkel-Effekt.
So the fabric starts to crincle.
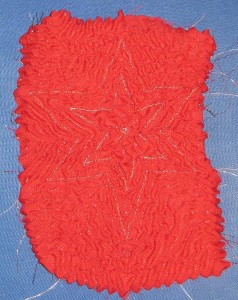 Ja und dann bewegt man das dampfende Bügeleisen einfach so lange über dem Stoff, bis einem der Effekt gefällt.
And then you move your steaming iron over the fabric until you like the effect.
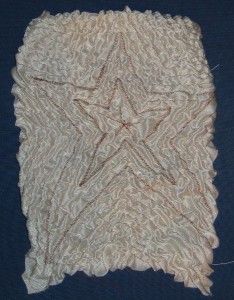 Achtung, wenn es zu viel ist, kann man den Effekt nicht mehr rückgängig machen!
Be carefull, if you steam to much there is no way to „undo“ the effect!
Zur Illustration zeige ich es auch noch mal auf weißer Seide, die photographiert sich plastischer.
As a second example I show the same on white silk, here the effect stands out better on the picture.
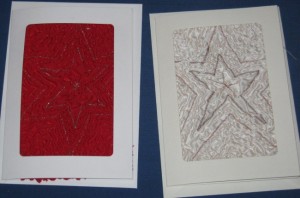 Danach muß man die Stoffstücke nur passend zuschneiden und in eine fertige Passepartout Karte kleben.
Then you cut your fabric and glue it into a passepartout card.
Je nach Stoff und Garn sind die Effekte sehr unterschiedlich. Der rote Stoff war übrigens ein leichter Wollstoff, den ich mal bei Bornstein-Stoffe bestellt hatte. (Ja, die gibt es nicht mehr. Ja, das war lange her. Der Rest des Stoffes war ein Kleid.)
Depending on fabric and yarn the effect turns out differently. The red fabric was a lightweight wool I’d ordered long ago from Bornstein-Stoffe. („Long“ means the company is out of business for quite a while. The rest of the fabric became a dress.)
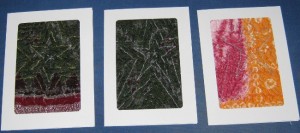 Zum Abschluß noch ein paar andere Beispiele, wie die Karten aussehen können. Die beiden links sind aus dem Rest eines Ikatsaris aus Indien, der rechts aus einem afrikanischen Batikstoff. Diesmal mit silbernem Stickgarn von Alterfil gestickt.
Here some more examples how different cards can look. The two on the left were made from Indian ikat sari fabric, the right one is an african batik. Embroidery was silver thread from Alterfil.
Falls ihr euch davon anregen laßt, selber Karten zu machen, erzählt mir davon oder zeigt sie mir!
If that inspires you to make your own cards then please let me know or show me!
Krinkel-Stern-Karten, Teil 2
Crash-Star-Cards, part 2
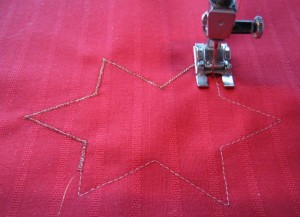
Jetzt wird die Kontur des Sterns mit einem schmalen Zickzackstich abgenäht. Dabei nähe ich genau über die vorherige Naht. Der Zickzackstich sollte zwar eng sein, also eine kurze Stichlänge haben, aber keine ganz geschlossene Raupe. Hier habe ich Madeire Stickgarn in Kupfer benutzt, weil ich das noch hatte. Metallic sieht jedenfalls gut aus dafür.
Now I am oversewing the stitches from the right side of the fabric with a narrow zigzag stitch. The stitchlength should be short, but not as dense as you would normally choose for an appilque or a button hole. Metallic embroidery thread looks usually nice, here I choose some copper embroidery thread from Madeira I still had in my stash from another project.
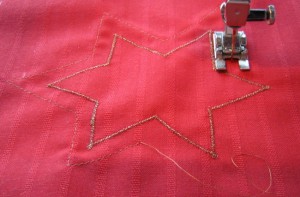 Jetzt benutze ich meine Zickzackkontur um füßchenbreit daneben einemal mit Steppstich herumzunähen. Auch hier gilt, daß die Stichlänge nicht zu kurz sein sollte.
Now I am using the outline as a guide for another round of stitching, here with a straight stitch. Again the stitch length should not be too short.
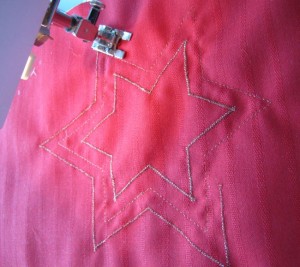 Die nächste Runde wird dann noch mal mit Zickzackstich genäht.
Next round is a zig zag stitch again.
Danach nähte man immer im Steppstich in Runden um den Stern herum und folgt der Kontur des Sterns. Bis sozusagen kein Stoff mehr da ist.
Afterwards you continue in rounds around the star with straight stitch only. Always following its contours. Until you run out of fabric.
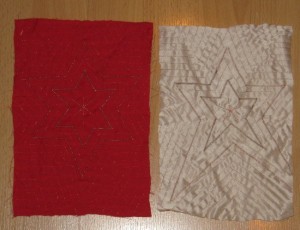 So sieht das ganze dann aus, wenn man fertig ist.
That’s the way it looks after you’re finished.
In die Mitte habe ich noch einen Stern aus sich kreuzenden Linien genäht.
In the middle I’ve sewn crossing lines that also mimics a star.
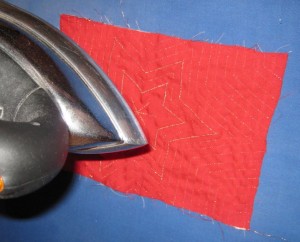 Jetzt kommt das Bügeleisen zum Einsatz. Sehr kräftig dampfen, aber dabei den Stoff nicht berühren…
Now it’s all up to the iron. Steam as much as possible, but don’t touch the fabric with the sole of the iron…
So… jetzt könnt ihr entweder selber ausprobieren was passiert oder ihr müßte warten, bis ich Zeit für den dritten Teil habe. 😉
Now you can either try yourself what happens… or you wait until I have the time to write part 3 of the story. 😉
Krinkel-Stern-Karten, Teil 1
Crash-Star-Cards, part 1
Da ich auf meinem Rechner gerade die Bilder gefunden habe, zeige ich jetzt mal eine weitere Möglichkeit, aus Stoffresten Weihnachtskarten zu basteln. Diesmal braucht man außer Stoffresten: einen Bleistift, Vlieseline Soluvlies, Sprühzeitkleber, bevorzugt Maschinenstickgarn (Nähgarn geht technisch auch, aber Stickgarn sieht besser aus) sowie ein Bügeleisen mit viel Dampf.
I just recovered some pictures on my computer so I’ll show you another possibility to transform random fabric scraps into Christmas Cards. Apart from the fabric scraps you need: a pen, Vlieseline Soluvlies (In some countries the products are sold unter the brand name „Pellon“, it might be „Wash N Gone“ but I can’t tell for sure from the website. It’s a non woven water soluble stabiliser. If you can’t get „Soluvlies“ please test first, if the desired reaction happens!), temporary spray adhesive, machine embroidery thread if possible (sewing thread works also, but embroidery thread looks nicer) and a steam iron that steams well.
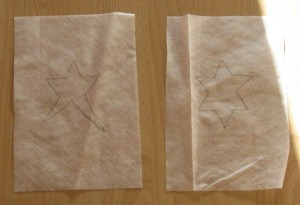 Zunächst schneidet man ein Stück Soluvlies zu. Es sollte deutlich größer sein, als die Karte später. Besonders gerade muß man nicht schneiden, am Ende wird ohnehin alles begradigt. Darauf zeichnen wir ungefähr in die Mitte mit Bleistift einen Stern. Man kann sich eine Schablone für gleichmäßige Sterne machen oder frei Hand zeichnen.
You cut a piece of Soluvlies a good deal bigger than the intended card. You don’t need to take care for cutting straight, we will cut back in the end. Then you take the pencil and draw the outlines of a star in the middle. If you like a regular shape you can use a stencil or you just draw it as you feel, irregular looks often more dynamic.
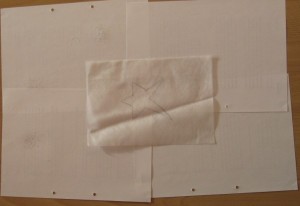 Danach bedeckt man seine Arbeitsfläche gut mit Papier, legt das Soluvlies mit der unbemalten Seite nach oben drauf und verpaßt ihm einen leichten (!) Sprühstoß aus dem Sprühzeitfixierer. (Keinen dauerhaften Sprühkleber, sondern solchen, dessen Klebewirkung nach einiger Zeit von selber verfliegt!)
Then cover your working environment well with paper, put the piece of Soluvlies in the middle, the side with the drawing on is facing downwards. Now give it a light spray from your temporary spray adhesive. (And make sur it is a temporary one, not real glue!)
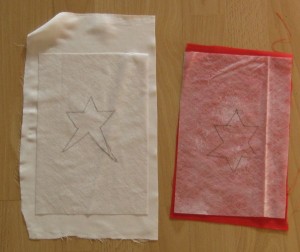 Dann braucht man Stoffstücke, die etwas größer als die Soluvlies Stücke sein sollten. Da klebt man die vorbereiteten Soluvlies Stücke auf die linke Stoffseite.
Now you need some fabric scraps that are a bit bigger than your pieces of Soluvlies und you adhere the Soluvlies to the left side of the fabric.
Danach kommt die Maschine dran, Stickgarn für den Oberfaden ist schöner und mit Sticknadeln läuft es auch besser. Im Unterfaden kann man hingegen auch Nähgarn nehmen, da ist es egal.
The thread your sewing machine with machine embroidery yarn and if you have take an embroidery needle. For the bobbing you can take any sewing thread, it doesn’t matter there.
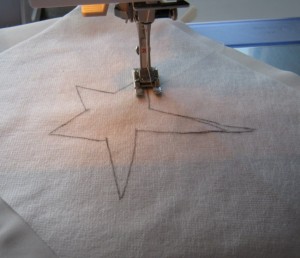 Danach näht man die Kontur des Sterns erst mal von der Seite mit dem Vlies her ab. Dabei eher lange Stiche nehmen, aber trotzdem die Ecken genau treffen. Also ggf. vor den Ecken die Stichlänge wieder etwas reduzieren.
Now choose a longer straigh stitch and sew the contours of your star from the side with the Soluvlies. To make sure to match the edges exactely reduce the stitch lenght when approaching the the „turning points“.
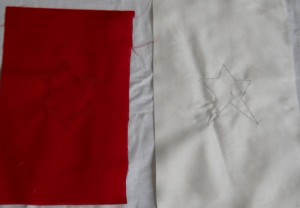 Wenn man die Stoffstücke jetzt umdreht, ist der Umriß auf der rechten Seite gut sichtbar. (Einmal auf ein Bild klicken bringt übrigens eine größere Version…)
Now turn your fabric. The star is well visible on the right side of the fabric. (Clicking on a picture shows you a bigger version…)
Und sobald ich wieder Zeit habe, geht es weiter… 😉
And as soon I have the time to continue writing, I’ll show you how to proceed… 😉
Pariser Vorweihnacht
Christmas Preparations in Paris
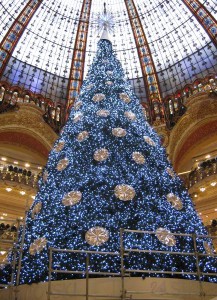 Dieses Jahr bekomme ich den Pariser Weihnachtsschmuck ja leider nicht mit, weil mein letzter Besuch für dieses Jahr schon im Oktober war. Aber eine kleine Vorschau gibt es doch, in den Galeries Lafayette war man nämlich schon dabei, den Weihnachtsbaum aufzubauen… 😀
This year I won’t see the Christmas decoration in Paris because my last visit for this year was in october. But I got a little preview, the Galeries Lafayette were already installing the christmas tree… 😀
Merry Christmas!
Ja, es ist schon so weit. Mit meinem Weihnachtsstricken bin ich fertig. 🙂 (Okay, das liegt an der geringen Anzahl der gestrickten Geschenke…)
Yes, it’s about time. I’ve finished my christmas knitting. 🙂 (Okay, two items… not really great achievement…)
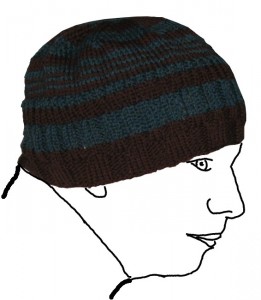 Da mein Bruder seine letzte Mütze ja den Motten geopfert hat (bzw die Hälfte davon, die Biester haben nur das teurere und weichere Garn rausgefressen) gibt es dieses Jahr eine neue.
Since my brother had his last hat eaten by moths he’ll get a new one this year. (Btw the moths ate only the softer and more expensive yarn out of the striped hat…)
Ich suchte was mit etwas Struktur, aber nicht so viel Schnickschnack und da gefiel mir „Strib Hat“ von Kelly Williams ins Auge. Nur habe ich die Streifen an mein Garn angepaßt. Und habe gemäß meinen eigenen Mützenerfahrungen 112 Maschen angeschlagen.
I had been looking for a pattern with some texture, but no „chichi“ and the „Strib Hat“ by Kelly Williams was perfect for me. Only changes I made was casting on more stitches (112) according to my own experience with hats and my gauge and I also changed the stripes according to my yarn.
Als Garn habe ich „Zenith“ von di.Vé aus einer Grab Bag von WEBS genommen und in der Maschenkunst noch ein Knäuel „Sportwool“ von Filatura die Crosa in Grün dazu gekauft. Ergebnis gefällt mir schon mal und hat außerdem Garn von meinem Vorrat verbraucht. Dann hoffe ich mal, daß es dem Beschenkten auch gefallen wird. Und die Motten nicht so schnell wieder drüber herfallen…
Yarn I used was „Zenith“ by di.Vé from my WEBS grab bag and added green „Sportwool“ by Filatura di Crosa. I like the result and I could use from my stash. So I hope the receiver will like the hat also. And I hope the moths will not eat it up so quickly…
Es weihnachtet…
Christmas is around the corner…
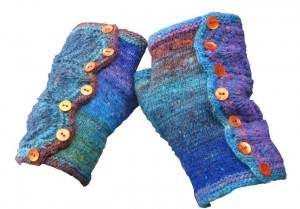 Ich habe nämlich mein erstes Weihnachtsgeschenk schon fertig. 🙂
I’ve finished my first christmas gift. 🙂
Das Strickmuster sind die bewährten Spatterdash Wristwarmer aus einer knitty vom letzten Jahr, gestrickt wieder mit Noro Kureyon Sock, dem Rest von meinen, um genau zu sein.
The pattern is Spatterdash Wristwarmer from knitty, as yarn I was using the rest of the Noro Kureyon Sock that I had used for mine.
Diesmal mit einem etwas andere Touch, durch die orangenen Knöpfe von Entrée des Fournisseurs in Paris.
This time I used orange buttons from Entrée des Fournisseurs in Paris and I think they give the yarn a completely different look.
Und so schön sie sind… ich glaube, jetzt habe ich sie oft genug gestrickt. Der nächste, der sie begehrlich anschaut, der strickt sie sich selber. 😮
I still love the pattern… but I think three times is enough. The next one who gives them longing looks can knit them herself. 😮

