The mysterious yeast dough…
Da es im Moment gerade nichts sehenswertes aus der Strick- oder Nähkiste gibt, mir aber erst in der letzten Woche wieder zwei gestandene und erfahrene Hausfrauen über den Weg gelaufen sind, die noch nie Hefeteig gemacht hatte, weil sie ihn so schwierig fanden werde ich mich diesmal einem Küchenthema widmen. Zumal ja gerade Zwetschgenkuchenzeit ist und dieser ja wohl bitte nur mit Hefeteig den richtigen Zwetschgendatschi gib. 😉
I have nothing to show sewingwise or knittingwise at the moment. But here it is high season for „Zwetschengendatschi“ (which is a cake with a special kind of plums) which normally is made on the base of a yeast dough. And only this week I talked to two experiencend wifes and mothers who told me they never made it because they considered it so compicated and difficult. So for today I’ll talk kitchen.
Wie ich das meistens mache, werde ich nicht nur zeigen, was ich tue, sonern erst mal versuchen zu erklären, warum das so ist und wie Hefeteig grundsätzlich funktioniert: Die einfachste Basis eines Hefeteigs ist Mehl, Hefe, Wasser und etwas Zucker. Locker wird der Hefeteig durch die Hefe. Hefe sind Plize, die mit etwas Zucker und Wasser bei Wärme anfangen zu gären. Durch die Gärung entstehen Gase, diese wiederum sind dann als Bläschen im Teig eingeschlossen. Beim Backen wird die Luft in diesen kleinen Luftbläschen dann warm, dehnt sich aus und es bleiben dann größere Lufträume als Poren im fertigen Gebäck. Dadurch geht das Gebäck beim Backen auf (wird größer) und ist hinterher locker und gut zu essen, nicht steinhart.
I’ll try to explain first how yeast dogh works in general: The basic ingredients are flour, yeast, water and a bit of sugar. Yeast is a living organism and if you „feed“ it with sugar and add warmth and water it will start to ferment. Fermentation produces gas which is enclosed as tiny bubbles in the dought. While baking the air in the bubbles will extend because of the heat, the dough will rise. And after baking you have pores that make your cake (or bread) taste fresh and light.
Die Grundzutaten, also Mehl, Hefe, Wasser und etwas Zucker kennen wir als Pizzateig oder von Fladenbroten. Zusätzlich kann man auch noch Fett und Ei zugeben. Durch Fett wird der Teig saftiger und weniger trocken, auch Eier machen den Teig saftiger, gehaltvoller und tragen zum Geschmack bei. Gleichzeitig wird der Teig aber „schwerer“, je mehr Eier und Fett im Teig sind, desto weniger geht er auf. Wasser hingegen benötigt man zwar, um das Mehl zu einem Teig zu verbinden, aber es macht am Ende das Backwerk trocken. Denn das Wasser verdunstet beim Backen wieder. Verwendet man Fett und Eier, um den Teig zu binden, benötigt man entsprechend weniger Wasser und der Teig wird nicht so schnell zu trocken und schmeckt auch nicht so schnell altbacken. Bei süßem Gebäck ersetzt man Wasser gerne durch Milch.
The basic ingredients, flour, yeast, water and a bit of sugar we know from pizza dough or some flat breads. Fat and eggs are often added. Fat makes your baked good less dry, also eggs add moisture. And taste. On the other hand the dough gets heavier the more fat and eggs you add. so it’ll rise less. Water on the other hand is necessary to make the flour into a dough. But it will evaporate in the baking process so the more water you add to the dought the drier the result will be after baking. This is why you use fat and eggs to make the flour into a dough. The more fat and eggs you use, the less water you need and the less dry your cake will be and also it will not taste stealth as quickly as if you only use water. For cakes and other sweet bakery water is often replaced by milk.
Hefeteig zu machen ist keine Zauberei, es gibt auch viele Wege, die zum Ziel führen. Ich habe auch etliches ausprobiert, bin aber zu der Technik zurückgehrt, mit der schon meine Oma Hefeteig gemacht hat. Ich mag das Ergebnis so am liebsten und es funktioniert am zuverlässigsten. Es klingt vielleicht manchmal kompliziert, ist es aber nicht. Und auch wenn die Gesamtzeit der Zubereitung ein wenig länger ist besteht sie doch hauptsächlich im Warten. Und da kann man was anders machen. Nähen zum Beispiel. 😉
To make yeast dough you don’t have to be a genius and there are different ways to do it. I’ve tried several ones, but in the end I returned to how my grandmother made it. I prefer the result that way and for me it works reliably that way. It may seem complicated but it really isn’t. And even though the prepration time is a little longer it does not mean you have to work all the time. Most of it is waiting for the fermentation to take place. While you are doing other stuff, like sewing. 😉
Am besten fängt man damit an, daß man Eier, Butter und Hefe schon eine Weile vor dem Backen aus dem Kühlschrank holt, damit sie Zimmertemperatur bekommen. Wenn man das vergißt ist es aber auch keine Katastrophe der Teig braucht nur länger, bis er aufgeht.
You start with getting your ingredients like eggs, butter and fresh yeast out of the fridge some time before you start. It works best at room temperature. But if you forget to do so it’s no problem either. Fermentation will just take longer.

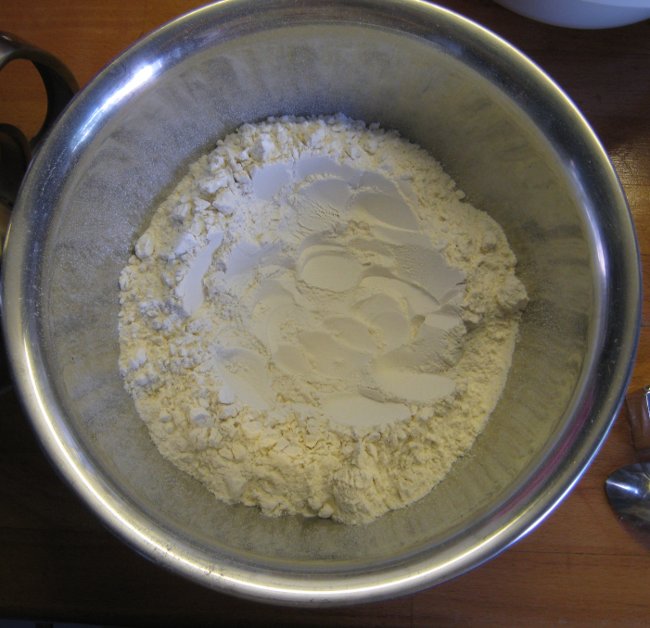
Das Mehl wird in eine Schüssel gesiebt. Man kann das Sieben auch weglassen, etwas lockerer wird der Teig aber, wenn man das Mehlsieb benutzt. (Oder ein Gemüsesieb und einen Löffel zum durchtreiben, falls man kein Mehlsieb hat.) In die Mitte meines Mehles forme ich mit einem Löffel eine Kuhle.
You take your flour and sieve it into a bowl. If you don’t have a flour sieve you can either take any other mesh that is fine enough to work and a spoon to „rub“ the flour through or you use the flour without sieving. Your cake will be a little less airy, but it will work, too. Then you take a spoon and make a hollow in the middle of your flour.
Ich benutze normales Weizenmehl, Dinkelmehl funktioniert ziemlich genauso, wenn man Vollkornmehl benutzt, dann sollte man mehr Flüssigkeit zufügen. Für einen Blechkuchen benötigt man etwa 500g Mehl, ich habe hier nur 300g genommen, das gibt eine recht dicke Teigschicht für eine Springform.
I am using standard wheat flour (no self raising, please), spelt works the same. If you take wholemeal you’ll need more liquid later. For a baking tray of cake I’ll need 500g of flour, for a springform pan 250g – 300g are enough. I used 300g here, that makes a thick layer of dough.
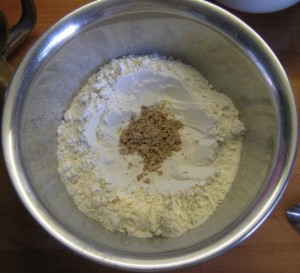 Als nächstes kommt die Hefe. Ich benutze die handelsüblichen 42g Hefeblöckchen aus dem Kühlregal. (Die billigen funktionieren übrigens keinen Deut schlechter als Dr. Oetker…) Ein Hefewürfel reicht für 500g-1000g Mehl. Als Faustregel kann man sagen, je mehr Fett und Eier man im Teig hat, desto mehr Hefe. Für einen Kuchenteig rechnet man also 500g Mehl auf einen Würfel Hefe, wenn man Hefebrot backen möchte, kann es auch mehr Mehl sein, wenn man dann weniger Fett und Eier nimmt. (Man muß aber nicht mehr mehr nehmen…) Ich habe hier etwa einen halben Würfel genommen und diesen in die Kuhle hineingebröselt.
Next step is the yeast. I am taking fresh yeast which here comes in small packages of 42g and can be found with the refrigerated goods. One package is supposed to raise 500g – 1000g of flour. So if you have other package sizes available or ask for how much flour they are supposed to last. If you have more fat and eggs, the yeast will raise less flour. So here I have a cake that will get more fat and eggs, so I will count one package for 500g. If you make bread which uses less fat and eggs you can use more flour. (But you don’t have to…) Here I’ve used about half a package of yeast and crumbled it into the hollow.
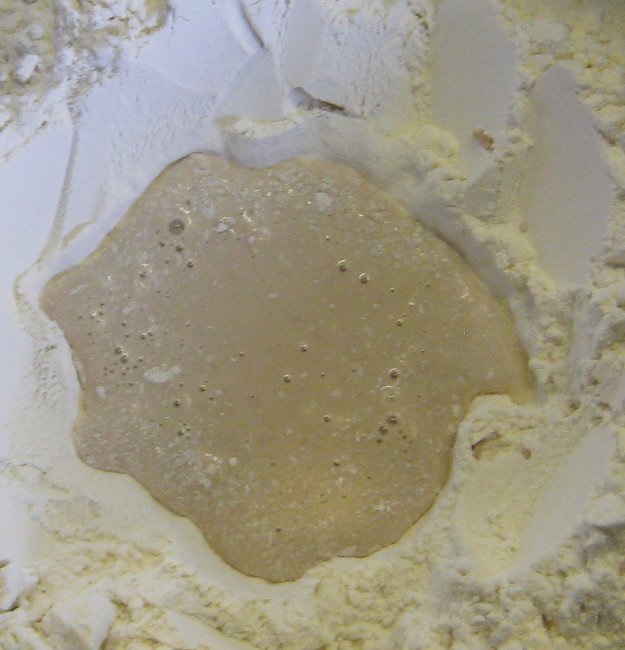
 Zur Hefe kommt ein halber Teelöffel Zucker (um die Gärung zu starten) sowie warme Flüssigkeit. In diesem Fall Milch. Je wärmer die Milch, desto schneller die Gärung. Allerdings ist Hefe ein lebender Organismus, wenn die Flüssigkeit zu warm ist, dann stirbt die Hefe und es gibt keine Gärung. Ich mache die Milch gerne etwa handwarm, eine Microwelle ist hier hilfreich. Alles zwischen 30°C und 38°C funktioniert nach meiner Erfahrung gut. Ist die Milch kälter kann man lange auf die Gärung warten, ist sie deutlich wärmer kann es sein, daß sie stirbt und dann gärt da nichts mehr. Die Menge ist an dieser Stelle nicht so kritisch, einfach ein wenig hineingießen, wenn es nicht reicht, kann man jederzeit nach schütten.
Now I am adding half a teaspoon of sugar (to start fermentation) and some warm liquid, here it is milk. Warm milk assures a quick and good fermentation, but yeast is a living organism, if the temperature is too high it will die. If the milk feels hand warm it is usually okay. (Microwave comes handy to warm the milk a bit.) Between 30°C and 38°C works normally fine, if the temperature is lower you’ll have to wait long for the fermentation, if it is much higher your yeast can die and there will be no fermentation. How much liquid you add doesn’t matter that much. Just pour a bit and if you find out it isn’t enough to dissolve the yeast add more in the process.
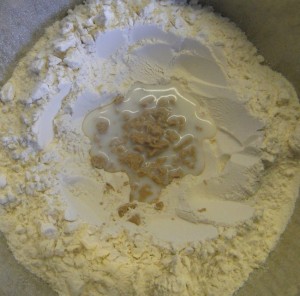
 Nun nimmt man einen Löffel und mischt vorsichtig, bis sich Hefe und Zucker gelöst haben. Dabei mischt man schon ein bißchen Mehl mit hinein. Das Ergebnis ist ein noch recht flüssiger Brei. Die Temperatur meiner Milch war offensichtlich gut, denn man sieht im Bild schon die ersten Gärbläschen.
Now you take a spoon and start mixing milk and yeast until sugar and yeast are completely dissolved. Doing this in the hollow of your flower assures that you are already mixing in a bit of flour also, which is good. The reasult is quite slurry. No liquid, but nor a firm dough either. The temperature of my milk was evidently good, because the bubbles show that fermentation started instantly.
Das Ergebnis nennt man „Teiglein“ oder „Vorteig“. Er dient zum einen dazu, zu sehen, ob die Hefe in Ordnung ist und der Gärprozess zustanden kommt. Zum anderen ist meine Erfahrung, daß der Teig später im ganzen gleichmäßiger aufgeht, wenn man die Hefe erst mal im Kleinen „arbeiten“ läßt.
What you have here is often called „Teiglein“ in German, It is a kind of a „pre-dough“. There are two reasons to make it: For once you can check if the yeast is okay and if the fermentation works properly before you add all other ingredients. Secondly my experience tells me that the fermentation in the end is more regular over the whole dough if you give the yeast time to develop before you add all the other ingredients.
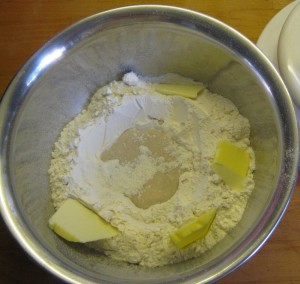 Jetzt schnippt man mit dem Rührlöffel ein wenig über den Mehlrand, so daß etwas Mehl über den Vorteig stäubt. Auf dem Mehlrand kommt eine Prise Salz und die Butter wird vorsichtig darauf abgelegt. Beides darf nicht mit dem Vorteig in Berührung kommen! Die Butter bekommt so die passenden Temperatur.
Now you „snip“ with your spoon over the rim of the flour border so some flour will cover the pre-dogh. Then add a pinch of salt on the flour border and pieces of butter. Both should not touch the pre dough! This makes sure the butter will have the right temperature later.
Was die Buttermenge betrifft arbeite ich mit 50g – 100g Butter auf 500g Mehl. Je nach dem, wie schwer er werden soll. diesmal habe ich auf meine 300g Mehr etwa 40g Butter genommen, also ziemlich viel. Da wir nur zu zweit sind, essen wir keinen ganzen Kuchen an einem Tag und mit mehr Butter schmeckt er länger gut. Außerdem kommen Zwetschgen drauf, die selber ja kein Fett enthalten. Wenn ich eine Mandel-Butter Belag machen würde oder wenn ich süße Brötchen haben will, die hinterher noch mit Butter bestrichen werden würde ich eher weniger Butter nehmen. (Und man darf sich gerne ins Gedächtnis rufen, daß die Buttermengen im Vergleich zu den meisten anderen Kuchenteigen immer noch sehr gering ist.)
For butter you count 50g – 100g with 500g flour. Here I took 40g of butter with my 300g flour, so quite a lot. One reason is that we are only two and won’t eat a cake in one day, more butter makes it last longer without going stealth. Also I will put fruit in top which contain no fat at all. If I made a topping of almonds and butter I’d use less butter in the dough. Or if I’m making sweet buns which will have spread butter on them I’d also use less fat. (And whatever: compared with most other doughs for cakes, cookies or muffins yest dough contains few fat.)
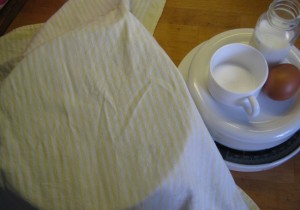 Anschließen bedecke ich die Schüssel mit einem Küchentuch, damit der Vorteig in Ruhe gehen lassen kann. Unter dem Tuch ist er vor Zugluft geschützt und die durch Gärung entstehende Wärme wird besser gehalten.
Now I take a tea towel and cover my bowl. The pre dough is protected from draft and since fermentation produces heat also this will be kept well.
Die Zeit fürs Gehen lassen des Vorteigs hängt von der Umgebungstemperatur ab, grob gesagt zwischen 10 und 20 Minuten, je nach dem, ob ich 25°C oder 38°C im Zimmer habe. Wenn die Küche kühl ist, kann man ihn auch gerne in ein wärmeres Zimmer stellen. Das gehen lassen im Ofen zu beschleunigen ist riskant, denn da ist die Hefe schnell tot. Und wenn man nicht nach genau 20 Minuten Zeit hat, sich den Teig wieder zu widmen? Nicht schlimm…. gärt er halt weiter…
Now you can take a break and do something else for about 10 – 20 minutes. Depending on the temperature of the environment. Anything between 25°C and 38°C works. If you think about putting the bowl in the oven to speed fermentation: better not, the risk is very high that the yeast will be killed and fermentation will stop. But you can move the bowl carefully to a warmer room in your house, if the kitchen is cool. And if you do not have the time to return after exactly 20 minutes? Doesn’t matter… fermentation will go on. Nothing to worry about.
Wie man sieht habe ich mir auch schon Ei, Milch und Zucker bereitgestellt. Denn Milch und Ei sollten ja auch nicht zu kalt sein. (Schon wieder ein ziemlich langer Artikel. Ihr müßt vom Lesen müde sein. Zumindest bin ich es vom Schreiben… deswegen beim nächsten Mal mehr.)
And as you can see I’ve also already prepared milk, egg and sugar. Because milk and sugar should have room temperature before I go on. (Long article already… you must be exhausted from reading. At least I am from writing… so next time more.)

 Nach einer gewissen Wartezeit wendet man sich dem Teig wieder zu und zieht das Tuch wieder weg.
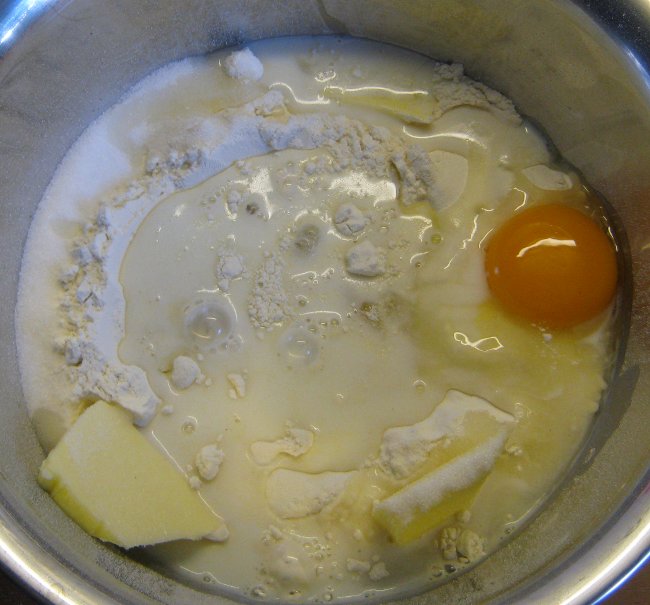 Dann kommen die restlichen Zutaten in den Teig. Zucker, Ei und Milch. Zucker rechnet man 50g – 100g auf 500g Mehl. Wenn man einen sehr süßen Belag hat, dann eher weniger Zucker, hat man eher säuerliche Früchte oder möchte den Kuchen ohne weiteren Belag essen, dann eher mehr Zucker. Letztlich aber ganz nach Geschmack. Eier rechnet man 1 – 2 auf 500g Mehr, je nach Geschmack. (Wer kein Ei mag oder veträgt nimmt etwas mehr Milch und Fett und läßt das Ei weg.) Und bei der Milch kann man 1/8 – 1/4l auf 500g Mehl rechnen. Das hängt einmal davon ab, wie viel Fett und Ei man drin hat und auch ob der Teil lieber etwas weicher oder etwas fester werden soll. Die Milch darf auch gerne wieder etwas angewärmt sein. Und keine Angst, wenn man hinterher den Teig zu weich findet… einfach noch etwas Mehl einkneten. Hefeteig nimmt das nicht übel.
 Jetzt wird gerührt. Ich habe die Knethaken vom Rührgerät genommen, ein Kochlöffel tut es aber auch. Oder man nimmt gleich die Hände.
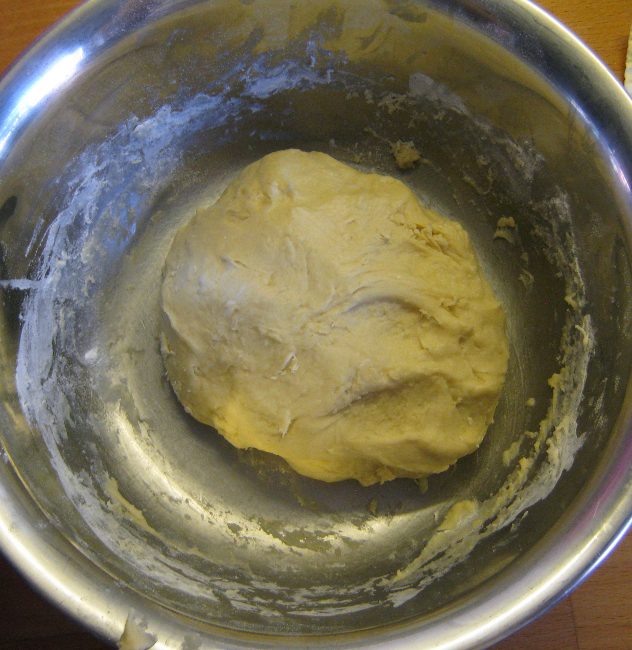 Dann wird aber noch weiter geknetet. Entweder mit dem Rührgerät oder mit den Händen. Am Ende nehme ich immer die Hände. Dabei spüre ich auch, ob der Teig nicht zu sehr klebt. Ich tauche meine Hände in Mehl, knete eine Zeit, wenn der Teig noch klebt, dann nehme ich wieder etwas Mehl, knete das ein,.. so lange bis ich eine nette Kugel habe, die auch nicht mehr arg an den Fingern klebt.
 Dann kommt wieder das Tuch drüber und man wartet. Etwa eine Stunde. In der Zeit darf man die Schüssel gerne in einen warmen Raum stellen. Wenn es warm ist geht der Teig schneller, wenn es kühl ist dauert es ein wenig länger. Und wenn man keine Zeit hat, gleich weiter zu machen, dann kann man den Teig auch etwas länger stehen lassen.
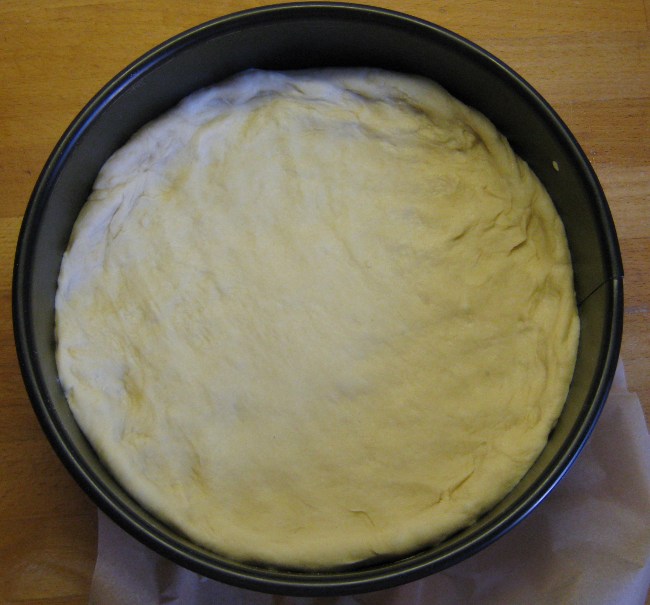 Und den kann man weiter verarbeiten. Ausrollen, formen,…. wie man mag.
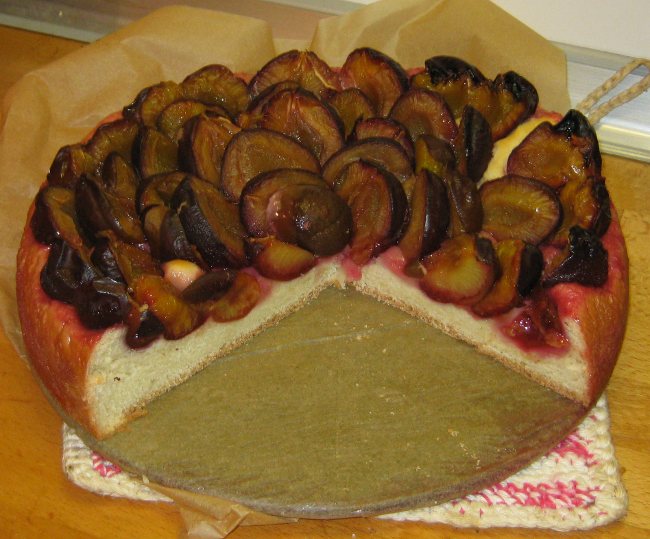 Etwa 40 Minuten bei 180°C später sieht das dann so aus: