A granted wish will bear new ones…
Letztes Jahr hatte ich zu Weihnachten ja diese Handwärmer verschenkt. Und was kommt? Genau, für den Hals sollte es doch bitte auch noch was Warmes geben. Ende November geäußert wird das doch sicher noch was, ne?
One of my last years gifts were those handwarmers. And next? Yes, something warming for the neck would be nice. And if I am told that end of november I will be able to do it for christmas, right?
Zum Glück hatte ich gerade wirklich nichts dringendes auf der Nadel. Und nachdem mir klar wurde, daß ich ja nicht mit „Kureyon Sock“ stricken muß, sondern was dickeres nehmen kann, dachte ich, es wäre einen Versuch wert. (Nachdem ich den Wunsch eh schon kategorisch für 2013 abgelehnt hatte.)
Okay, there was nothing urgent on my needles. And when I realized, that I needen’t take „Kureyon Sock“ but could choose a thicker yarn I decided to give it a try. (After I had categorically rejected that wish for 2013.)
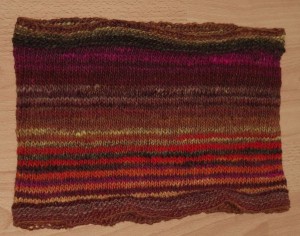 Also zwischen Sitzung und Weihnachtsfeier in die Casa Lana gesprintet (nicht mein Lieblingsladen, ist aber vom Büro aus ein Katzensprung), aus dem Noro „Kureyon“ Regal zwei scheinbar unterschiedliche, sich aber ergänzende Knäuel rausgefischt und ab.
So between office and office Christmas party I jumped into Casa Lana (which is not my favorite yarn store, but has the charme to be very close to the office), picked two balls of the Noro „Kureyon“ rack which seemed to be different, but working with each other and on I went.
Die beiden Garnknäuele entpuppten sich dann als die gleiche Farbe, auch recht. Stricken war einfach: Mit 4mm Rundnadel 130m anschlagen, 8 Runden abwechselnd eine Runde rechts, eine Runde links mit dem ersten Knäuel stricken, ab dann glatt rechts, abwechselnd zwei Runden mit dem einen Knäueln, zwei Runden mit dem anderen, bis Knäuel 1 aufgebraucht ist (bzw für keine zwei Runden mehr reicht), anschließend noch mal 8 Runden rechts und links im Wechsel mit Knäuel 2, abketten, fertig. Angefangen Donnerstag, fertig gestrickt am Sonntag (da war ein verhocktes Wochenende dabei) und bis zum nächsten Donnerstag war es dann vernäht und einmal im Handwaschgang der Maschine gewaschen. Die Kureyon wird dann doch deutlich fluffiger und weicher. Eine echte Weihnachtsüberraschung in nur einer Woche!
Both skeins claimed to be the same color (well.. Noro, you know…). Knitting was very easy: With 4mm circs casting on 130 stitches, 8 rounds garter stitch with skein 1, then in stockinette 2 rounds with skein 2 and 2 rounds with skein 1,… until skein 1 is used up (or has not enough left to finish 2 rounds, 8 rounds in garter stitch with skein 2, bind off, finish. Casted on on a Thursday, finished knitting on Sunday (there was a weekend of sitting and talking between) and until next Thursday the ends were woven in and th cowl had been washed in the hand wash programm of the washing machine. (Kureyon gets way fluffier when washed.) So a real Christmas surprise in one week!

