Blitz-Bügel-Bäumchen

Quickly Pressed Christmas Trees

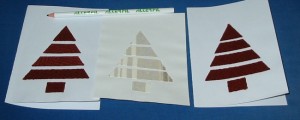
WeihnachtskartenMeistens brauche ich Möglichkeiten, schnell Weihnachtskarten zu Basteln. Und ich versuche, mit vorhandenem Material zu arbeiten und nicht vor allem mit extra gekauften Weihnachtsstoffen.

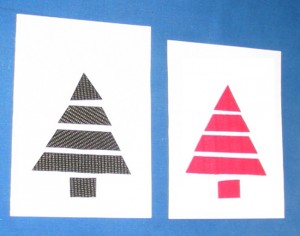
Diese stilisierten Bäumchen waren vor zwei Jahren das Ergebnis meiner Überlegungen.

Mir gefiels, die Empfänger haben sich auch alle gefreut und man braucht nur einige Stoffreste, Vliesofix und Karton für Karten. Und ein Bügeleisen. Die werden auch in letzter Sekunde noch fertig und man kann wirklich jeden Stoff nehmen, der einem farblich gefällt, gerade dickere Wollstoffe geben eine schöne Struktur. Und wer es bunt mag, nimmt farbigen Karton als Grundlage.

Und wer es im Gegensatz zu mir nicht so gerne grafisch und kitschfrei mag, der kann natürlich auch noch Pailetten oder Strass aufkleben, Glitter drüberstreuen oder was auch immer. 🙂

Wer es dann ganz genau wissen will: Hier ist die Anleitung für die Blitz-Bügel-Bäumchen.

WeihnachtskartenIf you are like me you will need last minute Christmas Cards that are supposed to be quick to make. Those fulfill the requirements. You only need Vliesofix/ Bondaweb, some fabric scrabs, cards and our iron.

Those I made two years ago and they were not only super quick, the recipients liked them also. That they are quite kitsch-free and more on the graphic side is another plus for me.

They work with any fabric, but paticularily well with thicker, struktured fabrics like coat wool. You can choose the colors as you like and if you want it more colorful use cards in different colors. (For those who like more kitsch: yes, you can add other decoration and glue on pearls, glitter or whatever.)

Detailed instructions are in the file above, but only in German. But basically you draw a equilateral triangle and a small square on the Vliesofix, press that to your fabric, cut out the shapes, but the triangle in stripes and press it to the card with some distance between the stripes. That’s all. (There are pictures in the instruction file, so look at it and if something isn’t clear yet feel free to ask in the comment section.)

Dark Glam

Ich hatte mal wieder fast ein ganzen Knäuel Wolle von Tortora übrig und Lust auf noch eine graue Mütze. Es schwebte mir was leichtes vor, lässig und eher slouchy, mehr für die Übergangszeit als für den Winter. Und nachdem ich das angefangene Knäuel, das natürlich nicht mehr genug für eine Mütze war, einige Wochen auf dem Schreibtisch ständig vor meiner Nase hatte machte es “Pling”.

Again I had a nearly whole skein yarn left over (from Tortora) and I felt like yet another grey hat. I wanted something airy, slouchy, nor really for winter but for cool autumn and spring days. The “I am not enough for another hat” skein sat on my desk for some weeks and while I was staring at it nearly every day the inspiration hit me.

Slouch/ Mütze Dark GlamIch hatte doch noch einen Rest Lace Garn, auch Alpaka, in der gleichen Farbe! Und damit das grau nicht zu langweilig wird… da war doch noch der M30 Zierfaden von Alterfil in silber… steht nirgendwo, daß man mit Nähgarnen nicht auch stricken darf, oder? 🙂 (Die anderen beiden Garne, “Alpaca Andes” von katia und “Alpaca 1” von Isager gibt es bei der Maschenkunst. Daß die Farben so exakt passen ist natürlich Glück.)

Didn’t I have another left over in grey alpaca from a lace project? And since grey alone might be a little dull I dug into my sewing threads and came up with some metallic silver M30 Zierfaden by Alterfil. There is no law against knitting with sewing thread, isn’t it? (The other yarns, “Alpaca Andes” by katia and “Alpaca 1” by Isager can be purchased at Maschenkunst. That the colors match perfectly was a nice coincidence.

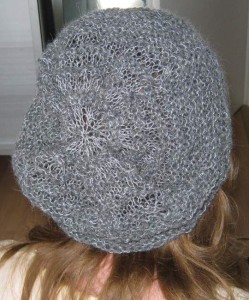
Slouch/ Mütze Dark GlamDann noch ein paar Abende mit einem Nadelspiel in 5,5 gearbeitet und fertig war die Mütze. Dichte und transparente Streifen wechseln sich ab, genau wie ich es wollte.

(Für Mützen sollte ich mir allerdings endlich mal ein Spiel mit langen Nadeln in der Stärke besorgen. Auf den kurzen war es doch etwas lästig…)

Add some evenings with a set of 5.5mm dpns and the hat was finished. Alternating dense and transparent stripes, exactely how I wanted it.

(Next time I’m knitting a hat with this needle size I should not forget to buy long dpns. Knitting the thick yarn on the short needles was not so nice.)

Und wie oft habe ich auch diesmal die Anleitung aufgeschrieben, es ist wirklich ganz einfach und schnell gemacht: Anleitung für “Dark Glam”.

(Wie immer für den privaten Gebrauch kostenlos, für alles andere vorher fragen. Der Verkauf von nach diesen Anleitung gefertigten Artikeln, der Verkauf der Anleitung selber oder die Verwendung der Anleitung in Kursen sind selbstverständlich kein privater Gebrauch mehr. Außerdem ist es mir lieber, wenn ihr den Link auf die Anleitung hier im Blog weiter gebt, statt einfach Kopien zu machen. Danke!)

And here is the pattern, it’s really easy: Pattern for “Dark Glam”.

(Like always: The pattern is free for private use. Anything else: just ask before. Selling items made after this patter, selling the pattern or using the pattern for classes are not considered private use. If you like the pattern and want to pass it on I prefer if you pass the link to the pattern in the blog, instead of making copies. Thank you!)

Zickentasche

Little Bag Pattern

ZickentascheDiese Tasche(n) für zwei Mädels im besten “Zickenalter” entstanden schon im Mai/Juni (und wurden auch mit Freude aufgenommen), aber die Anleitung zusammenzustellen hat ein bißchen gedauert.

I made those little bags/purses already earlier this summer (and they were received with joy) but it took my a while to make the pattern.

Der Schnitt ist super um auch Reste zu verwenden oder mit Bänder, Spitzen und Stickereien zu spielen (wenn man das mag). Die Taschen sind gefüttert und werden mit einem stoffbezogenen Druckknopf geschlossen.

Der Schnitt kommt mit einer Kurzanleitung und ist nicht unbedingt für komplette Anfänger geeignet, weil man doch so einiges in Kurven  einpassen muß.

Wer es trotzdem versuchen mag: Hier geht es zum Schnitt für die Zickentasche. 😉

The pattern is nice to use remnants and scraps of fabric and if you want you can decorate with buttons, beads, lace, embroidery,… as heavy as you like or not. The bags have lining and are closed with a fabric covered snap.

The pattern has only German instructions, but if you have questions just ask. If you want to try anyhow: Here’s the pattern for “Zickentasche” .

Wie immer ist der Schnitt für den privaten und nicht kommerziellen Gebrauch kostenlos und wenn ihr ihn weitergeben wollt, dann bitte als Link auf den Blog und nicht als Datei. (Vervielfältigung und Verkauf des Schnittes, seine Verwendung in Kursen oder die Herstellung von Artikeln zum Verkauf nach diesem Schnitt sind kein privater Gebrauch mehr. Danke für das Verständnis.)

Like always the pattern is free for private an non-commercial use and I appreciate it a lot if you pass it on as a link to this blog instead of copying the file. (Copying and selling the pattern, using it for classes or selling items made after this pattern are not supposed to be private use. Thanks for your understanding.)

Karamell (Füßlinge)

Karamell (Slipper socks)

Füßlinge mit LochmusterUnd noch mal Füßlinge, diesmal in einer luftigen Version mit kleinen Löchern, aber auch ganz einfach zu stricken.

More slipper socks/ liners. This time with cute and airy eylets, but also very easy to knit.

Als Garn waren diesmal etwa 35g “Meilenweit Cotton 50 Uni” von Lana Grossa am Start, die ich im Frühjahr bei Wolle Rödel in Bayreuth gefunden hatte.

Der Farbton kommt auf den Bildern nicht gut rüber, aber er hat den Namen inspiriert.

FüßlingeYarn is this time from Lana Grossa, “Meilenweit Cotton 50 Solid” and I had found it as a 50g skein at Wolle Rödel in Bayreuth.

The pics don’t do the color justice, but it’s the color of the yarn that inspired the name of the pattern.

Wer sie nachstricken mag findet hier findet hier die Anleitung für “Karamell”. Ich hoffe, es sind nicht zu viele Fehler drin…

(Und wie immer ist die Anleitung für den privaten Gebrauch gedacht und dafür kostenlos. Nicht gedacht ist sie, kopiert zu werden. Bitte gebt ggf. einfach den Link zu diesem Blogeintrag weiter. Danke!)

And if you want your own pair, here is the pattern for “Karamell” in English.I hope there are not too many mistakes left…

(The pattern is free for private and non commercial use. Please don’t copy it, but pass on the link to this blog post. Thank you!)

Verschenkesocke

Charitysocks

SockenManchmal möchte man Socken stricken ohne daß man die Größe des Empfängers genau kennt. Oder vielleicht sind die Socken für ein Hilfsprojekt gedacht, bei dem vorher gar nicht klar ist, wer sie bekommt.

Sometimes you want to knit socks for someone without knowing the size exactly. Or maybe you knit for charity where know one knows in advance who the recipient might be.

Nun sind Socken ohnehin dehnbar und können sich durchaus ein wenig dem Fuß anpassen, aber wenn man Rippen geschickt einsetzt, bekommt man Modelle, die etwa über fünf Größen hinweg passen. 🙂

Socks do stretch anyhow and will adapt the foot, but if you use ribbing the right way you can make socks that can fit over about five sizes. 🙂

SockenDie Anleitung umfasst die Größen M (36-39), L (39-43)  und XL (42-47). Auf den Bildern sind M die roten Socken, L die geringelten und XL die grauen mit den bunten Spitzen und Fersen.

The pattern includes sizes M (German size 36-39), L (39-43) and XL (42-47). On the pics you see red socks in M, striped socks in L and gray socks with blue in XL.

Die Füße die drin stecken haben von links nach rechts: 2x Gr. 39, 2x Gr 42 und der letzte Fuß hat Gr. 47.

SockenThe feet in the socks are from left to right: 1x size 39, 2 x size 42 and the last foot is size 47.

Und hier geht es zur Anleitung: Verschenkesocke.

(Hier gilt übrigens: Wenn ihr die Socken für ein Projekt strickt, bei dem die Socken an Bedürftige verschenkt werden, dann kopiert die Anleitung gerne an alle Mitstricker! Andernfalls bitte einen Link hierher weiter geben. Und natürlich ist die Anleitung für privaten Gebrauch kostenlos.)

And that’s the pattern: Charity socks.

(This pattern is free for private and non commercial use. If you want to pass it on, please don’t copy the pattern, but pass on a link to here. Except if you knit socks for charity. In this case you are invited to copy the pattern for everyone who wants to knit for charity also!)

Sicherheitsknopfloch

Security button hole

Die “Auflösung” der Knopffrage verrate ich natürlich noch nicht, wenn ihr das wissen wollt, dann müßt ihr am 27.07. im Bernina Blog vorbei schauen, da gibt es dann das fertige Bild. (Oder Geduld haben, bis ich Zeit habe, es hier zu zeigen.)

My button solution will not be shown here now. If you want to know that you’ll have to check the Bernina Blog on 07/27, there will be a picture of the finished jacket. (Or you are patient enough until I have the time to show it here.)

Aber derweil erzähle ich was von den Knopflöchern. Es gibt zwar ein paar Bilder, aber leider keine guten, die Makrofunktion dieser Kamera und ich stehen irgendwie auf Kriegsfuß. Oder ich sollte einfach die Bedienungsanleitung noch mal lesen…

But I’ll tell you something about my buttonholes. There are pics also, but not very good ones. The camera should be able to do Macro shots and sometimes does, but sometimes not. And I don’t know why. Maybe I should read the instructions again…

Problem bei dieser Jacke war, daß die Seide sehr leicht ausfranst und daß die oben aufliegenden Fäden auch nicht freiwillig liegen bleiben, wenn man sie durchtrennt. Handknopflöcher waren aus Zeitgründen keine Alternative, aber es gibt da auch ein paar Tricks mit der Maschine…

A problem with this fabric was, that the silk was fraying easily and also the loose fibers on top that form the pattern wont stay put once cut. Sewing button holes by hand was not an option due to the deadline, but there are some things you can do with the sewing machine…

KnopflochErster Schritt, ist die Position zu markieren und ein normales Augenknopflich zu nähen. Dabei wird die Raupe ein wenig “lockerer” eingestellt, also die Stichlänge minimal erhöht. Danach wird zwischen den Raupen Fray Check aufgetragen. Bei dem dicken Stoff sogar einmal auf der Jacke und einmal am Beleg.

(Den Schritt, bei dem man vier der Augenknopflöcher wieder auftrennen muß, weil man das Auge mal wieder an die falsche Seite genäht hat, den kann man gut weglassen…)

First step is to mark the position and sew the eyelet button hole. Change the stitch length of the “normal” setting of your sewing machine, making the stitch length a little longer. The button hole will be less densely sewn. Not apply fray check to the fabric between the sewn button hole. In my case (the fabric is very thick) from both sides. Apply on the jacket and apply on the facing.

(The step where you have to rip out four button holes because the eyelet is showing in the wrong direction can easily be omitted… )

KnopflochDanach den Fray Check wirklich gut trocknen lassen.

Danach das Knopfloch aufschneiden. (Falls man dabei die Raupe mit erwischt ist das nicht so schlimm, durch das Fray Check kann sich nicht alles auflösen.)

Allow the Fray Check to dry very well.

Then cut the button hole open. (If you cut some of the stitches it is not a problem, with the Fray Check on it it will not unravel.

Knopfloch fertigUnd dann wird noch mal ein Knopfloch genäht. Diesmal mit der normalen Stichlänge.

Am besten man orientiert sich wieder an seinen Markierungen, die sollte man also nicht entfernen, bevor man ganz fertig ist.

Meistens wird es nicht ganz so perfekt schön wie ein einfach genähtes, weil man (oder weil ich) dann doch nie zu hundert Prozent treffe, aber dafür hält es. Und wenn die Knöpfe zu sind, sieht man vom Knopfloch eh nicht viel…

Then bring your button hole back to the machine and sew the same eyelet button hole as before, but this time with the standard setting and dense stitches.

It works best if you use your original markings, so you should not remove those before everything is completely finished.

I have to admit that the result is normally not as perfect as a “normal” button hole because one (or because I…) never is able to match the two button holes perfectly, but it is stable and that’s a lot. And if the buttons are closed one doesn’t see to much of the button hole stitches anyhow…

Flatlocknaht für “Arme”

Low tech flatlock seam

Überraschung! Es gibt noch Nähtätigkeit! 😉

Eine Flatlocknaht ist eine Naht, die besonders flach ist, weil weniger Stoffschichten aufeinander liegen. Bei sehr dicken Materialien (wie Neopren) stoßen die Schnittkanten direkt aneinander, bei dünneren Materialien wie Wäschestoffen liegen die Stofflagen aufeinander wie bei einer offenkantigen Verarbeitung. Nur überdeckt ein Nähfaden die Schnittkanten.

Surprise, there is still sewing going on! 😉

A flatlock seam is a seam that is flat, because there are fewer fabric layers. For very thick material (like neopren) the cut edge will touch and not overlap, for thinner material like lingerie fabric you have the overlap like when sewing with open edges. Only in a flatlock seam the sewing thread will overcast the fabric edges.

Nun habe ich gelernt, daß nur eine echte Flatlockmaschine solche Nähte machen könnte. Allerdings konnte mir die Fachfrau zwar demonstrieren, wie anders eine Flatlockmaschine näht, sie konnte mir nur nicht erklären, wodurch sich die fertige Naht dann von einer anderweitig auf Stoß oder eben einfach überlappenden Naht unterscheidet. Also scheint es im Ergebnis doch nicht so anders zu sein, als die “hausgemachte” Variante, die viele Overlockmaschinen beherrschen.

Nun habe ich keine Overlock, aber ich dachte, so was ähnliches müßte mit der normalen Nähmaschine auch hinzubekommen sein. Und habe mit ein paar Dessoustoffen Testläufe gestartet.

Now a specialist explained to me, that a “true” flatlock seam can only be made with a “real” flatlock machine. She could show me how a differently a flatlock machine works, but she couldn’t explain me the difference to the good old overlapping seam. So my guess is that the result isn’t that different from the “homemade” version how many sergers can do.

Now not everyone has a serger, like me for example. And I wondered, it a similar effect might be possible with the normal sewing machine. I picked some lingerie fabrics and started testing.
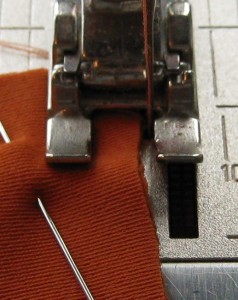
Zickzack an der KanteWichtig ist es zunächst, daß man die Stoffkanten wirklich gerade und sauber schneidet und auch die Nahtzugabe anpasst. Ich verwende einen sehr breiten Zickzackstich meiner Maschine und so breit muß die Nahtzugabe auch werden.

The first thing that is important is that the fabric edges are cut with precision and are not wobbly. You have to adapt your seam allowance. I have been using a very wide zigzag stitch and the seam allowance has to be the width of the stitch.

Dann wird die Oberfadenspannung gelockert. Die Stichlänge ist Geschmackssache, einfach mal testen. An meiner Bernina virtuosa 160 haben sich folgende Einstellungen bewährt: Zickzackstich mit Stichbreite 5 und Stichlänge 2, die Oberfadenspannung wird auf 2 reduziert. Allerdings verhält sich jeder Stoff anders, also erst mal testen.

My settings of the machine (virtuosa 160 from Bernina) is a zigzag stitch with length 2 and width 5, the thread tension of the spool thread reduced to 2. But test, it’s a matter of taste and also varies from fabric to fabric.

Als Garn habe ich AlterfilS 150 genommen. Wichtig ist, daß das Garn eine gewisse Elastizität hat. AlterfilS erfüllt diese Anforderung sehr gut. Es sollte auf auf alle Fälle ein gutes Polyesterumspinngarn sein.

Die Stofflagen werden normal aufeinandergelegt und dann wird exakt an der Kante entlang genäht, so daß der rechte Stich neben dem Stoff einsticht.
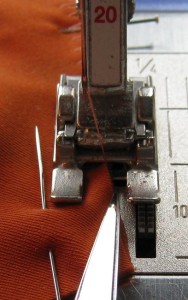
Nahtzugabe runterhaltenAs thread I choose the very fine AlterfilS 150. It is important that the thread has a certain elasticity. Not one you can feel with your hands, but it has to be there. AlterfilS is perfect for that. But whatever you take, choose a high quality polyester corespun thread.

Then you lay your fabric as normal and zigzag along the edge. The needle swings over the fabric and does sew next to the edge when it swings to the right. It does not sew into the fabric then.

Je nach Stoff und Nähfuß kann es sein, daß diese schmale Nahtzugabe sich beim Nähen etwas hochwölbt. Man kann sie dann einfach mit einem Gegenstand wie einer Stickschere vor der Nadel wieder nach unten leiten. Nicht aufdrücken, der Stoff muß ja noch transportiert werden können, nur unten halten.

(Den Standardnähfuß zu nehmen, der vorne geschlossen ist hätte es auch getan…)

Depending on the fabric and the pressure foot you use it can happen that the tiny seam allowance wants to stand up. That is not a problem, you can hold a small item (I used my embroidery scissors) in front of the needle to hold the fabric down. Don’t press, just hold it down. If you give to much pressure the fabric would stretch while sewing.
Naht von oben(Taking the standard pressure foot would have been also an improvement in that case…)

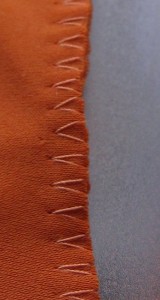
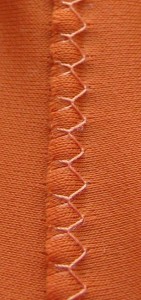
Von der oben betrachtet sieht das jetzt wie eine ganz normale Zickzack Naht aus.

Form the top it looks just like any ordinary zigzag seam.
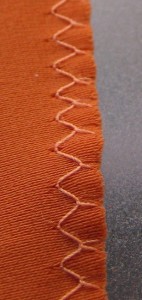
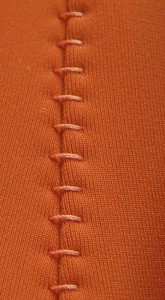
Naht UnterseiteVon Unten hingegen sieht es anders aus.

Denn dadurch daß die Oberfadespannung herabgesetzt wird, wird der Oberfaden natürlich auf die Rückseite gezogen.

If you turn it around it looks differently.

Since the upper thread tension was loosened the upper thread wraps around the edge and is visible on the other side.
Flatlock auseinandergezogenDiese lockere Fadenspannung ist für den nächsten Schritt nötig: Die beiden Stoffteile werden kräftig auseinandergezogen. (Deswegen ist es auch wichtig, daß der Faden selber eine gewisse Elastizität hat. Fehlt die, dann reißt der Faden.)

Dadurch klappen sich die Nahtzugaben um und liegen übereinander.

Auf der ehemaligen Unterseite (also die Seite, die beim Nähen unten war) sieht das auch schon sehr gut aus.

The loose thread tension is necessary for the next step: you pull on the fabric as if you wanted to pull the seam apart. (This is also why you need a certain elasticity in the thread. If it’s to rigid it will break.)

Now the seam allowances will turn and lay flat on each other.
Flatlock obenOn the side of the bobbin thread it looks already fine.

Die andere Seite noch nicht ganz. Hier ist der Stoff noch ein wenig eingerollt. (Wem das so gefällt und flach genug ist, der kann das im Prinzip auch so lassen. Aber ich wollte es flacher.)

Ob das passiert hängt vom Stoff ab und wohl auch davon, ob die Schnittkante in Maschenrichtung oder quer dazu verläuft. Bei manchen Stoffen genügt es, die Naht abwechselnd längs und quer zu dehnen und die Kante rollt sich noch raus.

The other side is not as perfect. You see that the edge is still a bit rolled to the inside. (If you like it like that and think it is flat enough for your purpose you can leave it like that. But I wanted really flat.)
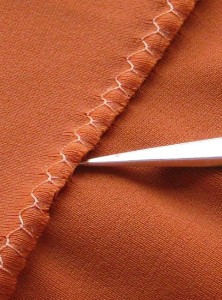
Nahtzugabe rausschiebenIf that happens or not depends on the fabric and also if you cut with the grain or crossgrain. Sometimes it’s enough to stretch the seam alternatively lenghtwise and crosswise to make the edge come out.

Bei dem Stoff aber nicht. Also hieß es nachhelfen.

Das ist mühsam, man kann entweder mit einem nicht zu spitzen Gegenstand die Stoffkante rausschieben oder sie von der anderen Seite mit einer ganz feinen Häkelnadel rausziehen.

Aber gut… dafür braucht man keine neue Maschine dafür.

On this fabric this was not enough, so I had to push/pull the edge out.

That takes some work, you can either push it out with a not to sharp tool or you can pull the edge out from the other side with a very fine crochet hook. Not really fun.

But you don’t have to buy another machine…
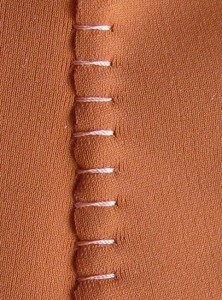
Flatlock fertig linksUnd die Mühe wird belohnt, der Stoff liegt flach. (Das Bild war vor dem Büglen.)

And you are rewarded in the end, the fabric lays flat. (The pic was taken before the final press.)
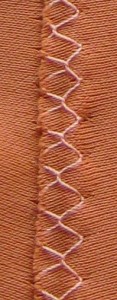
Flatlock obenUnd so sieht es von der anderen Seite aus.

And that is what it looks from the other side.

Ich habe mich entschieden, die auf dem linken Bild sichtbare Seite nach außen zu nehmen, denn zum einen wollte ich den Faden als Verzierung, zum anderen ist die andere Seite flacher und weicher auf der Haut.

Das kann man aber machen wie man will.

I took the side you see on the left pic as “right” side because I liked the decorative effect. The other reason is that the other side is flatter and softer on the skin.

But it’s up to you to choose.

Die Bilder zeigen auch die Grenzen der Technik: Die Stoffkanten sind nicht wirklich dicht eingeschlossen, es ist also nur für Stoffe geeignet, die nicht ausfransen.

Und durch die längeren Stiche gegenüber einer Overlock ist es vermutlich auch nicht ganz so elastisch. Ich habe es für ein Hemdchen und ein Panty verwendet, das funktioniert prima. Ob es für Sportkleidung auch geht müßte man erst mal testen.

Aber… die Technik erfordert keine teure neue Maschine und geht mit fast jeder simplen Maschine die Zickzack kann und die Fadenspannung verstellen läßt. 🙂

The pics also show the limits of that technique. The edges are not as well enclosed as with a serger so you can only use it for fabrics that do not ravel to much.

And since the stitches are longer as on a serger the resulting seam will not be as stretchy. I used it for a cami and for some undies and it does fine there. If you want to make sports gear you should test first if it can hold.

But it’s a simple technique you can make on nearly any machine that is able to sew zigzag and allows you to change the thread tension. No need to buy an expensive and new machine. 🙂
Eulersche Streifen

Euler’s stripes

Schal Eulersche StreifenIch weiß, das ist komplett die falsche Jahreszeit, aber der Schal ist nun mal jetzt fertig und der nächste Winter kommt bestimmt.

I know it is completely the wrong season, but the scarf was finished now and there will be another winter.

Ein Freund, der sich immer mal meinen Computer kümmert, hat sich einen “Schal, den man zwei Mal um den Hals wickeln kann” gewünscht. Ich würde sagen… Wunsch erfüllt.

A friend who is sometimes taking care of my Computer wanted a “scarf I can wrap around my neck twice”. Mission accomplished….

Schal \Da ich unregelmäßige Streifen mag, mir aber keine Streifenfolge ausdenken will, habe ich mir eine der vielen netten Zahlen mit unendlich vielen Stellen hinter dem Komma geschnappt und das in Streifen umgesetzt. Wie der Name des Schals nahe legt, es war die Eulersche Zahl die herhalten mußte.

I like irregular stripes but didn’t want to bother with thinking about a rhythm for the stripes myself I took one of those numbers with an indefinite number of digits and turned them into stripes. As the name of the pattern suggests it was Euler’s number I choose.

Der Schal hat abgeschrägte Enden und ist im Perlmuster gestrickt. Also nicht sehr schwierig. Nur 2,30m lang.

Material war Merino Wolle aus der Maschenkunst, “Zara Solid” und “Zara Chiné” von Filatura di Crosa sowie “Merino extra” von Schachenmayr von dem ich noch knapp 3 Knäuel hatte. (Und auch prompt noch eines nachkaufen mußte, was dann nicht so ganz einfach war.)

Falls jemand einen “geekigen” Schal für den Mathematiker oder Physiker seines Lebens braucht oder selber auf derartig entstandene Muster steht:

Hier ist die Anleitung: Schal Eulersche Streifen.

Wie immer zum persönlichen Gebrauch frei. Alles andere bitte nach Anfrage und statt die Anleitung zu kopieren wäre es netter, wenn ihr einfach den Link hierher weiter gebt. Danke schön.

The scarf has slanted ends and is knitted in seed stitch. (Moss stitch for the British, I think) So it is not difficult. Only 2.30m (2.50yds) long.

Material was merino from Maschenkunst, “Zara Solid” and “Zara Chiné” from Filatura di Crosa and “Merino extra” from Schachenmayr where I had a little less than three skeins (and of course I had to buy one more which was not at all easy).

So if you want to make a scarf for the geek in your life or like that yourself, here is the pattern:

Euler’s stripes.

As always the pattern is free for personal an non commercial use. If you want to pass it on please don’t copy it but pass on the link to this blog. Thank you!

Gretel (Füßlinge)

Gretel (Slippersocks)

Füßling mit ZopfDa sich meine Füßlinge vom letzten Jahr beim Tragen durchaus bewährt haben, ein Paar für einen ganzen Sommer aber doch etwas wenig ist, habe ich mir ein zweites Paar gestrickt.

Since my “heels for flats” last year have proven to wear well and be useful I needed a second pair. One for a whole summer is not really enough…

Da zwei Mal genau das gleiche aber auch langweilig ist, habe ich ein wenig variiert: Die Zunahme ist etwas anders und ein kleiner Zopf läuft über die Spitze und am Rand entlang. (Daher dann auch der Name… zu Gretel gehören Zöpfe.)

Der Entwurf für die Socken lag übrigens auch schon seit letztem Sommer bei mir herum, aber da ja Winter war, war es nicht so eilig….

Sohle von GretelAußerdem hat die Sohle diesmal auch ein wenig Muster bekommen.

Since it is to boring to knit exactely the same twice I varied it a bit. The increases are worked a bit differently and there is a cable that starts on the toe and frames the foot. (That is also what gave the socks their name. The German word for “cable” in knitting is “Zopf” and “Zopf” also is the name for braided hair. Braids then are something that goes with the name Gretel.)

The design for those socks has been around since last summer, but I didn’t have the time to make it then, in winter other things were more important to knit and so it took until now to actually knit them.

The sole also got a bit of a pattern.

Gretel FüßlingeUnd wie üblich behalte ich meine “Weisheit” nicht für mich, sondern habe die Anleitung aufgeschrieben:

Anleitung für Füßlinge “Gretel”, ca Gr. 38-40

(Und wie immer ist die Anleitung für den privaten Gebrauch gedacht und dafür kostenlos. Nicht gedacht ist sie, kopiert zu werden. Bitte gebt ggf. einfach den Link zu diesem Blogeintrag weiter. Danke!)

And as usual I did write down the pattern:

Pattern for socks “Gretel”

(The pattern is free for private and non commercial use. Please don’t copy it, but pass on the link to this blog post. Thank you!)

Rockschnitt im Eigenbau

DIY Skirt pattern

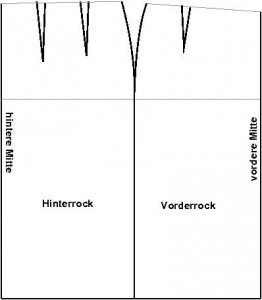
Den Schnitt für meinen Patchwork-Rock hatte ich ja selber gemacht. Und das ist gar nicht so schwierig, deswegen habe ich eine Schritt für Schritt Anleitung als pdf zusammengefasst, die ihr euch zum Eigengebrauch runterladen könnt.

Schema für RockschnittThe pattern for my patchwork skirt I had constructed myself. That’s not difficult, so I made step by step instructions how to do it and put the in a pdf file. Sorry that these are only in German, but if you want to try anyhow, there are a lot of pics and numbers, it might work anyhow.

Die Konstruktion orientiert sich weitgehend an “metric pattern cutting for women’s wear” von Winifred Aldrich, wobei ich noch eine Änderung für die “natürliche Taille” eingefügt habe. Denn die verläuft gerade bei runderen Frauen oft nicht parallel zum Boden, wie die Schnittkonstruktion das vorsieht.

Die angegebenen Maße sind für einen Hüftumfang von 122cm, das ist ungefähr Gr. 50. Man kann aber auch seinen eigenen Taillen- und Hüftumfang verwenden und sollte so im Bereich Gr. 46 – 54 ein brauchbares Ergebnis bekommen.

Ist die Abweichung größer, wird vermutlich der erste Testrock noch etwas mehr Änderungen brauchen. Aber so ein gerader Rock hat ein wirklich einfaches Konstruktionsprinzip.

Hier also die Datei: Konstruktionsanleitung gerader Basisrock.

(Falls jemand tatsächlich mal einen Rock danach konstruiert und näht, würde ich mich über einen Link zu einem Bild sehr freuen. 🙂 )