
Don’t be afraid of knits: Stretch and cutting
Immer wieder ist im Forum die Frage zu lesen, wie man denn mit Strickstoffen und Jersey umgeht, ob man das nur mit einer Overlock nähen könnte,… und nicht nur Anfänger, auch manche Näherin mit Erfahrung schreckt davor zurück. Deswegen beschreibe ich an meinem Motivationsshirt vom September ein bißchen genauer, wie es genäht habe. Ganz ohne Overlock.
Aber da gute Vorbereitung der Schlüssel zum Erfolg ist, erzähle ich erst mal noch ein paar Grundlagen.
Questions about how to sew knits are not so rare in the Forum. And not only beginners but also sewers with quite a bit experience with wovens are afraid when it comes to knits. But there is no reason for fear, and to prove that I’ll describe some of the steps of the construction of my „September motivation“ in detail. No serger required.
But as often good preparation is the key, so I’ll start with some basics.

Die erste Frage die sich bei Strickstoffen stellt ist, wie dehnbar muß er sein? Hier sollte der Schnitt Hinweise geben. Ich habe Glück, denn mein Schnitt von Vogue liefert an der Kante der Schnittüte sogar eine Lehre zum Testen mit.
Der Stoff wird quer gefaltet, an die Kante gelegt und an den beiden Pfeilen (auf das Bild klicken öffnet eine größere Abbildung) mit je einer Hand festgehalten. Die linke Hand bleibt wo sie ist, die rechte dehnt den Stoff bis zu dem zweiten angezeichneten Pfeil. Kann ich den Stoff ohne brutale Gewalt so weit dehnen, stimmt die Dehnbarkeit. Die geforderte Dehnbarkeit hier ist eher moderat.
One of the first questions when working with knits is the question: How much stretch do I need? Here the pattern should tell you something about. My vogue pattern has the most comfortable way to test the amount of stretch.
There are marks on the edge of the pattern envelope. You fold the fabric crosswise, align it with the marks and hold the fabric. Left hand on one mark, right hand on the other. The left hand remains, the right hand stretches the fabric to the second mark. (Clicking on the pic will show a bigger version.) If you can do so without overstretching the fabric, the amount of stretch is just right. (My pattern needs only a moderate amount of stretch.)
In der Regel geht es um die Dehnbarkeit quer zur Stoffbahn, den Gestricktes ist in erster Linie quer dehnbar. Geht es um die Längsdehnung, sollte das explizit beim Schnitt vermerkt sein. Manchmal ist auch gefordert, daß Stoff bi-elastisch ist, also in beide Richtungen dehnbar. Dann können auch zwei unterschiedliche Angaben vorhanden sein.
Leider machen es einem nicht alle Schnitte so komfortabel. Gelegentlich sind Prozentangaben vermerkt, so wie „10 Prozent Dehnung“ oder auch mal (bei Stoffen für Sportbekleidung) 100 Prozent Dehnung. Dann macht man den Dehntest wie geschildert mit einem Maßband oder malt sich diese Lehre selber. (10 Prozent Dehnung bedeutet, daß man den Stoff im Abstand von 10 cm anfasst und auf 11 cm dehnt. Bei 100 Prozent Dehnung müssen sich 10 cm auf 20 cm dehnen lassen.)
Unangenehm wird es erst, wenn der Schnitt nur von „moderater Dehnung“ oder „starker Dehnung“ spricht. Dann hilft leider nur raten und Erfahrung.
Usually the stretch is across the fabric, that is where knits naturally stretch. If lengthwise stretch is needed, then it should be indicated with the instructions. If the fabric has to stretch lenghtwise and crosswise this also should be indicated. Here you might also find a different amount of stretch needed for each of the directions.
Not all patterns make testing the stretch so easy. Sometimes you will find something like „10 % stretch needed“ or even „100 % stretch needed“ (some patterns for swim- or sportwear require that). Then you can test your fabric with tape measure or ruler in hand. Or you make those marks yourself on a piece of paper. (10 % stretch means that 10cm of fabric have to be stretched to 11cm, 100% would mean stretching the 10 cm of fabric to 20 cm)
And sometimes indication will just say something like „moderate stretch“, the you have to guess.
Bei mir stimmte die Dehnbarkeit übrigens perfekt, also der ideale Stoff für den Schnitt.
(Kann ein Stoff eigentlich auch zu stark dehnbar sein? Intuitiv würde man sagen, nein, kann nicht. Das stimmt aber nicht ganz. Denn nicht jede Stelle an einem Kleidungsstück soll sich gleichermaßen dehnen. Und wenn der Stoff sich stärker dehnt als benötigt, kann der Sitz ebenfalls verändert werden. Man denke nur an Schulternähte, die sich auf einmal bis auf den Ellenbogen dehnen. Es muß nicht immer negativ sein, aber man sollte im Kopf behalten, daß es anders wird.)
In my case the stretch just fits perfectly the requirements of the pattern.
(Can a fabric have to much stretch? First thought might be „no“. But that is not the whole truth. Not everything on a garment is supposed to stretch the same amount. And if the fabric has more stretch than needed, then this can alter the fit of the garment. Just think about the shoulder seam. If a garment has to much stretch there, the shoulder of the garment ends up halfway down the arm… More stretch does not have to be bad, but keep in mind that it will be different.)
 Der nächste Punkt an dem sich Jerseys und Strickstoffe von Webstoffen unterscheiden ist die Ermittlung des Fadenlaufes. Zum einen hat ein Strickstoff streng genommen keinen Fadenlauf sondern einen Maschenlauf.
Falte ich einen Webstoff für den Zuschnitt, kann ich die Webekanten aufeinanderlegen und den Stoff glatt streichen. Ist er nicht in sich verzogen, dann liegt er auch gerade.
Bei einem Strickstoff ist das nicht der Fall. Dazu muß man wissen, daß Strickstoffe in der Runde gestrickt werden (quasi wie gigantische Schläuche) und dann aufgeschnitten. Durch das Stricken in der Runde läuft die Stoffbahn aber automatisch etwas schräg. Will ich also sauber im Maschenlauf zuschneiden, muß ich auch genau im Maschenlauf falten. Und muß dazu gucken, wie meine Maschen laufen. (Man kann natürlich auch einlagig zuschneiden, aber auch dann muß man den Maschenlauf finden, und zwar für jedes Schnitteil.)
Da mein Stoff interlockartig gearbeitet ist, verlaufen auf der Rückseite rechte Maschen als Längslinien. Ich suche mir so eine Maschenreihe und falte genau daran entlang. (Ich habe versucht, das Bild etwas zu bearbeiten, daß man das so halbwegs erkennt.)
Before you can cut a knit fabric you have to find the grain. That is a bit different from wovens.
For a woven you can fold it, bringing the selvedges together, then you straighten the two layers and if the fabric is straight in itself, the your fold will be on the grain. For knit fabric this cannot work. Knit fabrics are normally knit in rounds, like a giant tube. Then they are cut open, so they can lay flat. But this also means, the stitches do not run straight but are a pit slanted. Therefor, to fold exactely on the grain, you have to search the grain and fold along it. (Another option is of course, to cut the fabric in one layer, but then you will have to search the grain for each piece of the pattern.)
My fabric is a bit like interlock, so there are knit stitches on the wrong side of fabric. I just have to identify one „column“ of stitches and fold along that. (I’ve changed the picture a bit, hoping that this makes the way the stitches run a bit more visible.)
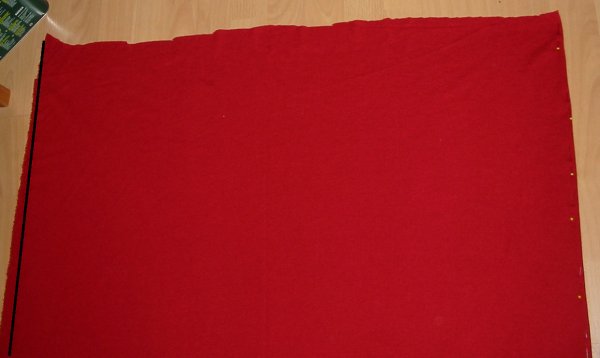
Das letzte Bild zeigt den gefalteten Stoff.
Hier sieht man (mehr oder weniger) den Unterschied zu einem Webstoff. Das was den Schnittkanten entspricht liegt nicht gerade aufeinander, wenn der Stoff sauber im Maschenlauf liegt.
Der schwarze Strich an der linken Seite zeigt die obere Stofflage, der rote Rand ist die untere Stofflage.
The last picture shows the fabric folded on the grain.
Here you can see (more or less…) the difference to a woven fabric: that what is equivalent to the selvedges of a woven fabric is not aligned, when the fabric is fold correctly on the grain.
The black line on the left side shows the upper layer of the fabric, the red part that reaches a bit beyond that is the lower layer of the fabric.