Die Lage ist alles

Placement is everything, and that is not only true for real estate

Und das gilt nicht nur für Immobilien.

Mein Stoff hat ja eine flächendeckende Stickerei, also muß ich den Schnitt so auflegen, daß es zumindest in der hinteren und vorderen Mitte paßt. Wie man das macht, zeige ich heute. Es ist nicht wirklich schwierig, aber zeitaufwendig. Der Zuschnitt nur des Oberstoffs dauerte vier Stunden.

My fabric has an all over embroidery so I have to choose well where to cut, because I want the pattern to match at the middle front and back. How to do this I’m going to show now. It is not really difficult, but time consuming. Cutting the outer fabric only took me four hours.

RückenteilZuerst habe ich den Stoff mal ausgebreitet und die Schnitteile ein wenig hin und her geschoben. Einlagigs Zuschneiden ist hier ohnehin Pflicht, das Muster ist nicht gespiegelt oder so. Dabei habe ich festgestellt, daß ich das Rückenteil so zuschneiden kann, daß die Naht (oder zumindest der gerade Teil der Naht, in der Krümmung kann man das Muster nicht passend machen) fast ganz zwischen den Motiven verläuft. Das spart schon mal viel Mühe. Auch beim Vorderteil habe ich mir eine Stelle gesucht, wo ein “Bruch” etwas weniger auffällig ist.

Anschließend habe ich ein Vorderteil und ein Rückenteil zugeschnitten. Am Vorderteil habe ich die vordere Mitte (sowie den Tunnel für die Schleife) mit einem Heftfaden markiert, diese benutze ich auch als “Paßstelle”. Alternativ kann man auch die Nahtzugabe der vorderen Kante markieren und an der vorderen Kante anpassen,

Am Rückenteil, das hier im Bild zu sehen ist, habe ich den Taillentunnel markiert und dann die Nahtzugabe der hinteren Mitte.

If you want to match a pattern like that you have to cut single layer. I took my two pattern pieces (back and front) and decided how to arrange them on the fabric. I found that it was possible to cut the back in a way that most of the center back seam is between the embroidery and will only have to be matched on a few places. For the front also I found a placement with not to much going on where the fronts will overlap.

Then I cut one front and one back, single layer. On the front I thread traced the casing for the belt and the front middle which I use for the matching. At the back (see pic above) the casing it thread traced and the back middle seam is also marked.

passend aufgelegtAnschließend wir der Stoff an der Markierung nach links gefaltet, also am Rückenteil die Nahtzugabe weggefaltet und am Vorderteil alles jenseits der Mittellinie.

Danach heißt es puzzlen. Nämlich das zugeschnittene Teil so auf den Stoff legen, daß kein Musterversatz da ist. Dabei lohnt es sich, auch die Reihenfolge der Teile zu ändern. Ich konnte ein Vorder- und ein Rückenteil nebeneinander zuschneiden, bei den beiden anderen Teilen ging das nicht. Hätte ich das zweite Rückenteil darüber plaziert und dann das zweite Vorderteil noch mal darüber hätte mir der Stoff (immerhin 3m für einen Schnitt, der 1,80m bei ungemusterten Stoffen braucht) nicht gereicht. Andersherum, also erst das zweite Vorderteil und dann das zweite Rückenteil ging es problemlos und ich hatte mehr als genug für die Schleife übrig. (Das Bild zeigt jetzt übrigens das Vorderteil.) Und natürlich feststecken, wenn man die richtige Plazierung gefunden hat.

Next thing is to fold the cut pieces at the chosen placement line to the wrong side of fabric. On the back you fold back the seam allowance, on the front you fold along the middle line.

Not just match the cut pieces to the fabric. It’s worth checking different option. I my case I could cut the first front and the first back from one width of fabric. Not so the second ones. I tried to layer first the second back piece and then the second front above that… my fabric wouldn’t have been enough. But starting with the second front and placing the second back above saved me largely enough for the tie. When you have found a position on the fabric where the pattern matches pin the already cut piece to the fabric.

FadenmarkierungWichtig ist an der Stelle noch ein Gegencheck mit dem Papier(oder in meinem Fall Folien)schnitt, ob das Schnitteil auch zur Seite genug Platz hat um noch drauf zu passen.

Dann markiere ich wieder mit einem Nähfaden (dicker Heftfaden auf Seide ist nicht so gut, ich will ja keine großen Löcher, feine Nadel und gutes Nähmaschinengarn sind gerade richtig) die Faltlinie meines Schnitteils auf dem noch ungeschnittenen Stoff.

Don’t forget to check with your paper pattern piece that you have enough width to place the pattern you want to cut next.

Then you take sewing thread and a fine needle (basting thread wouldn’t be good on silk, who wants big holes?) an threadtrace the foldline of your cut piece to the uncut fabric.

Schnitteil auflegenDas zugeschnittene Teil kommt weg und entlang der gehefteten Linie lege ich jetzt wieder meinen Folienschnitt auf. Dabei verläuft beim Rückenteil (im Bild) die Nahtlinie der hinteren Mitte auf der markierten Linie, beim Vorderteil die vordere Mitte.

Schnitteil feststecken und das bereits dzugeschnittene Teil noch mal daneben legen. Einmal um an Querlinien (hier die Markierungen für den Tunnel) zu kontrollieren, ob die Höhe auch stimmt, zum anderen um sicher zu gehen, daß man nicht hinterher zwei linke oder zwei rechte Teile hat…

Now you remove the cut piece and put the pattern on the fabric. (Plastic sheet here is better than paper because you can easily see through.) For the back the seamline of the pattern has to match the threadtraced line on the fabric, for the front the middle front.

Pin the pattern to the fabric and before you cut place the already cut front or back against the fabric again. Once to check horizontal lines (in my case the casing for the tie) to match also and second to be sure that you do not end up with two left fronts or two right backs…

Dann nur noch zuschneiden. Das Zuschneiden der beiden Teile für den Gürtel war übrigens reine Erholung…

Then cut the rest. After that cutting the tie was real fun!

Das war es, womit ich den gestrigen Tag verbracht habe. Heute hingegen standen die Paspelöffnungen für den Gürtel auf dem Plan.

PaspelöffnungCapricorna hatte mir den Tip mit einer Technik aus Threads gegeben. Das Heft hatte ich nicht, aber ich konnte mich erinnern, daß Summerset mal ein kleines Tutorial gemacht hatte (danke dafür!) und das versorgte mich mit den Informationen, die ich brauchte.

Und so sieht die Öffnung auch passabel aus. (Wenngleich ich sie als gemogelt empfinde, weil die Schnittkanten nicht eingefasst werden, sondern die Paspeln nur druntergeschoben… aber optisch ist das Ergebnis gut.)

Cutting was what I did yesterday, today I worked on the welt openings for the tie.

Capricorna had suggested to use a technique from Threads. Only I didn’t have that issue, but I remembered that Summerset once made a little tutorial about it (thanks for that!) and that provided me with all the information I needed.

So the opening for the tie looks good. (Though I still feel this technique is kind of “cheating”, because the edges are not really bound… but the result looks good.)

Außerdem habe ich den Gürtel genäht (bis auf die letzten Handstiche, aber die können warten) und die Schnitteile für die Belege gezeichnet. Aber das ist ja nicht so schwierig. Morgen ist dann erst mal wieder ein langer Tag Geldverdienen angesagt, da wird es wohl nichts mit Nähen.

Also I made the tie today (except the last slipstitches, but that can be done later) and I drew the pattern for the facings. But that’s not difficult at all. Tomorrow there will be a long day making money, so probably no time for sewing.

Test geglückt!

Testing successfull

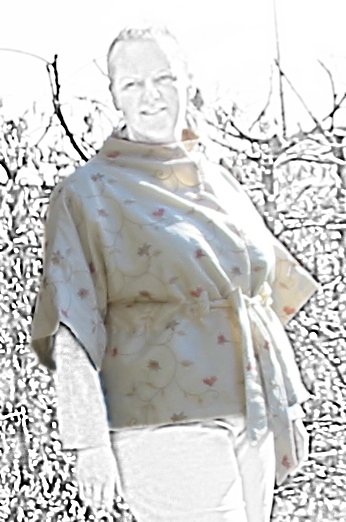
Jacke nach VogueEs geschehen tatsächlich noch Zeichen und Wunder. Nicht nur, daß die Jacke am Wochenende fertig wurde, nein, sie paßt auch. Ohne jegliche Änderung. Das hatte ich noch nie, glaube ich.

Sie sieht auch in etwa aus wie auf dem Bild des Schnittes, aber die Ärmel sind deutlich kürzer. (Eigentlich schreien sie nach langen Handschuhen, aber das schaffe ich vorher nicht mehr. Bärbel, willst du mir nicht noch eben lange Spitzenhandschuhe häkeln? Zwei Wochen sind doch ein Klacks für dich… *gg*) Daß der Gürtel laut Schnitt oberhalb der Taille liegt kommt mir zu paß, denn so sitzt er bei mir etwa auf der Taille.

Jedenfalls habe ich ja der Jacke auch gelernt, wie ich die andere Jacke sinnvollerweise nähen werde, denn meine Änderung mit der Wattierung zieht ja andere Änderungen nach sich. Statt das Futter mit der Maschine einzunähen (was ich hier mal wieder gemacht habe, was bei mir aber zumindest an den Ärmeln immer ungleichmäßig wird) werde ich Belege an allen Kanten aus dem Oberstoff arbeiten und das Futter von Hand einnähen. Das hat einmal den Vorteil, daß ich eine Bewegungsfalte einarbeiten kann und zum anderen… von Hand kann man ein Futter auch am Abend vorher noch im Hotelzimmer einnähen… *gg*

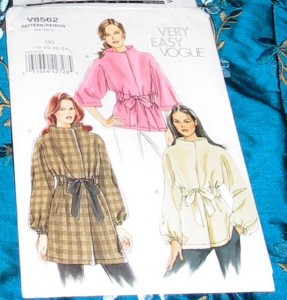
Miracles happen.. not only I did finish the test jacket this weekend, it also fits right out of the envelope without any alteration. I never had that ever. (I think.) I basically looks like on the pattern envelope, only the sleeves are shorter. (It calls for gloves, but I wont manage that in time.)

And with the assembly of this jacket I figured out what is the best way to sew the jacket. Since I’m using a batting and this makes major changes necessary in the process of sewing. Here I installed the lining with the machine with the usual result that the sleeves are a bit uneven. I decided to make facings for the silk jacket and then install the lining with handstitches. Which also has the big advantage, that you can hand sew a lining the night before in a hotel room….

Schwester Plattfuß grüßt von der Shopping-Tour

Shopping

Der Fortschritt an der Probejacke ist noch nicht so weit, wie ich ihn gerne hätte, weil ich heute den ganzen Tag unterwegs war. (Und noch etwas länger als geplant, weil ich die Büroschlüssel vergessen hatte und erst mal wieder nach Hause fahren mußte, um sie zu holen. Blöderweise kann ich dafür nicht mal jemandem die Schuld geben… *grr*)

There is less progress on my test jacket than I’d like, but today I was “on the road” all day. (And even longer than planned, since I had forgotten to take the keys for the office. So when I arrived there I had to go back home to fetch the keys. And I cannot blame anyone for that than me. Stupid…)

Und danach bin ich wieder quer und schräg durch die Stadt für den Großeinkauf. In jedem Laden ein Artikel (und nicht nur Nähsachen.) Aber immerhin habe ich jetzt die meisten Zutaten beieinander. Stoff Müller hatte die Watteline und Futter für die Probejacke. Karstadt den Seidenorganza für die Einlage. dann links abbiegen zu Plissee Becker, wo der geniale Inhaber meine Frage nach großen Druckknöpfen nicht mit dem Griff zum Prym Päckchen beantwortete, sondern dunkel brünierte aus einer seiner unzähligen Schubladen zog. Die kann ich dann verwenden, ohne sie überziehen zu müssen. (Von Prym habe ich auch welche mitgenommen, die brauche ich für die Testjacke.)

After doing some printing in the office I ran again front and back, left and right through the city. Stoff Müller had my batting, Karstadt the silk organza, then turning left to Plissee Becker where the owner answered my request for big snaps not with the standard silver ones from Prym but with one of his amazing wooden drawers where he took some in a dark and warm metallic colour. So I will be able to use them without covering. (I bought some from Prym also for my test jacket.)

Ja und dann kehrt Marsch in die entgegengesetzte Richtung… ne, da habe ich die U-Bahn genommen… und außerdem hatte mein Besuch bei der Maschenkunst jetzt nichts mit dem Nähprojekt zu tun. Ich gestehe, stricken tu ich trotzdem noch…

And then I turned on my heels, walked to the opposite direction… no, I took the metro… and my visit at Maschenkunst had nothing to do with this sewing project. I have to confess that I haven’t stopped knitting.

Leider habe ich immer noch nicht alles zusammen, denn das Futter, das ich für die Jacke gerne haben wollte ist gerade nicht vorrätig, meine Ersatzfarbe auch nicht… also wird es wohl das gleiche blau werden wie für das Kleid. Aber es muß, zusammen mit dem Reißverschluss, erst losgeschickt werden. Aber ich habe genug, um mindestens eine Woche lang arbeiten zu können. (Und sollte bis Ende der Woche eigentlich auch alles erledigt haben, was geht… So weit der Plan…)

(But I still need some notions. The lining I wanted for the jacket is not on stock, neither the second colour…. so I will have to take the same blue I choose for the dress. But it’s not on it’s way yet, neither the zip for the dress. But I have enough material for at least one week. And should habe done everything that is already possible until next week. Well… so far the plan…)

Kleinarbeit…

Small steps were what I did today.

… stand erst mal an.

GürtelWas immerhin schon mal fertig ist, ist der Gürtel.

Die Ecken könnten schöner rausgebracht sein und in der hinteren Mitte habe ich die Handstiche ziemlich geschludert. Ersteres werde ich bei der anderen Jacke besser machen, letzteres ist egal, weil das im Tunnel verschwindet.

Die Anleitung sieht keinerleich Verstärkung vor. Ich dachte zuerst, daß ich den Gürtel an der Seidenjacke unbedingt verstärken muß, bin mir aber inzwischen nicht mehr so sicher. Der Gürtel muß ja nicht viel Zug aushalten und ist wohl eher dekorativ zu verstehen. Und je dicker…. desto mehr trägt er auf.

The tie is done. The edges could be sharper and the slipstitches after turning were done for quick, not for quality. The first thing I will make better on the silk jacket, the latter… well this part will always be inside the channel and never visible. So one possibility to save time.

The instructions show no interfacing for the tie. First I was sure that I would change that for the silk but now I am less sure, because the tie is more decorative and a well padded tie is not what I need around my waist…

RückennahtFür eine Alltagsjacke okay ist die Musterpassung auf der hinteren Rückennaht (Im oberen Teil kann das Muster nicht passe, da ist die Naht gerundet.)

Ich habe eine Technik ausprobiert, die mir das Handnähen ersparen soll. Aber für das edle Stück ist mir das Ergebnis doch nicht schön genug. Da werde ich wohl doch hohl von Hand nähen. *seufz*

I tried a quicker technique to match the pattern on the back seam. The result is okay for a everyday jacket, but for the silk one the result isn’t good enough. So I will end up handstitching that seam, I guess…

PaspelöffnungUnd ich habe die Paspeln am Gürtelauslass. Ein schnödes Knopfloch kommt da nicht in Frage.

Das Ergebnis befriedigt mich hier auch nicht wirklich, meine Technik funktioniert auf Wolle prima, auf andere Materialien offensichtlich nicht.

Dann werde ich wohl doch die Technik ausprobieren, die Capricorna im Forum vorgeschlagen hat. Ich habe das Threads-Exemplar zwar nicht, aber in einem anderen Blog habe ich vor nicht allzulanger Zeit mal ein Tutorial dazu gesehen. Muß ich nur noch wiederfinden…

And I made the welts where the tie will come out. Just large buttonholes are out of question.

The result here also this technique works well in woolen fabrics but in nothing else, so I will try another technique which Capricorna proposed in the forum. I don’t have the mentioned issue of Threads, but I know I’ve seen a tutorial in another blog not too long ago. I’ll just have to find it.

Im Prinzip wären es jetzt noch vier Nähte bis die Jacke selber fertig ist. Allerdings soll sie ja eine Wattierung bekommen, die noch nicht mal zugeschnitten ist und die ich größtenteils von Hand zusammen nähen muß. Und außerdem muß ich den Tunnel für den Gürtel aufnähen, denn ich will nicht, daß die Wattierung am Ende durch die Öffnungen guckt.

Die Anpassungssitzung morgen klappt also leider eh nicht. 🙁

Theoretically there are only four seams until the outer shell is done. Practically I’ll have to cut and assemble (mostly by hand) the batting and I need a extra tunnel for the tie so nothing of the batting can show thruogh the openings.

So no fitting session tomorrow anyhow. 🙁

Under Pressure…

… arbeite ich vermutlich doch am Besten. Oder zumindest am Effizientesten. Hoffe ich wenigstens.

… seems that I am working best. Or at least most efficient. At least I hope I will…

Wir sind Ende des Monats (ja, diesen Monats) zu einem Hochzeitsempfang eingeladen. Da alles was ich so an festligen Sachen habe irgendwie schwarz als Basisfarbe hat und somit weder zur Hochzeit paßt noch zum Frühling muß ich mir also was neues nähen. (Gut, man kann auch sagen, es war eine Ausrede, teueren Stoff zu kaufen… *hüstel*)

Stoff Da die Zeit wirklich knapp ist, habe ich meine Pläne schon auf etwas hoffentlich durchführbares eingekocht.

Als Kleid werde ich mir ein schlichtes Etuikleid mit etwa dreiviertel Ärmeln oder kurzen Ärmeln nähen, nach meinem bewährten Schnitt mit Prinzessnähten. Alle Dekoideen habe ich konsequent gestrichen und mir dafür 2,50m von einen Seiden-Wollstoff bei De Gilles in Paris geleistet. Er hat eine etwas körnige Struktur, so dass auch ein schlichtes Kleid gut aussehen wird. (Falls noch Zeit sein sollte kann ich immer noch Perlenstickerei am Ausschnitt anbringen oder so was.)

End of the month we are invited on a wedding reception. Since all my clothes for festive events are more or less black and this is neither suitable for a wedding nor matches springtime I have to sew something new. (One could say it’s a pretence to buy expensive fabric…)

Since the time I have is short I discarded all time consuming ideas and brought it down to simple. So I’ll make a simple straight dress with princess seams (TNT pattern) and purchased I nicely structured silk-wool blend at De Gilles in Paris. The texture should make it suitable for a very simple dress. (If I should have time left I can always add some beading to the neckline. But that won’t happen.)

Wirklich anfangen kann ich damit aber noch nicht, denn ich habe zwar den Stoff und passendes Nähgarn, den Reißverschluss (der als Nachtreißverschluss ziemlich am Anfang eingenäht wird) und das Futter mußte ich aber bestellen. Mal sehen, wann das kommt.

I cannot really start the dress, because I have the fabric and the sewing thread, but lining and the zip (which will be a in seam zip and therefore will have to be installed first) I had to mailorder. So let’s see, when it arrives.

bestickte Seide und Vogue SchnittDas ist jedoch nicht so schlimm, denn ich will aus dieser schönen bestickten Seide von Sacré Coupons auch eine Jacke nähen. Der Schnitt ist ein “Very Easy, Very Vogue” und wird den Stoff durch die wenigen Teilungsnähte gut zur Geltung bringen.

Allerdings muß ich den Schnitt erst mal testen, denn Kimonoärmel und keine Teilungsnähte sind nicht so leicht anzupassen. Außerdem will ich die Verarbeitung etwas sauberer machen als in der Anleitung, ich will die Jacke mit Watteline doppeln, Kragen und Vorderteil mit Belegen arbeiten statt nur mit Futter zu verstürzen (so meine 3m Stoff dafür genügen) und außerdem Kragen und Kanten mit Seidenorganza verstärken.

Hier kam immerhin heute schon mein Freitag Nacht bestelltes Nähgarn von Alterfil (weil man kann so viele Farben haben wie man will… es fehlt dann doch eine – und petrol ist keine Farbe, die ich häufig vernähe), die waren wirklich wieder megafix! (Und als Beifang ist noch ein Röllchen “moonglow” in den Warenkorb gehüpft, leuchtendes Garn muß ich doch mal ausprobieren und es war gerade im Sonderangebot…)

Das Futter hingegen ist im gleichen Paket wie das für das Kleid. Und Watteline sowie Seidenorganza… kann ich erst Freitag kaufen.

Well, no problem, because there is also a jacket to sew. Since the embroidered silk (from Sacré Coupons in Paris) won’t need any further embellishement I’ve choosen a “Very Easy Very Vogue” Pattern that has only few seams. On the other hand this pattern is not tested yet and I don’t know how complicated it will be to fit, since it has no darts, kimono sleeves and few seams.

Plus the instructions are to simple for that nice fabric. They just tell you to double the jacket with lining. I intend to make facings for front and collar (if the 3m of fabric I have are enough for that), interface collar and front with silk organza and to interface the whole jacket with “Watteline” (a kind of batting, I’m not sure what it might be called in English).

The sewing thread I ordered from Alterfil Friday night already arrived today (you can have as many threads you want, you’ll be able to find a colour you do not have matching thread…), but the lining was ordered from the same dealer as the lining for the dress. And Watteline and silk organza will only be purchased on Friday.

Auch das ist nicht wirklich ein Problem, denn der Schnitt muß ja erst mal getestet werden. Kurz bevor ich in ein altes Bettuch schnitt fiel mir ein, daß ich eigentlich auch dringend eine Übergangsjacke brauche. Also tauchte ich erst mal in die Stoffkiste ab und kam mit einem bestickten Polyestertaft wieder. (Entsetzter Blick des Ehemannes wie immer göttlich, er (der Blick) sagte so was wie “… aber…. das hat ein MUSTER!”) Und den… habe ich jetzt schon mal zugeschnitten. (Ja, natürlich habe ich einen Weg gefunden, mehr Arbeit zu machen. Denn eine Jacke die auch tragbar ist muß ausgearbeitet werden, ein Testteil aus Bettlaken nicht.)

Vorderteile zugeschnittenDer Stoff (er könnte jemandem bekannt vorkommen… 😉 ) ist allerdings wirklich blitzdünn und beinahe durchsichtig, deswegen wird er mit einem Polyestervlies verstärkt (so ich noch genug habe…)

Optimalerweise sollte ich meine “tragbare Testjacke” bis Donnerstag fertig haben, damit Frau mhs mal auf den Sitz gucken kann.

Allerdings kann ich bis dahin kein Futter einnähen, weil das kann ich auch frühstens Freitag besorgen….

Ich glaube, allmählich wird es ein Problem. Drei Kleidungsstücke und so am 25. März sollten sie alle fertig sein. *schluck*

No Problem either, the pattern of the jacket hasn’t been tested yet. Just before cutting in an old bed sheet I realised that I could need a every day spring jacket. (Mine is so old and rotten that I’m hardly wearing it if I can avoid it..) So I picked an embroidered simple polyester fabric from my stash and cut it. (When my husband saw it he sopped and got that funny look that says “…but… that is not a plain fabric… there is a PATTERN!”) Yes, I’ve found a way to make more work. Because sewing a wearable muslin means a good deal more work than just putting together something without lining or proper closure from an old sheet.

Since the fabric is nearly see through thin I’m wanting to interface it with some polyester batting I still have. (At least I hope I still have enough.) It would be perfect having finished the wearable muslin on Thursday so Frau mhs can check the fit. Only.. I have no lining and will only be able to purchase that.. on Friday.

I think I am in trouble… three pieces and due day is around the 25th. Of this month… Good time to start panicking…?

Wider die Model-Monokultur?

Against model monocropping?

Was mich an den üblichen Modephotos ja am meisten stört ist nicht, da die Models dünn sind. Es gibt ja auch dünne Menschen, das ist okay.

Nein, was mich noch mehr stört (außer wenn man Knochen zählen kann) ist, daß alle die gleiche Magergröße haben. Es gibt so viele Frauen mit so vielen unterschiedlichen Figuren… warum wird immer nur eine Variante gezeigt?

What I do not like about the usual fashion pics is not, that models are thin. I’m okay with that, some people are thin. No what is getting on my nerves is that all of the models look like cloned. All the same figures. Humans have so many different figures, why do they show only one type?

Kleid ButterickAber bei den neuen Butterick-Schnitten bin ich über dieses Kleid gestolpert. Den Schnitt gibt es von 8 bis 24W (also ungefähr 34 bis 52) und die Photos helfen einem hier doch mal gut, vorher einen realistischen Eindruck zu bekommen.

(Ich weiß, ottobre zeigt auch verschiedene Figuren, aber bei den neueren Heften hat man die echten “Moppelchen” doch wieder eingesoart.

But among the new Butterick spring patterns I spied that one. The pattern comes in sizes from 8-24W and they also show it on models of different sizes. I like that a lot, because more people get a realistic impression how it will look on them from the pics!

Aus dem Blogarchiv

Sewing, socializing and other crafty websites

Februar 2006

Februar 2007:

Februar 2008:

Afrika im Bett

Africa in bed

Ich mag ja die afrikanischen Druck und Batikstoffe, nur wohin anziehen?

Also wurde der Stoff von Toto in Paris ein Pyjama. Was auch ganz praktisch ist, denn er kommt in 5 yard Stücken und das reicht gut für einen Pyjama und läßt nicht zu viele Reste.

Pyjama nach PatronesI like african print and batik fabrics, but where do I have the occasion to wear them?

So my fabric from Toto in Paris became a pyjama. Since the fabric comes in pieces of 5 yds each that is just the right amount for a plus sized sleepwear without having to much restovers.

Der Schnitt ist der Patrones-Schnitt den ich hier für den Motivationsmonat schon mal verwendet hatte. Wie damals geplant habe ich das Oberteil oberhalb der Taille etwas gekürzt und den Ärmel erst nach schließen der Seitennähte eingenäht. Das ging wirklich einfacher.

Außerdem habe ich im Rücken eine etwa 3cm tiefe Kellerfalte eingefügt. Am Kragen paßte das Oberteil nämlich sehr gut, nur wenn ich mich im Bett einrolle, brauche ich am Rücken doch etwas mehr Weite.

The pattern used is from Patrones in 2005 and I’ve used it before. Last time I sized up the top one size (from spanish 48 to spanish 50) and added 3cm FBA to the front. To get the bottom big enough I had cut the pattern lengthwise where the side seams would have been if the pattern had side seams and added there half of the difference between the hip measurement of a spanish size 48 and my own hip measurement. This time I also shortened the top a bit above waist and I did first close the side seams and then set in the sleeves. (Lessons learned from the first time.)

Also this time I’ve added a 3cm deep pleat to the center back, because the collar is fine, but when I am curling in in bed I need more room over my shoulderblades.

Sonst ist wieder alles genäht wie beschrieben, also durchweg französische Nähte. An was ich beim nächsten Mal denken sollte ist die Belege für das Vorderteil zu vergrößern. Vor allem wenn man wie ich größere Knöpfe nimmt als vorgesehen reicht das Knopfloch sonst über den Besatz hinaus und ist zur Hälfte unverstärkt. Beim anderen Schlafanzug machte das aber bisher auch keine Probleme und so habe ich hier die Knopflöcher dann auch wieder zusätzlich mit Fraycheck gesichert. (Die im Herbst 2003 gekaufte erste Flasche ist jetzt übrigens leer. Sehr ergiebig das Zeug.)

Und ich hatte einen kurzen Moment darüber nachgedacht, einfach chaotisch zuzuschneiden und nicht auf das Muster zu acheten, aber wie man an der vorderen Mitte sieht habe ich das dann doch nicht übers Herz gebracht. 🙂

Apart from that I constructed like last time, with french seams for all seams. Next time I should remember to make the facings larger. since I tend to use bigger buttons my buttonholes are halfway beyond the facings. But it still lasts on the last pyjamas, so I added some Fray Check to the buttonholes and hope it will do. (Btw. my first bottle of Fray Check I purchased in 2003 is empty now. Did last quite long.)

And yes, for a short moment I did think about not matching the print at all and just cut at random. But I couldn’t as you can see from the front. 🙂

Nadelstatistik 2009

Needlestatistics 2009

Weniger als die Anzahl der “geschafften” Sachen interessiert mich, wie häufig ich eigentlich Schnitte und Anleitungen aus welcher Quelle benutze. Deswegen stelle ich das mal für die Sachen zusammen, die ich 2009 fertig gestellt habe und im Blog vorgestellt. (Da wird vermutlich ein wenig Kleinkram fehlen, aber für eine Tendenz reicht es.) Bei veränderten Schnitten nehme ich den, der ursprünglich mal zu Grunde lag, auch wenn der nicht mehr erkennbar sein sollte.

I am less concerned about the question how may things I made, but I’m curious which patterns I am using most, so I make a little statistic about all items I finished this year and blogged about. (Some minor things will be lost that way, but that’s not so important for my purpose.) If I altered patterns to an extend where the original pattern wasn’t recognizable I will still “count” the source of the pattern basic.

Genähtes (Sewn items):

  • 2x Elingeria
  • 1x Kwik Sew
  • 1x McCall’s
  • 1x Ezi-Sew
  • 1x Marinique Lingerie
  • 4x Burdastyle
  • 1x Vogue
  • 9x eigener Schnitt (own pattern)

Gestricktes (Knitted items):

  • 1x Victorian Lace Today
  • 3x Encyclopédie des Ouvrages de Dames
  • 1x Knitty
  • 1x eigene Anleitung (own pattern)

Gehäkeltes (Crocheted items):

  • 2x Gehäkelte Trend Socken (Bärbel Born)
  • 1x 1 Knäuel Häkeln (Bärbel Born)

Sonstige Basteleien (other crafty stuff):

  • 2x eigene Anleitungen (own pattern)

Dieses Jahr habe ich offensichtlich vor allem nach eigenen Schnitten und Ideen gewerkelt. Das könnte allerdings auch was damit zu tun haben, daß ich kaum Kleidung genäht habe.

Seems that this year I mostly used own patterns. Which might be due to the fact that I hardly made any clothes.

Aus dem Blogarchiv

Tutorials (and more) from the past

Januar 2006:

Januar 2007:

Januar 2008:

Ein wunderschönes neues Jahr wünsche ich euch allen!

Happy New Year everyone!