P-A-Challenge 2007: Top, der Praxis zweiter Teil oder Ich sticke, ich sticke, ich sticke den ganzen Tag…

…und das seit einer guten Woche.

Nun gut, ich habe auch noch ein bißchen was anderes gemacht, arbeiten etwa. Aber meistens habe ich gestickt. Wenn ich mich nicht gerade selber für meine Idee verflucht habe. 😮

Stickrahmen und Stoff
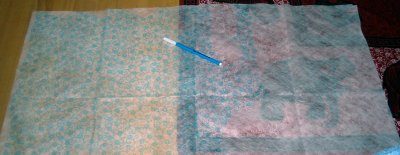
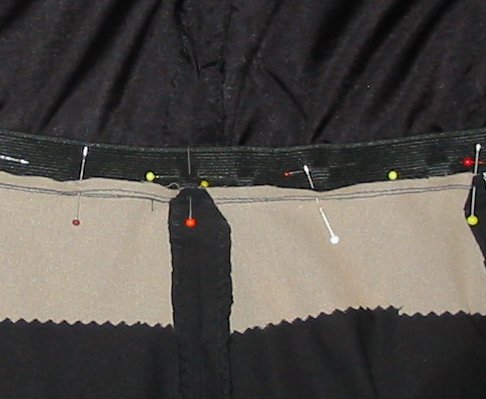
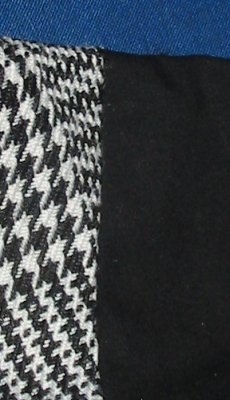
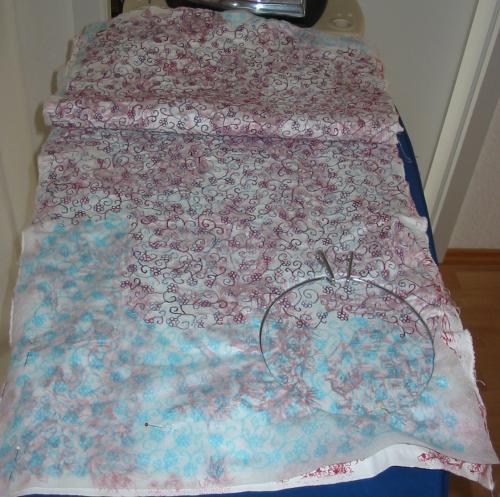
Das Soluvlies mit der Vorzeichnung habe ich leicht überlappen auf dem Stoff festgesteckt. Da ich mit einem Stickring arbeite und der Stoff nicht elastisch ist, muß ich es nicht fest fixieren.

Als ich mit der Vorzeichnung fertig war, war es schon wieder gegen Abend, aber zumindest einen Ring mußte ich noch absticken. Ich arbeite in etwa von der Mitte nach außen, wobei ich etwas nach rechts versetzt beginne, weil ich die Stelle, an der die beiden Sulovliesstück überlappen möglichst bald überstickt und somit auch gesichert haben will. Die zweite Stickfläche setze ich dann auch schon auf den Überlapp.

Ich benutze den großen Stickring von Madeira, der hat einen Durchmesser von ca 18 cm. Je größer der Ring ist, desto weniger Stabilität bekommt der Stoff und desto schwieriger ist er auch zu führen. Zumal der Durchlass meiner Maschine ein paar Milimeter kleiner ist als der Außendurchmesser des Ringes, so daß ich schon mal anstoße, wenn ich ganz an der linken Kante des Ringes arbeite. Aber wenn ich irgendeine Chance haben will, rechtzeitig fertig zu werden, dann muß die Perfektion jetzt mal drei Schritte zurück treten. Hier soll es ja nur auf den Gesamteindruck ankommen, nicht die Stickerei im Detail.

After all that tracing I can finally start stitching. What I’m doing since.. well… since I completed tracing last week. :o)

The Soluvlies just gets pinned on my fabric. As I’m working with a hoop glueing oder basting is not necessary. To have any chance to finish in time I’m using the biggest hoop I have (from Madeira with a diameter of about 18cm). The disadvantages are, that the bigger the hoop the less stability of the fabric. Luckily this fabric isn’t elastic at all and not to soft either, so it will to. Of course it’s also more diffcult to move the big hoop precicely than doing the same thing with a smaller one. And the hoop is a fraction larger than my machine has room, so if i’m working on the very left border of it, it bumps to the machine on the right side which does not at all help to stitch where I want to stitch. But… time’s a matter here, so compromise is better than going naked… 😉

StickfortschrittAnother difficult thing was the handling of the threads. Frankly… both of them together fed into the tension system… was a little more than what a household sewing machine is supposed to use. And mine was set to work best with fine threads (by the mechanic on my demand), because that’s what I’m using most.

As my design has very round forms, it would be best to make the stitches as small as possible. But as the thread is rather thick it catches somewhere in the bobbin, if the stitches are small… Finding an appropriate needle wasn’t easy either. The largest embroidery needle I have is a size 90 (Titanium from Organ). One. So no needle break please, because I don’t know where to buy these locally…?

Next I learned a lot about cotton thread I think I haven’t been using any for ages. And never stitched so much with it. One lesson is: cotton creates much more lint everywhere in the machine than my usual polyester thread.

Second lesson was: when you work quite at the edge of the machines specification (or even a bit beyond…) use quality thread. On the bobbin, too.

On the bobbin I’m using ususally a cheap, thin, white polyester thread I bought really verry cheap quite long ago. (In quite big amounts, of course…) No, I wont do that again. But so far it worked well for embroidery.

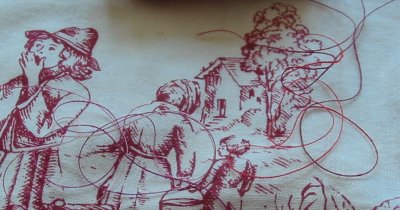
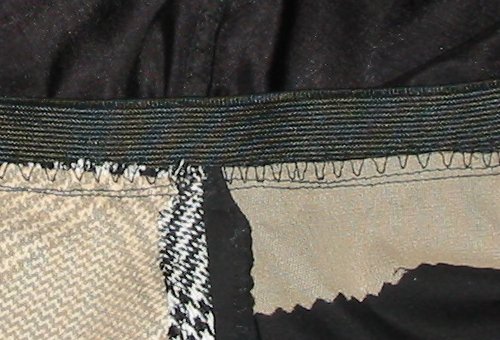
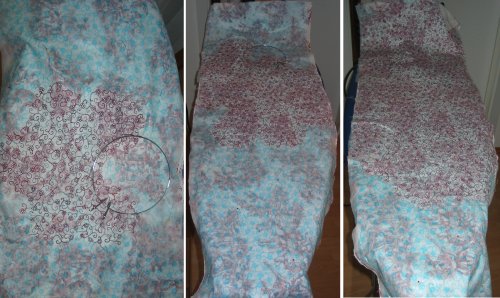
Well, here it didn’t. I had a lot of birds nests, the Valdani thread would catch somewhere under the stitch plate… Okay, part of it is due to the fact, that the two threads are to thick for the machine. But after I replaced the cheap thread by a simple white Gütermann it went much, much, much better. So over the days I made some progress, as the pictures show…

Als Oberfaden verwende ich zwei Rollen des handgefärbten Valdani-Baumwollgarns, die ich gemeinsam durch die Oberfadenspannung und die Nadel laufen lasse. Ehrlicherweise muß ich sagen, daß das Garn so eigentlich zu dick für meine Maschine ist. Um so mehr, weil ich sie bei der letzten Wartung auf dünne Fäden habe optimieren lassen, weil ich diese ja am häufigsten verarbeite. Der nächste Haken ist, daß mein Muster ja recht viele Rundungen hat. Diese stickt man am schönsten mit möglichst kleinen Stichen nach. Das dicke Garn jedoch verlangt lange Stiche, sonst gibt es Fadensalat… Kompromisse, Kompromisse,… Ebenso die Nadel. Die dickste Sticknadel die ich habe ist eine 90er Titan von Organ (natürlich genau eine…. also bitte kein Fadenbruch, denn ich hae keine Ahnung, wo ich die hier vor Ort bekommen könnte?). Nun ja, etwas Stärker wäre besser, glaube ich. (Gibt es überhaupt Sticknadeln in 100?)

Trotzdem gibt es Fortschritte, wie die Bilder zeigen. Langsame.

Eine deutliche Verbesserung hatte ich übrigens, als ich das billige Polyestergarn, das ich als Unterfaden verwendet habe (habe ich vor langer Zeit mal megabillig geschossen, natürlich in größerer Menge, und es taugt wirklich nichts – nein, seither kaufe ich so was auch nicht mehr – aber als Unterfaden zum Sticken funktionierte es bislang ganz gut, dachte ich wenigstens…) durch ebenso simples weißes von Gütermann ausgetauscht habe. Gut, Lektion gelernt. Auch wenn es sonst immer funktioniert hat… bei Problemen Billiggarn ersetzen.

Eine andere Lektion war: Baumwolle fusselt deutlich mehr als meine Polyestergarne. (Allmählich verstehe ich, warum die Patcherinnen und Quilterinnen so versessen aufs Maschine putzen sind…. mit Baumwolle setzt sich da wirklich mehr ab.) So oft habe ich meine Maschine glaube ich noch nie sauber gemacht…

Fortschritt testen 
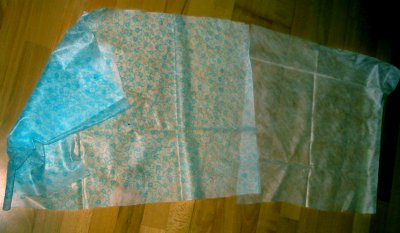
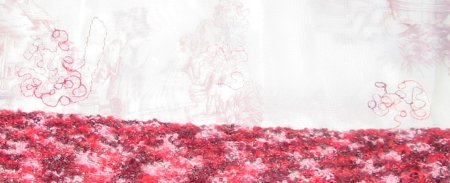
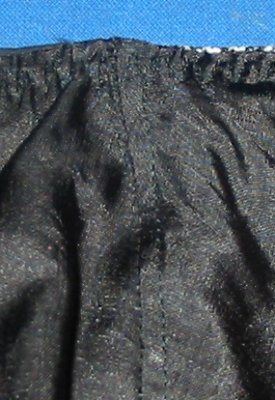
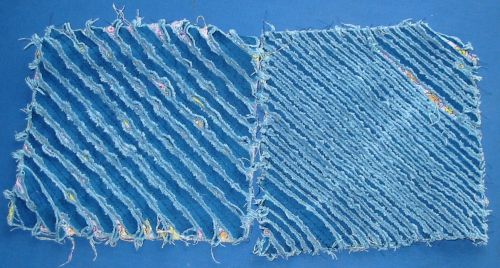
Irgendwann war der Stoff dann mal zu großen Teilen bestickt.

(Ich habe mich deswegen dafür entschieden, den ganzen Stoff zu besticken und nicht nur die Konturen der Schnitteile, weil ohnehin kaum etwas ungenutzt bleiben wird. Und sollte ich irgendwo in meinem Outfit doch noch ein Schnipselchen von diesem Stoff einarbeiten wollen… nachträglich ist die Stickerei nicht mehr aufzubringen.)

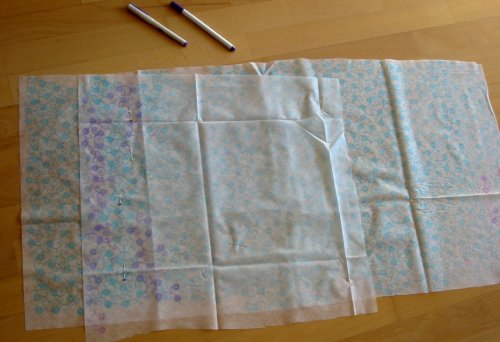
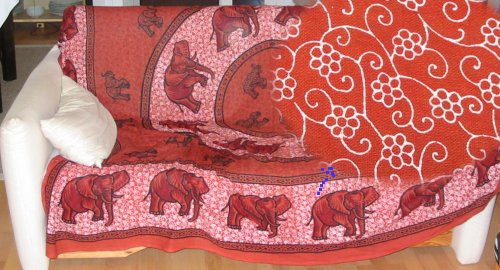
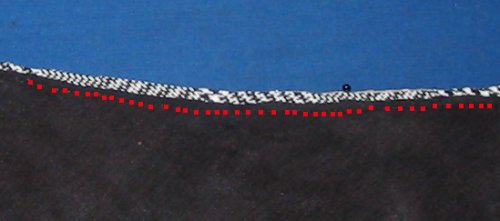
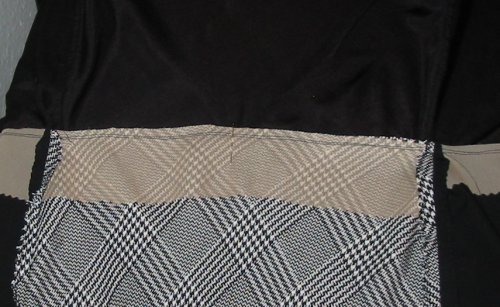
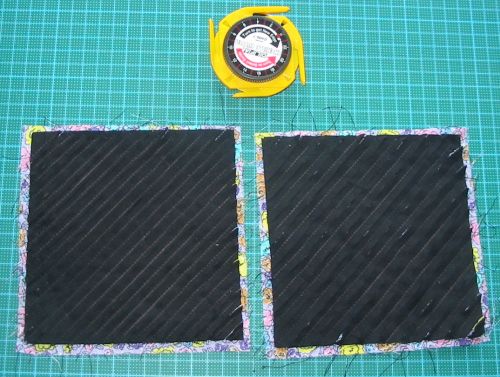
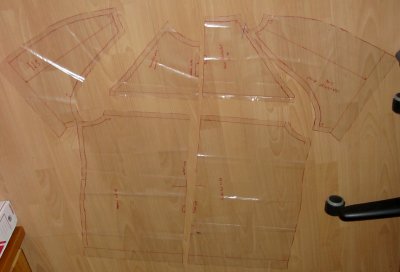
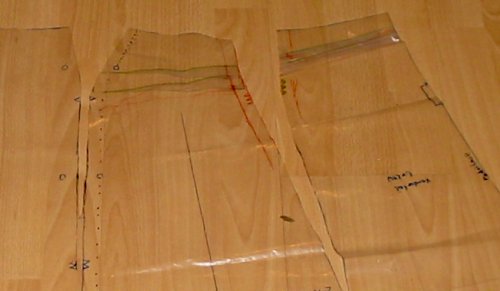
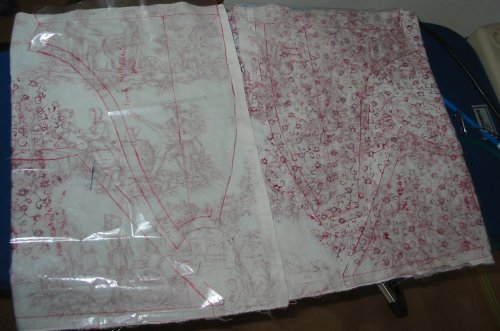
Daß ich die beiden Schnittkanten komplett besticken muß war mir klar, da werden die Schnitteile angelegt. Aber an den Schmalseiten kann ich vielleicht ein bißchen was sparen, deswegen mal eine Kontrollauflage meiner Schnitteile. – Doch, ein paar Ecken kann ich weglassen.

Before I finished the embroidery I decided to check, where I could maybe leave some of the borders without stitches. Saves money and material.

So I put on my pattern pieces to check… and…. yes, there are some corners I can just leave as they are…

Why I decided to stitch the whole fabric and not only the pattern pieces? Well… first of all there is not much fabric that will remain anused. And second: I haven’t decided about the design of my jacket. So it is very well possible, that I want tu use a scrap of that fabric in the jacket too. But after it’s cut it’ll be (nearly) impossible to reproduce the same embroidery.

Stoffbahn fast fertig bestickt
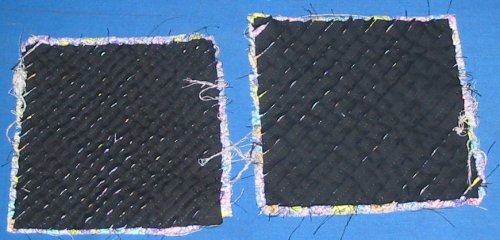
But now, slowly, I can see some light…

Except for the problem that I am way from my time schedule… the stitching should come to an end before the weekend actually starts.

Only there’s a new threat in sight… there is not much thread left… :o)

And since I bought the last spools in this two colours… I cannot just buy more. 🙁

So keep your fingers cross…. PLEASE!

Aber so allmählich kommt Licht am Ende des Tunnels in Sicht.

Abgesehen davon, daß ich meinem Zeitplan weit hinterher hinke, nähert sich die Stickerei ihrem Ende. Und sollte noch fertig werden, bevor das Wochenende wirklich los geht.

(Und ich kann nächste Woche dann vielleicht auch mal die Presseschau nachliefern. Die Burda PLUS liegt hier schon rum und mal sehen, ob ich heute noch dazu komme, das neue Monatsheft der Burda zu holen…)

Vorausgesetzt… vorausgesetzt der Faden reicht noch. :o)

Denn natürlich waren es die beiden letzten Röllchen in diesen Farben, die ich Silvia abgekauft habe. Auch auf den kleinen Spulen ist nichts mehr davon da…. Also kann ich nicht nachkaufen…

Also drückt mir die Daumen, bittebittebitteeee…!

P-A-Challenge 2007: Top – der Praxis erster Teil

Muster, Stickvlies und KaffeeDie Idee habe ich, also muß ich sie nur noch umsetzen… Das Muster pause ich auf Soluvlies von Freudenberg durch. Fürs frei geführte Sticken mit der Nähmaschine immer noch mein Favorit.

Es ist durchsichtig genug, um zumindest ein kontrastreiches Muster durchzupausen (ich wähle den Teil des Musters, der weiß auf rot ist) und fest genug, um zusammen mit einem Stickrahmen ausreichend Verstärkung zu bieten. Und es wäscht sich rückstandsfrei aus.

Als Stift wähle ich den Trickmarker Aqua von Prym, weil der in der reichlichen Auswahl der diversen Marker der einzige ist, der wirklich lange genug sichtbar bleibt. Irgendwie ist mir schon klar, daß ich das nicht an einem Tag abgestickt bekomme…. Und falls doch etwas auf die Decke kommt, kann ich es auch da poblemlos auswaschen. Außerdem bietet das blau einen gut sichtbaren Kontrast. Das hilft bei Sticken.

Also Soluvlies auf die Decke gelegt, festgesteckt, Tässchen Kaffee dazu, Arte angeschaltet und losgelegt…

To transfer the pattern to the fabric I use Soluvlies from Freudenberg. It’s transparent enough to see through and datch the contures, it’s strong enough to support the fabric while I’m stitching (I will be using a hoop anyhow) and it disappears completely when you wash it. (For free motion stitching this is my first choice.)

Muster kopieren To trace the design I use Prym’s Aqua Trickmarker. It’s the only one I know that really lasts long enough. I somehow suspect, that stitching will taker longer than some hours… Plus the colour privides a good contrast to my red thread and white and red Toile de Jouy, that will make stitching easier.

So I pin the Soluvlies on the african fabric, take a cup of coffee, switch the TV to Arte and start…

Three documantaries (the coffee long gone) later there is some result. And I’ve found out that tracing will take longer than expected, because of the elephants.

The elephants hide a lot of the small pattern so I can only trace relatively small parts and then have to shift the Soluvlies a bit, then finding the right connection points, trace a bit, shift a bit, search a bit…

Drei Dokumentationen und einen Kaffee später zeigen sich erste Ergebnisse. Allerdings dämmert mir auch schon, daß das durchzeichnen (noch) länger dauern wird als gedacht, denn die Elefanten sind im Weg…

Muster durchpausenDenn die Elefanten verdecken doch recht viel von dem kleinen Rankenmuster und so muß ich das Soluvlies ständig verschieben, den Rapport wieder finden, wieder ein bißchen durchpausen, wieder verschieben, wieder den Rapport suchen…

Erst mal Abendessen und dann zu CSI: Miami umschalten.

After dinner and CSI:Miami…

It’s getting late and I’m still tracing…

Night-programm on the TV provides “Blade”, there’s nothing better than bad TV serials for boring work..

Muster kopiert Nachtprogramm im Fernsehen: “Blade”. Es geht nichts über schlechte Serien zu stupider Arbeit.

Spät in der Nacht oder besser in den frühen Morgenstunden nähert sich das erste Stück seiner Vollendung. Allerdings gibt es noch ein zweites…

(Mein Mann war auf Dienstreise und ich war nicht gezwungen, am nächsten Morgen früh auf zu sein, also wollte ich es unbedingt fertig machen.)

Doch dann ein ganz unerwarteter Rückschlag…

Very late that night or very early that morning the first sheet of Soluvlies was finally done. Only there was a second one. Smaller, luckily…

(My husband was on a business trip that day and I had no obligations the next morning, so I planned to finish the tracing that day. No matter how long it would take.)

But then something absolutely unexpected happend…

Stift leer Der Stift war leer!

Welche Frustration! Ich habe dann meine anderen Marker ausprobiert, dazwischen auch immer wieder ein paar Striche mit dem Aqua-Marker gezogen… mußte aber einsehen, die anderen Sublimatstifte verschwinden zu schnell.

(Keine Ahnung an welchen Stoffen diese Stifte getestet werden. Diejenigen, die angeblich zwei bis drei Tage sichtbar bleiben sollen verschwinden normalerweise nach ungefähr zehn Minuten, die länger haltbaren, zehn Tage heißt es da auf der Packung, schaffen vielleicht mal einen.)

My Aqua-Marker stopped marking!

Can you guess how frustrating that is! I tried some of my other Trickmarkers who vanish by themselfes after a certain time, but they simply don’t last long enough.

(I have not the slightest idea on what kind of fabric they are testing those markers. There ones are supposed to last three day before they vanish, when I’m using them I can see the marks about ten minutes. The others claim to be visible for ten to forteen day… well one day, after my experience…)

Finally I went to bed. 🙁

The next morning… okay, around noon, I tried again. I could trace a bit with the Auqa Trickmarker, but the again it stopped. So I took a trip to town to buy a new one. It took me only three hours. For one marker. But I’m proud of myself, even if I had to cross the wool department to get to the notions I didn’t buy any. (Instead I bought myself two pair of socks and some Icecream… but that doesn’t count, does it?)

Also trollte ich mich frustriert ins Bett.

Am nächsten Morgen, okay, eher Mittag, unternahm ich noch einen Versuch. Der Stift hatte sich über Nacht ein wenig erholt, aber weit kam ich trotzdem nicht damit. Also dackelte ich Richtung Innenstadt um einen neuen zu kaufen. Dauerte alles in allem auch nur drei Stunden. Für einen Stift. Aber ich binstolz auf mich. Obwohl der weg zum Trickmarker durch die Wollabteilung führte, habe ich keine gekauft. (Stattdessen zwei Paar Socken für mich und eine Portion Eis. Aber das zählt nicht, oder?)

P-A-Challenge 2007: Theorie zum Top

Im Moment komme ich ja wirklich nicht so viel zum Bloggen… aber wenn ich in Verlauf der nächstens Posts erklärt haben werde, was ich gerade tue, dann werdet ihr verstehen.

(Und mich zur bescheuertsten Hobbyschneiderin weit und breit wählen…)

I’m not blogging too much these days but after the next two or three posts you’ll understand why. (Besides winning the contest of the most crazy/nuts/lunatic sewer… 😮 Not sure about the adequat translation of “bescheuert”…)

Nachdem meine Idee mit der Chenilletechnik ja grandios gescheitert ist brauchte ich was anderes für die Toile de Jouy. Denn so plakativ will ich das Muster dann auch nicht auf der Brust haben. Zumal es ein günstiger Stoff war und somit nicht gerade den schönsten, feinsten Druck aufweist.

Ganz verstecken will ich die Motive aber auch nicht.

Also werde ich versuchen, einen Trick aus der optischen Zauberkiste anzuwenden: Wenn man zwei gleich starke Muster überlagert, ist keines davon mehr richtig zu erkennen und es bleiben erst mal nur ein abstrakter Eindruck und die Farbwerte übrig.

Zumindest in der Theorie.

Fadenwahl As my attempts to kind of hide the Toile de Jouy with Chenille-Technique didn’t work I needed another idea. I don’t want to the Jouy-motives to be the focus of my top, especially as it was a relatively cheap fabric that has not the finest, most elegant print, but I don’t want to hide it completely either.

So I’m trying to use optical illusion. when you superpose two motives that are more or less equal in “strenght” you will not actually see each of them, but only something abstract and the overall impression of the colour.

At least in theory.

To achieve this I intend to embroider the whole piece of fabric with a small motive in red.

But not having enough of the right embroidery thread was one of the things that got me stuck some time ago. But with the help of sewing friends I had a lot of choice only one week later: Frau mhs phoned another co-sewer in her town who is a great patchwork-artist and owns an embroidery machine, too. And she had more of the colour I wanted.

But also Silva sent me two spools of the wonderful valdani variegated cotton.

Farbwahl Um diesen optischen “Versteckeffekt” zu erreichen möchte ich den Stoff flächendeckend besticken. Und das Fehlen des passenden Stickgarns gehörte zu den Sachen, wegen der ich vor einiger Zeit mit nichts weitermachen konnte.

Doch wie immer sind Nähfreundinnen toll: Frau mhs organisierte von ennertblume Stickgarn im gewünschten rot und Silvia schickte mir von dem wunderbaren Valdani-Verlaufsgarn, das ich eigentlich schon immer mal ausprobieren wollte.

Da ich mich nicht entscheiden konnte hatte ich mir zwei appetitliche Farbstellungen schicken lassen: Strawberry Cream und Raspberry Fizz. (*lecker*)

Strawberry Cream enthält genau den hellen rosa Ton des Strickstoffes, Raspberry Fizz die anderen beiden. Was tun, sprach Zeus?

Rankenmuster I have two yummie colourways of the Valdani thread: Strawberry Cream and Raspberry Fizz. But which one to take? The first contains the lightest hue of the knit, the second the other two. What now?

Well… testing of course. I made stitches with both on a transparent fabric, so I could lay it over the Toile de Jouy and evaluate the effect. On the right is Raspberry Fizz, in the middle Strawberry Cream. Hm… Both work, but I wasn’t perfectely happy… so I tried using both threads together through one needle. Yes, I think that’s it!

Da war also wieder testen angesagt. Ein paar Stiche auf einen transparenten Gardinenrest… rechts desn Raspberry Fizz, in der Mitte Strawberry Cream. Nett, beide… trotzdem… so ganz ist es das nicht… also versuche ich es mal mit beiden Fäden gleichzeitig…. Ja, so sollte es gehen.

Fehlt nur noch eine Kleinigkeit: Das Stickmuster.

(Erwähnte ich schon: ich habe keine Stickmaschine, bei mir muß die Nähmaschine ran. Und den Stickrahmen muß ich selber führen… 😮 )

Aber da hilft mir mein Sofa weiter, genauer gesagt die Decke, die derzeit die großen Löcher im Bezug verdeckt. Das Rankenmuster sollte mit seinen Schnörkeln gut dazu passen…

Okay, I have the thread. Now I need a motive to embroider. I cannot draw at all, so I have to steal.

From this african print, that hides the big holes in the original cover. If you look very closely… there’s a nice flower motive all over. And that’s what I intend to use.

(Did I mention: I have no embrodery-machine. Just my sewing machine and my hands… 😮 )

P-A-Challenge 2007: Gummibund flachgelegt (Teil 2)

Gummi annähenGut, dann also auf zum Gummi.

Ich benutze einen etwa 1,7cm breiten schwarzen Gummi, der relativ weich ist, den gibt es bei uns auf dem Wochenmarkt an einem Kurzwarenstand sehr billig und ich habe bislang keine schlechten Erfahrungen damit gemacht. (Beim ersten Mal habe ich ihn aus der Not gekauft, weil ich dringend welchen brauchte und keine Gelegenheit hatte, ins Fachgeschäft zu gehen.)

Die Länge bestimmte ich, indem ich mir den Gummi um die Taille ziehe, bis er stramm aber nicht zu eng sitzt und dann abschneide.

The elastic I’m normally using in my skirts and trowsers ist about 1,7cm large, black and soft. But still strong enough. I get it on the weekly grocery market… :o) There is someone selling all kind of household supply, from soap-holders to needles. Mosty cheap and poor quality, but this elastic is cheap and okay.

To determine the right length of the elastic I’m simpliy pulling it around my waist until I think it feels right. Every elastic is different in how strong it stretches, how soft it is etc. so this is the most reliable method.

I’m folding the elastic in half, again in half and mark four parts of equal length with pins. On the skirt I’m marking the sides (the darts in this case) and the front and back middle of the skirt also with pins.

Then I’m pinning the elastic on the lining matching the pins. Next thing is to stretch the elastic to the length of the skirt waist and secure it with a lot of pins as the picture shows.

The elastic is on the lining, under the seam allowances. What is important is, that the elastic does not touch the stitchline, but is about 2mm or 3mm away on the lining. If the elastic is to close to the stitchline the lining will show from the right side… (guess how I found out… :o) )

Danach werden am Gummiband Viertel mit Stecknadeln markiert (zwei Mal zur Hälfte falten). Am Rock markiere ich die Seiten (in diesem Fall die Abnäher) sowie die vordere und rückwärtige Mitte.

Der Gummi wird anschließend passend (also Stecknadel zu Stecknadel) auf den Futterrock gelegt und dann abschnittsweise so weit gedehnt, daß er genau die gleiche Länge wie der Stoff darunter hat. Das ganze mit vielen Stecknadeln befestigen, wie das Bild zeigt.

Gummi angenäht Der Gummi liegt also auf dem Futterrock aber unter der Nahtzugabe.

Wichtig ist dabei, daß er nicht direkt an der Naht positioniert wird, sondern etwa 2mm-3mm daneben. Das ist nötig, damit man den Bund letztlich wenden kann und der Futterrock wirklich innen ist, ohne hervorzuspitzen. (Drei Mal dürft ihr raten, wie ich das herausgefunden habe… :o) )

Anschließend wird der Gummi aufgenäht. Ichbenutze dazu den genähten Zickzackstich (manchmal auch Wellenstich genannt, glaube ich), mit einer Stichbreite von 5,5mm und einer Stichlänge von 1. (Das ist etwas mehr als die Maschine voreingestellt hat.)

Beim Nähen muß man den Gummi dehnen, aber nur so weit, daß der Stoff nicht mitgedehnt wird. Und langsam genug nähen, daß der Stoff unten keine Falten bekommt.

Die Nahtzugabe wird dabei, wie man sieht, gleich mit versäubert.

To sew the elastic I use an elastic stitch. Would “sewn zigzag” be the appropriate term in English? Stitch widht is 5.5, stitch length about 1. (Normal zigzag is also okay.)

I’m sewing on the seam allowances and thorugh the elastic, of course. So the seam allowances are secured, too.

im Nahtschatten feststeppen Don’t forgent to stretch the elastic to the length of the fabric while you sew. And better sewing slowly, to be sure not to have any ugly folds in the lining.

Well… nearly done. Just turn the lining to the inside of the skirt.

To make sure it remains there and doesn’t show I secure it with “stitch in the ditch” of the seams and darts I have. This skirt has enough seams an darts to keep elastic and lining in place. If this is not the case (for example on a trowser without darts, four points to attach all layers is not always enough) I attach with hand stitches where neccessary.

The picture here from the right side shows… right, nothing. The stitches are invincible. Using a very fine 150 Alterfil thread did help…

So, jetzt muß der Futterrock eigentlich nur noch in den Rock hinein gestülpt werden. Und, damit er dort bleibt und nicht hervorlugt, etwas befestigt.

Letzteres geht sehr einfach, indem man in den Nähten exakt auf der Nahtlinie steppt. (Quilter kennen die Technik meist.) Die Naht dazu etwas auseinanderziehen und durch alle Lagen durch etwa 2cm (also Gummibreite) steppen.

Das Bild zeigt… nichts. Die Naht ist unsichtbar. Der feine 150er Alterfilfaden war da natürlich kein Schaden.

Bei diesem Rock habe ich auch ausreichend Nähte und Abnäher, um den Bund zu befestigen. Vier Nähte (etwa eine Hose ohne Abnäher) sind meist nicht ausreichend. In diesem Fall helfe ich mir mit ein paar Handstichen von der Futterseite her an strategisch geeigneten Postionen.

Hängt der Rock auf dem Bügel, sieht der Bund etwas gekräuselt aus. Aber am Körper liegt er dann flach an, gibt aber nach, so daß er über den Tag nicht unbequem wird und auch ein paar Kilo Gewichtsschwankung mitmacht. *g*

Gummibund von innen Auf der Innenseite des Rockes sieht man die gewellte Naht, mit der der Gummi angenäht wurde und man sieht, wenn man ganz genau hinsieht, die Längsnaht, die den Gummi stabilisiert.

The last picture is the skirt from inside. You see the zigzaged seam and if you look very, very closely you see the short seam that keeps elastic and lining in place.

To finish the skirt I attached the lining to the zipperband whit some handstitches.

And I added a hook and eye to the waist. Here it is important to sew through the elastic, but not through the outer fabric. So the zipper can not open itsself and its the elastic that will “carry” the skirt.

The result is a skirt that looks a bit odd on the dresshanger, but has no bulk in wearing while offering all the comfort of a “normal” elasticezed waistband.

Only the hem has to be done. Here a little help from sewing friends will be welcome…

Um den Bund fertig auszuarbeiten nähe ich noch das Futter mit einigen Handstichen am Reißverschlußband an.

Damit der Gummi auch gut um den Körper gespannt ist und tatsächlich den Rock “trägt” nähe ich an der Futterseite noch einen kleinen Haken und eine Garnschlinge. Von außen ist das unsichtbar.

Tja… und jetzt fehlt nur noch der Saum. Bei dem mir Frau mhs und ihr Rockabrunder am Donnerstag hoffentlich helfen werden.

Ich werde also schon mal nicht nackt in Aachen antregen müssen.

Hoffe ich. :o)

P-A-Challenge 2007: Gummibund flachgelegt (Teil 1)

Bißchen wenig los hier die letzte Woche, ich gebe es zu. Wobei bei mir viel los war, ich war ein Wochenende meine Mutter besuchen und da habe ich keine Nähmaschine. Eigentlich wollte ich ein wenig stricken, aber mein Bruder hat mir als nachträgliches Geburtstagsgeschenk “Victorian Lace Today” geschenkt, also mußte ich lesen und staunen. Danach habe dann noch ein bißchen Verwandtschaft auf Besuch zu mir mitgebracht und in Köln und Aachen Tourist gespielt.

Rock und Futterock zusammengesteckt Deswegen ging das Nähen nur in kleinen Portiönchen vorwärts, meist Abends. (Was leider eine blöde Zeit ist, schwarze Stoffe zu photographieren… 🙁 )

Sorry for not updating the blog during the last week. But I spent a long weekend without sewing machine at my mothers place. I intended to knit, but my brother had another birthday present for me (in my family we tend to be a little “timeless”, sometimes), “Victorian lace today”. That kept mit busy reading. I’ll need Lace yarn. Huge amounts of it, I suppose…

When I came back home I brought a young relative with me who visited me and I enjoyed Cologne and Aachen as a tourist.

So I only could do a bit of sewing, mostly at night time. My skirt is nearly finished now, but it’s not a good time to take pictures of black fabric… sorry for the quality. 🙁

Ein Problem bei Röcken und Hosen ist, daß mein Bauch nicht immer den gleichen Umfang hat. Was morgens paßt, beginnt spätestens am Nachmittag zu kneifen, was am Nachmittag richtig sitzt, rutscht morgens noch. (Lustigerweise ist der Effekt stärker wenn ich bei der Arbeit keine Zeit habe, was zu essen…)

Um das zu vermeiden gibt es die tolle Erfindung des Gummibundes. Der aber leider den Nachteil hat, daß er fürchterlich aufträgt. Wenn man Größe 36 hat mag das noch erträglich sein… in meiner Größe ist es hingegen höchst unerwünscht.

Aber ist gibt eine Möglichkeit, etwas Dehnweite in den Bund zu bekommen, ohne dicke Kräusel mit sich herumschleppen zu müssen. (Ich habe diese Technik zwar noch in keinem Buch gefunden, aber ich vermute sehr, daß andere schon ähnliche oder die gleiche Idee hatten, weil sie eigentlich naheliegend ist. Ich behaupte also nicht, sie “erfunden” zu haben. 😉 Falls man Nähtechniken überhaupt “erfinden” kann.)

Das erste Bild zeigt den Futterrock, der rechts auf rechts über den Rock gezogen ist. Die Öffnung für den Reißverschlußschlitz bleibt natürlich offen, die Nahtzugaben sind versäubert und auf die linke Seite des Futterrocks gebügelt.

One of my problems with the waist of skirts or trowsers is that my tummy grows over the day. Either it fits in the morning, then it will become very uncomfortable in the early afternoon or it will hang very loose in the morning to fit later the day. (The funny thin is, that this effect is even stronger when I don’t have the time to eat something during work…)

Using elastic in the waist stay helps a lot, but it creates bulge. When you’re a size 8 or so this may be acceptable, but in my size… it’s highly unwanted.

Nahtzugabe zurückschneiden So I created a technique for a flat elastic waist. (I haven’t seen it in any book so far, but I don’t claim to be the “inventor” of it I’m quite sure, others hat the same or similar ideas before.)

The first picture above shows the first step: put skirt and lining skirt together, right sides facing each other. The place where the zipper sits in the skrit hast du remain open, of course. I zigzaged it and pressed the seam allowance to the left side of the lining skirt.

Die Rock und Futterrock an der Taille zusammennähen.

Anschließen die Naht von beiden Seiten flach bügeln und die Nahtzugaben zurückschneiden. Vom Oberstoff etwa auf 6mm-7mm, vom Futterstoff auf 3mm.

Da man die Nahtlinie schwarz auf schwarz wirklich gar nicht sieht, habe ich sie mit den roten Punkten etwas nachgezogen.

I sew skirt and lining together at the waist.

Then I press the seam flat from both sides and cut back the seam allowances. The skirt fabric I’m cutting back to baout 6mm-7mm, the lining to 3mm.

Nahtzugabe Richtung Futter gebügeltAs the stitchline isn’t visible at all, black on black, I’ve marked it with the red dottet line.

Anschließend wird die Nahtzugabe in den Futterrock gebügelt.

Wer genau hinsieht erkennt, daß es scheinbar zwei Nahtlinien gibt. Das liegt daran, daß ich den Oberstoff nicht nur mit Vlieseline G785 gegen verdehnen geschützt habe (ein Teil des Rockes ist ja schräg zugeschnitten), sondern auch eine Stütznaht genäht habe.

(Das heißt einfach eine Gradstichnaht mit etwa 1,2cm Entfernung zur Schnittkante auf die Nahtzugabe des Rockes genäht. Das ist ein einfaches und billiges Mittel, Verdehnen des Stoffes schon während der Arbeit zu verhindern.)

After cutting back the seam allowances I pressed them towards the lining skirt.

You may notice two stichlines… one ist just a staystitch on the skirt. As the front and back pannel were cut in bias as you might remember, I also used fusible interfacing, Vlieseline G785 from Freundenberg, a very soft one that still provides enough strenght here.

So weit ein ganz normaler Bund. Die Sache mit dem Gummi kommt dann im nächsten Eintrag.

So far an ordinary waist stay. The thing with the elastic will be described in my next posting.

P-A-Challenge 2007: Na gut, dann halt die Jacke

Nachdem ja wegen des fehlenden Materials sonst nichts mehr ging, habe ich mir doch die Jacke vorgenommen. Ich habe ja meist mehrere Projekte gleichzeitig am Haken, aber allmählich nimmt das Chaos überhand… kann ja nichts wegräumen, an dem ich noch arbeite.

Schnitt McCalls Aber den Schnitt für die Jacke könnte ich ja dennoch mal angehen.

Ich will hierfür diesen McCalls Schnitt benutzen, den ich sehr liebe. Ich finde diese “einer für alles” Schnitte ohnehin sehr praktisch. Stoffe und Details geändert und vom Strandurlaub über die Businessgarderobe bis zum Abendoutfit ist alles drin. Die Jacke, den Mantel und die Hose habe ich schon genäht.

Die Jacke, so zumindest meine Erinnerung, paßte eigentlich gut, nur eine FBA wäre eine Optimierung. Ich hatte sie genäht, bevor ich diesen Anpassungstrick kannte.

Since I couldn’t do anything else I finally decided to start with the jacket. I’m normally doing several projects in the same time, but my space now looks more chaotic than normal. I couldn’t range ongoing projects, could I? So… one more.

I intend to use this McCall’s pattern I really love. I like in generall the idea of these wardrobe patterns. One pattern and with few alteration and different fabrics you can create outfits from holiday to business to evening wardrobe. I’ve sewn te jacket twice, once as jacet, once as coat. And I rememberd that it did fit quite well. Only I FBA might optimize it. (The last time I’ve used this patterns was beforde i knew how to do that.

Für eine FBA braucht man den Brustpunkt. Also die Jacke schnell angezogen, um dessen Lage zu überprüfen. Knöpfe geschlossen, Stecknadel durch den Brustpunkt. (Der Jacke….) Hm. Die Ärmel sind auch etwas eng am Oberarm. Bißchen knapp am Rücken. Der Knopf auf der Taille schließt. Aber… er spannt auch.

Da werden wohl ein paar Änderungen mehr nötig sein. Gut, wenn ich die FBA mache wird es an Taille un Hüfte auch weiter. Am Rücken könnte es dann auch reichen. Ansonsten sind ja Teilungsnähte da. Und den Oberarm solte man auch weiter machen können.

Eine Menge Änderungen für einen Schnitt, den ich nehmen wollte, weil er schon paßt.

For the FBA I need to know where the breastpoint is. So I put on the jacket. Marking the breastpoint with a pin. (On the Jacket…) Hm. Well. The sleeves ar a little… snung.. around my upper arm. The waist button kan still be closed… but… well… fit… not really.

So some more alteration will be needed. The FBA will give more room around waist and hips. That’s good. Maybe this will create more room an the back, too. End the upper sleeve… should be possible to enlarge that. Quite some things to do for a pattern I intended to use because it fits…

Während ich so den Folienschnitt meditiere kommt die Erkenntnis über mich: Die Jacke und damit der Schnitt sind einfach eine Nummer zu klein. Glücklicherweise habe ich das Originalschnittmuster auch noch Und es geht bis Größe 22… Na gut, dann kopiere ich den Schnitt in Größe 22 neu und nähe eine Testjacke.

Was irgendwie der Schritt war, den ich aus zeitgründen vermeiden wollte… :o)

While I’m still meditating my pattern enlightenment comes over me: The jacket and the pattern… are just too small. Luckily I still have the original pattern and it goes to size 22. Well… I’m copying the pattern in 22 and I will do a test garment. Which was exactely the step I hat planned to avoid… :o)

P-A-Challenge 2007: Frust

*grmpf* Heute klemmt es total.

Den Rock kann ich nicht fertig machen, weil ich nicht mehr genug Futter habe, für das Oberteil habe ich jetzt eine Idee (natürlich eine, die aus meinem Schnell und einfach Projekt etwas sehr zeitaufwendiges macht) und für die fehlt mir Stickgarn. Ich habe zwar noch eine halbe Rolle in einer passenden Farbe, aber leider hat niemand in Köln Mettler poly sheen und so kann ich nicht zukaufen. Und die Alternative die ich gefunden habe muß ich bestellen. 🙁

Und darauf, am dritten Teil zu arbeiten, bin ich irgendwie noch gar nicht eingestellt. Im Kopf bin ich noch bei den anderen beiden Projekten und wollte eigentlich erst mal sehen, wie Rock und Oberteil aussehen, bevor ich die Jacke dazu nähe.

Außerdem habe ich morgen einen Zahnarzttermin.

(Nach dem ich wenigstens Futterstoff kaufen gehen kann… :o)

Today I’m completely stuck.

I can’t go on with the skirt because I don’t have enough lining left. For the Top I have an idea I think I will like (and what will turn my auick and easy project into something very time-consuming), but I need embroidery thread for that. I still have, even in the right colour, but nobody in Cologne sells Mettler poly sheen, so I cant buy more of it. And the possible alternative I have to order. 🙁

I tried to work on the jacket, but I cannot put my mind to that. My head is still too much with the other two unfinished projects. Plus I’d like to see how skirt and top turn out, before I start planning the design of the jacket. Hoping to find inspiration in the finished parts…

Oh… and tomorrow I have an appointment with my dentist.

(After which I hope to find the time to buy the lining. Black Venezia should be available in Cologne… :o) )

P-A-Challenge 2007: Oberteil oder War ja nur so ‘ne Idee…

Test ChenilletechnikWie schon gesagt, einfach nur die Toile de Jouy oben an den Strickstoff ansetzen… ist mir zu langweilig. Und paßt einfach nicht ganz. Da fehlt was. Zu hell? Zu wenig Struktur? Egal, einfach so ist es einfach zu platt.

Da sah ich irgendwo beim Surfen (leider weiß ich nicht mehr wo) ein Kissen in Chenilletechnik. Was mir gefiel war, daß man das Muster der untersten Stofflage irgendwie noch erkennen konnte. Und für Struktur sorgen die plüschigen Raupen auch.

Eine prima Idee, den gewonnen Chenilleschneider einmal einzusetzen.

As I’ve said before… just sewing the Toile de Jouy to the knit doesn’t work for me. Is it to light in colour? Is it the structure that doesn’t match? No matter… it doesn’t work.

But some time ago, surfing the web (I don’t remember where) I saw a cushion in Chenille. What I liked about that model was, that the lowest fabric was a print and you could still figure out, that it was a flower print. No details, but the idea was still there. Plus the Chenille creates texture…

So I decided to try my newly won Chenille-Cutter.

Manchmal werde ich gefragt, woher ich denn immer vorher weiß, was hinterher rauskommt.

Die Antwort ist einfach: Ich weiß es nicht, ich probiere es.

Da ich von den Challenge-Stoffen nicht viel habe, teste ich die Idee zuerst einmal mit einem Rest eines alten Blumendruckes. (War mal ein Sonderangeobt und ich hatte sehr viel davon. Ein Schlafanzug für mich und ein Kleid für eine liebe kleine Verwandte waren damals entstanden.) Obendrauf kommen zwei Lagen des blauen Köper vom Proberock.

Zuerst lerne ich, daß es gar nicht so einfach ist, richtig mit dem Chenilleschneider umzugehen und dann lerne ich, daß die unterste Stofflage etwas größer sein sollte, damit man den Einstieg besser findet.

Ich versuche die schmalste und die breiteste Einstellung, die der Schneider hergibt. Nach zwei Runden in der Waschmaschine ist es noch nicht perfekt, aber die Richtung stimmt so grob. Es wird plüschig und die Abstände zwischen den Steppreihen sollten nicht zu klein sein. Dann könnte es klappen…

aufgeschnitten Sometimes people ask me, how I know in advance what will be the outcome of my experiments. Well, the answer is easy: I don’t know, I just try…

The amount of fabric from the Challenge is somewhat limited, so I’m using the restover of an old flower print (bought very long ago at a sale and made into pyjamas for me and a cute dress for a little girl in my family) as basis and two layers of the blue fabric of my test-skirt.

First thing I learn is, that using this tool corectly takes a little more experience than expected. (Not much, but I had expected it to work with “no experience at all”). Second thing I learn is that the lowest layer of fabric shold be a little bigger than the other, to make it easier to insert the cutter in the tunnels.

I make to samples, one in the smalles variation, the other in the largest. The first picture shows the scraps after running through the washing machine twice. Not perfect yet, I cannot see enough of the basic fabric, but if the other fabric ravels a little more… it should do.

Doch jeder Stoff verhält sich anders, also die nächste Testrunde mit dem schwarzen Silicon popelin, der auch auf das engültige Kleidungsstück drauf soll.

Der Umgang mit den Chenilleschneider klappt schon viel besser.

Diesmals wähle ich die beiden mittleren Tunnelgrößen. 1cm und 0,7 cm.

aufbürsten zwecklos But every fabric is different.

So next try, again with the flower print as basic layer but on top the black “Silicon Popelin” I intend to use for the Challenge garment.

This time I’m choosing the two “middle” sizes of the cutter: 1cm and 0,7cm for the tunnels.

And cutting goes much quicker now… the tool it easy to use…

Nun, das untere Bild zeigt den Stoff nach zwei Runden in der Waschmaschine.

Und heftigem Bürsten mit dem Nagelbürstchen.

Kein großer Unterschied zu Bild 2?

Richtig. Der Stoff… franst gar nicht. Nicht nenneswert jedenfalls. Das war schon mal nix… ich brauche mal wieder einen Plan B. Und diesmal… hat mein Hirn noch keinen. Aber es brütet…

Well, the last picture shows the samples after having passed the washing machine twice. And heavy brushing with a strong brush.

Not much difference to picture two, you say? Yeah… the fabric doesn’t ravel. Or only very, very few.

So I’ll need another plan. I have no idea, what my brain will come up with. Neither has my brain… but we’ll see…

P-A-Challenge 2007: Erste Überlegungen zum Oberteil

Schnitt von burdaDer Rock ist zwar noch nicht fertig, aber das hindert mich natürlich nicht, auch schon mal vorsichtig über das Top nachzudenken. Die Aufgabe sieht ja ein gesamtes Outfit vor. (Welcher Depp hat sich eigentlich das ausgedacht? Ach so… ich war das. 😮 )

Vorgesehen dafür habe ich den Strickstoff. Langweilig, ich weiß, aber es bietet sich irgendwie an… Damit es nicht ganz so langweilig wird, dachte ich an einen Raglanschnitt.

Und weil bei meinem Arbeitstempo die Zeit bei weitem nicht reicht, um für alle Teile erst ein Probeteil zu nähen, benutze ich einen alten Schnitt. Ein Burda-EASY Plus, Nummer 8441 (schon lange wieder aus dem Programm genommen, wie immer, wenn ich mal einen burda-Schnitt mag..), der mit relativ wenigen Änderungen… nun ja, tragbar wurde. Paßformsensibel ist ein weites Shirt ja nicht so sehr. Und der Strickstoff ist extrem weich, der hat und hält ohnehin keine Form.

The skirt isn’t finished yet, but I’ve started thinking about the shirt. The Challenge demands a whole wardrobe, not just one piece.

I’ll take the knit fabric for the shirt, that’s not really thrilling, but the easiest solution. To make it a little less boring I decided to use a raglan style pattern. And as a very slow worker I won’t have the time to test another pattern, so I picked one from my “archive”.

An old (discontinued after a short time and long ago, that’s what always happens with Burda-patterns I like) Burda-EASY in Plus size. I’ve altered it to fit sufficiently well and used it three times, so far.

Daß der Strickstoff alleine nicht reichen würde war klar, also wollte ich die Ärmel aus einem anderen Stoff nähen. Meinen schwarzen Zusatzstoff, den Silicon Popelin hatte ich dafür im Auge. Schwarz in der Nähe meines Gesichtes ist nicht optimal… aber wird gehen müssen.

Schnitteile an Stoff angepaßt.Ein kurzes Anhalten des Strickstoffes zeigte allerdings, daß nur die Ärmel aus einem anderen Stoff nähen nicht reichen wird. Zumindest nicht, wenn ich nicht vorhabe, bauchfrei zu gehen. (Nicht daß nicht genügend Bauch zum zeigen da wäre… so quantitativ… *g*)

Also muß oben eine Passe abgetrennt werden. Was nicht weiter schwierig ist, einmal quer durchschneiden, neue Nahtzugabe dran, fertig. Und bei der Gelegenheit auch gleich noch kurze Ärmel aus den langen gemacht.

It was quite clear from the beginning, that the knit fabric alone wouldm’t be enough for a whatever in my size. So I had been planning to make the sleeves from the black silicon popelin I had bought in addition to the challenge fabrics. Black close to my face isn’t the best choice, but as long as it’s only the sleeves it should be okay.

A closer look to the knit-fabric revealed, that, if I want the shirt to cover my tummy, I would have to add more fabric. Also to the front and back. This led to the decision to make a kind of a yoke.

A very easy thing to do: Just draw a line, cut and add new seam allowances. (Okay, I didn’t cut the pattern I had, I made a fresh copy. With short sleeves, the other change on this pattern.

Allerdings… mit der Passe kommt der schwarze Stoff nahe an mein Gesicht, nicht ganz erwünscht… Ich drehe und wende die Stoffe ein wenig hin und her…und stelle fest, daß der Toile de Jouy vom Rotton her eigentlich ganz gut zum Strickstoff paßt. Im Strickstoff sind ja viele Rottöne drin… Einfach nur hinnähen ist mir aber zu unruhig. Und zu langweilig… Da muß ich mir noch was einfallen lassen.

The yoke is a good idea to deal with the shortness of the knit. But then I’ll have the black fabric close to my face….. not really good. A little tossing around of all the so far unused fabrics showed, that one of the red hues of the knit is not so far from the red of the Toile de Jouy. So I’ll try to combine those two. Only the contrast between the clear Toile de Jouy and the deep red of the knit is to strong for my taste. So I’ll have to find a solution to deal with that…

P-A-Challenge 2007: Letzte (?) Schnittänderung Rock und Plan B

Rockschnitt angepasstMeine vorne tiefe Taille mußte wieder auf den Schnitt zurückübertragen werden.

Es war ja ganz schön viel wegzunehmen. Zuerst habe ich, in bewährter Manier, einfach die fünf Zentimeter brutal weggefaltet und an dem Seitenteil einen ebenso großen Keil. (Der seitliche Abnäher sollte ja nicht kürzer werden, daher ein Keil.)

Dabei stellte ich dann fest, daß es so doch schwierig wird, die Nahtlinien anzupassen. Außerdem war mein erster Versuch auch etwas tief, ich muß ja die Taille tiefer setzen, also sollte die Änderungsstelle möglichst weit oben sein.

Also… (wieder was gelernt) statt faul einen Keil wegfalten habe ich die Strecke auf zwei Mal rausgenommen. Und schon sehen die Übergänge besser aus.

On the pattern I had to take out 5cm in the middle but none at sides. That’s quite a lot.

First I tried to fold away all in once. (I’m kind of lazy… :o) But then finally decided, that it is way, way, way easier to smoothen out the seamlines if I’m doing it in two steps. Okay… lesson learned…

Auf dem vorderen Mittelteil (im Bild rechts) habe ich zwei sehr flache Keile weggfaltet, 2,5cm an der Mittellinie, 2,0cm an der Naht.

Das Seitenteil (links im Bild) mußte dann den restlichen Unterschied vertragen, hier habe ich Einschnitte quer gemacht und zwei Mal zwei Zentimeter überlappt. Am Abnäher hingegen habe ich nach dem wieder zukleben nur die Nahtzugabe aufgeschnitten, da mußte natürlich etwas weiter rein. Die eine Seite des Abnähers ist jetzt stark gekurvt, mal sehen, wie viel Spaß es machen wird, da einen Reißverschluß einzuarbeiten.

Damit ich bei meinen verschiedenen Änderungsschritten nicht durcheinanderkomme, verwende ich verschiedene Farben: Die erste Version, so wie ich den Schnitt kopiert habe, ist blau. Die erste Änderung rot und für die letzte (hoffentlich) Änderung habe ich grünen Stift verwendet.

On the middle gore of the skirt I did just fold in the pattern, 2.5cm at the midline, 2cm at the seamline to the side panel. This I did twice.

The rest I did on the side gore. (This is one piece of fabric with a long dart, but no sideseam.) Here I made a slit from the seamline to the dart and made the plastic overlap 2cm at the “seam-side” direction to front to no overlap at the dart-side. This also I did twice.

One side of the dart is now very curvy. Putting in the zipper there will be fun, I guess… 😮

Als das erledigt war, machte ich mich gestern Abend ans puzzlen.

Eine gute Stunde später wußte ich, was ich vorher geahnt hatte: Keine Chance, den Rock aus dem vorhanden Stoff zuzuschneiden. Viel fehlt nicht, vielleicht fünf Zentimeter in der Weite und zehn in der Länge… aber so…. Nein.

Da ich dieses allerdings schon geahnt hatte, hatte mein Gehirn über die letzten Wochen genügend Zeit, einen Plan B auszubrüten: nur vorder und Rückenteil des Rockes werden aus dem Glencheck, die Seitenteile aus meinem schwarzen Zusatzstoff. (Von dem ich noch mal drei Meter nachgeordert habe, denn mir ist für das Oberteil auch noch eine stoffverbrauchende Technik eingefallen….)

After finishing the pattern I tried to lay it on the fabric. One hour later (yesterday night) I knew for sure, what I had somewhat guessed before: No way, there’s not enoug fabric für the pattern. It’s not much, what’s missing… like 5cm larger and 10 cm longer… but… it’s not there.

So switch to Plan B since I had been thinking all the time, that this might happen, my brain has had enough time to produce Plan B. (Things like that my brain can do without me… I don’t know about it, but when I need it, the idea is there and pops out. In most cases, at least.) Only the middle parts (front and back) will be made of the prince-de-Gaulle, for the sides I’ll use the black silicon popelin I had bought. (And I had just ordered 3 more meters of it, because I had another fabric-consuming idea….)