Textile Schnellkarten

Quick Textile Christmas Cards

WeihnachtskartenDieses Jahr habe ich es endlich mal geschafft, Weihnachtskarten zu machen, die schnell gehen und gleichzeitig Stoff aufbrauchen. Und so geht es…

This year I finally reached my goal to make christmas cards that do not take ages to make and use up some of my fabric. And that’s how it goes…

Zuerst läd man mal Bärbel ein. Bärbel ist nämlich die ungekrönte Königin des Stempelns und kann einem alles verraten, was man darüber wissen will und noch ein wenig mehr. Daß sie außerdem Stempel und Stoffmalfarbe mitbringt ist ein praktischer Nebeneffekt. (Also Bärbel ist bei mir auch ohne Stempel willkommen, aber wenn sie Stempel mitbringen darf vergisst sie den Termin nicht so leicht. 😉 )

First you invite Bärbel. Bärbel is the queen of stamping and she can tell you anything about that subject you want to know and some more. That she brings the material is a nice add on. (Bärbel in generally very welcome, but she is also a very busy lady and if you promise her that stamping will on the schedule it is more likely that she will not forget the day or the time. 😉 )

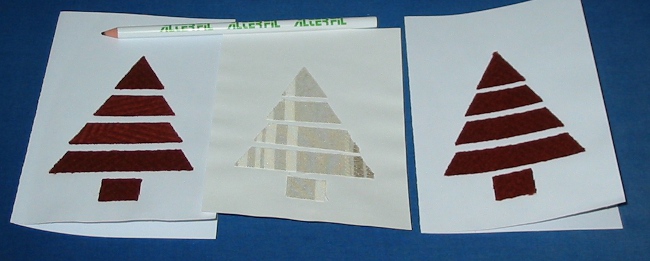
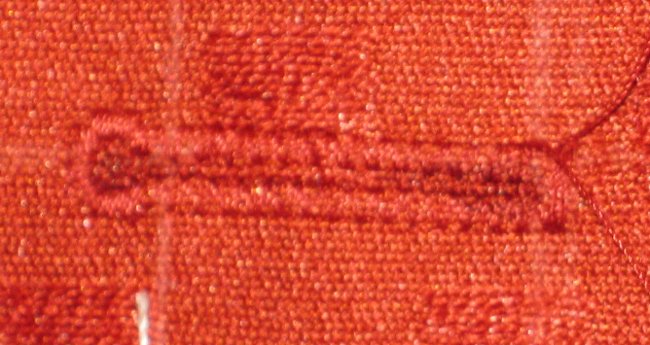
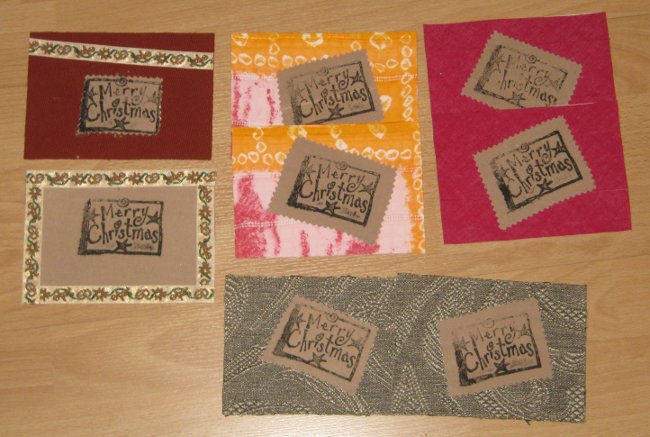
Gestempelt habe ich dann auf einen schlichten Baumwoll-Canvas mit schwarzer Stoffarbe. Danach habe ich fertige Karten genommen, habe da doppelseitige Klebefolie aufgebracht und einen Basisstoff aufgeklebt. Die beiden Karten unten sind mit einem festeren Deco-Stoff “grundiert”, das dunkelrote ist ein ungefaltetes gekauftes Schrägband, das ich mal geerbt habe und das Stoß an Stoß geklebt wurde. In der Mitte eine poppigere Variante mit afrikanischem Batik Stoff. Danach wird mein gut getrockneter bestempelter Stoff ebenfalls mit der Folie beklebt, dann mit der Zackenschere ausgeschnitten und nach Lust und Laune aufgeklebt. Alles gut angedrückt hält das einfach bombig und man holt sich keine klebrigen Finger.

As base fabric for stamping I used some beige cotton canvas fabric. Stamped with colors for fabric, of course. Next step is using plastic sheet that is adhesive from both sides to bring one layer of fabric to the cards. For the two cards on the bottom I used a heavy decorators fabric, the red one on the right is cotton bias tape I’d inherited from somebodys grandmother and never used. I just stuck it edge to edge. And in the middle a more “jazzy” version with African batic fabric. After that I applied the same double sided plastic foil to my stamped fabric, cut it with pinking shears and fixed it on top. Pressing well with fingers and it will last forever. (Okay, some years… but enough for Christmas cards. And unlike glue it doesn’t give you sticky fingers.

Die beiden Karten links sind ein bißchen anders gemacht. Bei der unteren habe ich einfach nur den bedruckten Stoff aufgeklebt und dafür noch ein bißchen Bänder von Kafka dazu geklebt, bei dem oberen habe ich den bedruckten Stoff auf den Basisstoff gelegt und beides gemeinsam geschnitten, so daß der bedruckte Stoff als “Intarsie” eingefügt wird. Und auch da noch etwas Kafka-Band dazu. Geht ja immer.

The cards on the left were made a little differently. The one on the bottom has only the stamped fabric glued to the card and then got some more decoration with ribbons by Kafka. And for the top one I layered base fabrick and stamped fabric before cutting. So the printed fabric is not on top, but fits precicely in the cut out of the base fabric. Again some Kafka ribbon added. You never can go wrong with that.

Und jetzt habe ich Zeit, mir für meine restlichen Karten wieder was umständliches auszudenken… 😮

And now I have the time to figure out something complicated for the rest of my cards… 😮


Kuli – eine Taschenanleitung

(Update September 2012: Die Anleitung enthielt einen Fehler, dieser ist jetzt korrigiert, wer sie vor September 2012 runtergeladen hat, bitte die korrigierte Version runterladen.)

Gezeigt habe ich euch meine vielseitige Urlaubstasche ja schon hier.

I’ve already shown the bag I made for my holidays here.

Die Anleitung hat den Namen “Kuli” bekommen, weil sie auch große Lasten faßt. (Tragen muß man sie dann leider selber….) Angeblich kommt das Wort sogar aus dem Urdu, einer der vielen Sprachen, die in Indien gesprochen werden. Paßt ja. 🙂

The pattern got the name “Kuli” because it can take heavy weight. (But you’ll have to carry it yourself…) It is said that the word is Urdu, one of the languages spoken in India. 🙂 Sorry to say the pattern is in German only, but there are some pictures. If you want to give it a try anyhow: follow the link below. The pattern is free for private and non commercial use.

Wer sie auch nachnähen will, kann die Anleitung hier herunterladen. Wie immer kostenlos zum privaten und nicht kommerziellen Gebrauch. 🙂


Cardito, die Anleitung

How to make Cardito

Mein Kartenmäppchen Cardito habe ich ja schon im Februar gezeigt, aber jetzt ist endlich die Anleitung fertig. (Nicht daß euch der ganzen Indienkrempel zu sehr langweilt…)

Wer also auch ein Zuhause für 14 Karten und einige Geldscheine brauchen kann und noch einige Stoff- und Bandreste übrig hat, der findet hier die ausführliche und bebilderte Anleitung. (Oder das Freebook, wie man auf neudeutsch sagt. Es ist aber nur ein normales pdf. :o) )

This time the instructions how to sew “Cardito” are only in German, but they have a lot of pictures. If anyone seriously wants to sew it let me now, then I can translate the sewing pattern. And if you don’t remember how it looked like: It’s shown in this entry in February.

Kratzschutz

Scratch protection

Mein derzeitiger Trieb, den Stoff möglichst “Auzuarbeiten”, statt die Reste zu lagern führt dazu, daß ich auch Sachen mache, die ich schon immer mal machen wollte, die aber einfach nie gemacht wurden. Ich habe extrem brüchige Nägel, die Kanten die dann übrig bleiben sind aber sehr scharf, so daß man sich damit erstaunlich tiefe Kratzer zufügen kann. Also habe ich immer eine Nagelfeile dabei.

I am eagerly working to use up all that fabric from the skirt project and the result is, that some ideas I had been wanting to make for long but somehow never happened get finally executed. My fingernails break very easily and the resulting edge can be quite sharp. It is surprising how deep scratches you can execute to yourself with that… So I always carry an emery board with me.

Nur… so eine Nagelfeile feilt nicht nur Nägel, sondern sie kratzt auf allem herum. Kameradisplays zum Beispiel. Und was noch so in meiner Handtasche rumfliegt. Dabei kostet es wirklich nur wenig Zeit und kaum Material, so eine Hülle zu nähen.

Only this does not only smooth nails, it scratches anything. Like displays of cameras. And anything else in my handbag. And it costs hardly any tome and even less material to make a cover.

Stoff mit UmrissMan braucht einen Rest eines etwas festern Stoffs (so wie mitteldicker Jeans zum Beispiel), auf dem zeichnet man zuerst die Umrisse der Feile nach und umnäht die dann zweimal. Einmal auf der gezeichneten Linie, einmal ca 3mm daneben. Kurze Stiche, Stichlänge 2.

You need a scrap of firm fabric like decorators fabric or denim, then you trace the outlines of your emery board. With a short stitch (lenght 2mm) of your sewing machine you stitch once on that line and a second time about 3mm on the outside of it.

ausgeschnittenDanach die Maschine auf Zickzack stellen, Breite 4,5 mm, Stichlänge 1,5mm und wieder die Form umrunden. Dabei trifft der “innere” Stich des Zickzacks die innere Stepplinie. Danach knapp an den Stichen entlang ausschneiden.

Then you set your machine to zigzag stitch, width 4.5mm, length 1.5mm and you sew around your stitching line. The “inner” stitch of the zigzag hits your inner line of straight stitch. Then cut away the fabric close to the stitching.

Ich habe ein Farbverlaufsgarn von Valdani genommen (“Monochrome M-31”), aber normales Nähgarn geht natürlich auch.

I’ve used variegated thread from Valdani (“Monochrome M-31”), but normal sewing or embroidery thread does the same.

Raupe nähenJetzt den Stich breiter (5mm) und kürzer stellen (so wie sonst bei der Knopflochraupe oder zum applizieren) und am breiteren Ende die Rundung umnähen. Etwa 2,5cm unterhalb anfangen und genauso weit auf der anderen Seite runter nähen.

Now set your machine to a wider (5mm) and shorter zigzag stitch. Same stitchlength as you would use for a buttonhole or for appliqué. Now you sew around the curve of the wider end of your fabric strip. Start about 2,5cm down from the “peak”, sew over the curve and go down on the other side the same length.

Zuletzt die beiden Stoffstreifen links auf links aufeinander legen (falls es eine linke Seite gibt) und den Rest mit der engen Zickzack Raupe umrunden. Also Zusammennähen und Versäubern in einem.

NagelfeilenhülleNow lay both pieces on each other, left sides facing (if there is a left side) and sew around the rest with the same buttonhole zigzag stitch as before. That sews the pieces together and overcasts in one step.

Nagelfeile rein, das war es auch schon. Keine Kratzer mehr. 🙂

That’s all, put your emery board in. No more damage in the hand bag. 🙂

Dreher (Anleitung für Herrensocken)

Dreher (pattern for men’s socks)

SockenDiese Socken hatte mein Bruder ja zu Weihnachten bekommen. Da kamen sie gut an und ich bin endlich dazu gekommen, auch die Anleitung dafür zu schreiben.

My brother got those socks for Christmas. He likes them and I like my pattern also, so finally I’ve found the time to sit down and write the pattern.

Die Socken werden von der Spitze nach oben gestrickt und außer linken und rechten Maschen muß man nichts können. Und zählen… Denn Langeweile kommt trotzdem nicht auf, denn es gibt eine rechte und eine linke Socke, die gegengleich gestrickt werden. Ich hoffe, ich habe wirklich alles richtig aufgeschrieben.

The socks are knitted toe up and you only need to know how to knit and how to purl. And how to count… Even though the technique is easy knitting is not boring. You have a left and a right sock and as you can see the pattern is mirrored. And I really, really hope I’ve written down everything correctly.

Dreher SockenDie Anleitung ist für Größe 43, wer es länger oder kürzer braucht, sollte versuchen, das über die Spitze oder die Nadelstärke zu regulieren, denn das Muster zu verändern ist nicht ganz trivial. (Wobei am Anfang Reihen weglassen nicht ganz so problematisch ist.) Von der Weite her ist es weniger schwierig, denn das Muster bietet da viel Elastizität und Spielraum.

The pattern is for German shoe size 43, if you need it smaller or longer better try to make most of the changes in the toe region or by changing needle size. Changing the pattern is less easy. (Though leaving out pattern rows at the beginning or the end is less critical.) Widthwise it shouldn’t be much of a problem, the pattern includes a lot of elasticity.

Anleitung für Herrensocke “Dreher”

Sock pattern “Dreher” in English

Wie immer liegen die Rechte für die Anleitung bei mir, es ist für den privaten und nicht kommerziellen Gebrauch kostenlos. Verkaufen, kopieren und weitergeben ist nicht erlaubt (Ihr dürft aber gerne den Link auf diesen Blogeintrag weitergeben). Alles andere nur nach Absprache. Danke!

Like always the pattern is mine, it’s free for private and non commercial use. You are not allowed to make copies (but you can pass on the link to this blog entry) or to sell the pattern. For anything else please ask. Thank you!

Blitz-Bügel-Bäumchen

Quickly Pressed Christmas Trees

WeihnachtskartenMeistens brauche ich Möglichkeiten, schnell Weihnachtskarten zu Basteln. Und ich versuche, mit vorhandenem Material zu arbeiten und nicht vor allem mit extra gekauften Weihnachtsstoffen.

Diese stilisierten Bäumchen waren vor zwei Jahren das Ergebnis meiner Überlegungen.

Mir gefiels, die Empfänger haben sich auch alle gefreut und man braucht nur einige Stoffreste, Vliesofix und Karton für Karten. Und ein Bügeleisen. Die werden auch in letzter Sekunde noch fertig und man kann wirklich jeden Stoff nehmen, der einem farblich gefällt, gerade dickere Wollstoffe geben eine schöne Struktur. Und wer es bunt mag, nimmt farbigen Karton als Grundlage.

Und wer es im Gegensatz zu mir nicht so gerne grafisch und kitschfrei mag, der kann natürlich auch noch Pailetten oder Strass aufkleben, Glitter drüberstreuen oder was auch immer. 🙂

Wer es dann ganz genau wissen will: Hier ist die Anleitung für die Blitz-Bügel-Bäumchen.

WeihnachtskartenIf you are like me you will need last minute Christmas Cards that are supposed to be quick to make. Those fulfill the requirements. You only need Vliesofix/ Bondaweb, some fabric scrabs, cards and our iron.

Those I made two years ago and they were not only super quick, the recipients liked them also. That they are quite kitsch-free and more on the graphic side is another plus for me.

They work with any fabric, but paticularily well with thicker, struktured fabrics like coat wool. You can choose the colors as you like and if you want it more colorful use cards in different colors. (For those who like more kitsch: yes, you can add other decoration and glue on pearls, glitter or whatever.)

Detailed instructions are in the file above, but only in German. But basically you draw a equilateral triangle and a small square on the Vliesofix, press that to your fabric, cut out the shapes, but the triangle in stripes and press it to the card with some distance between the stripes. That’s all. (There are pictures in the instruction file, so look at it and if something isn’t clear yet feel free to ask in the comment section.)

Zickentasche

Little Bag Pattern

ZickentascheDiese Tasche(n) für zwei Mädels im besten “Zickenalter” entstanden schon im Mai/Juni (und wurden auch mit Freude aufgenommen), aber die Anleitung zusammenzustellen hat ein bißchen gedauert.

I made those little bags/purses already earlier this summer (and they were received with joy) but it took my a while to make the pattern.

Der Schnitt ist super um auch Reste zu verwenden oder mit Bänder, Spitzen und Stickereien zu spielen (wenn man das mag). Die Taschen sind gefüttert und werden mit einem stoffbezogenen Druckknopf geschlossen.

Der Schnitt kommt mit einer Kurzanleitung und ist nicht unbedingt für komplette Anfänger geeignet, weil man doch so einiges in Kurven  einpassen muß.

Wer es trotzdem versuchen mag: Hier geht es zum Schnitt für die Zickentasche. 😉

The pattern is nice to use remnants and scraps of fabric and if you want you can decorate with buttons, beads, lace, embroidery,… as heavy as you like or not. The bags have lining and are closed with a fabric covered snap.

The pattern has only German instructions, but if you have questions just ask. If you want to try anyhow: Here’s the pattern for “Zickentasche” .

Wie immer ist der Schnitt für den privaten und nicht kommerziellen Gebrauch kostenlos und wenn ihr ihn weitergeben wollt, dann bitte als Link auf den Blog und nicht als Datei. (Vervielfältigung und Verkauf des Schnittes, seine Verwendung in Kursen oder die Herstellung von Artikeln zum Verkauf nach diesem Schnitt sind kein privater Gebrauch mehr. Danke für das Verständnis.)

Like always the pattern is free for private an non-commercial use and I appreciate it a lot if you pass it on as a link to this blog instead of copying the file. (Copying and selling the pattern, using it for classes or selling items made after this pattern are not supposed to be private use. Thanks for your understanding.)

Karamell (Füßlinge)

Karamell (Slipper socks)

Füßlinge mit LochmusterUnd noch mal Füßlinge, diesmal in einer luftigen Version mit kleinen Löchern, aber auch ganz einfach zu stricken.

More slipper socks/ liners. This time with cute and airy eylets, but also very easy to knit.

Als Garn waren diesmal etwa 35g “Meilenweit Cotton 50 Uni” von Lana Grossa am Start, die ich im Frühjahr bei Wolle Rödel in Bayreuth gefunden hatte.

Der Farbton kommt auf den Bildern nicht gut rüber, aber er hat den Namen inspiriert.

FüßlingeYarn is this time from Lana Grossa, “Meilenweit Cotton 50 Solid” and I had found it as a 50g skein at Wolle Rödel in Bayreuth.

The pics don’t do the color justice, but it’s the color of the yarn that inspired the name of the pattern.

Wer sie nachstricken mag findet hier findet hier die Anleitung für “Karamell”. Ich hoffe, es sind nicht zu viele Fehler drin…

(Und wie immer ist die Anleitung für den privaten Gebrauch gedacht und dafür kostenlos. Nicht gedacht ist sie, kopiert zu werden. Bitte gebt ggf. einfach den Link zu diesem Blogeintrag weiter. Danke!)

And if you want your own pair, here is the pattern for “Karamell” in English.I hope there are not too many mistakes left…

(The pattern is free for private and non commercial use. Please don’t copy it, but pass on the link to this blog post. Thank you!)

Verschenkesocke

Charitysocks

SockenManchmal möchte man Socken stricken ohne daß man die Größe des Empfängers genau kennt. Oder vielleicht sind die Socken für ein Hilfsprojekt gedacht, bei dem vorher gar nicht klar ist, wer sie bekommt.

Sometimes you want to knit socks for someone without knowing the size exactly. Or maybe you knit for charity where know one knows in advance who the recipient might be.

Nun sind Socken ohnehin dehnbar und können sich durchaus ein wenig dem Fuß anpassen, aber wenn man Rippen geschickt einsetzt, bekommt man Modelle, die etwa über fünf Größen hinweg passen. 🙂

Socks do stretch anyhow and will adapt the foot, but if you use ribbing the right way you can make socks that can fit over about five sizes. 🙂

SockenDie Anleitung umfasst die Größen M (36-39), L (39-43)  und XL (42-47). Auf den Bildern sind M die roten Socken, L die geringelten und XL die grauen mit den bunten Spitzen und Fersen.

The pattern includes sizes M (German size 36-39), L (39-43) and XL (42-47). On the pics you see red socks in M, striped socks in L and gray socks with blue in XL.

Die Füße die drin stecken haben von links nach rechts: 2x Gr. 39, 2x Gr 42 und der letzte Fuß hat Gr. 47.

SockenThe feet in the socks are from left to right: 1x size 39, 2 x size 42 and the last foot is size 47.

Und hier geht es zur Anleitung: Verschenkesocke.

(Hier gilt übrigens: Wenn ihr die Socken für ein Projekt strickt, bei dem die Socken an Bedürftige verschenkt werden, dann kopiert die Anleitung gerne an alle Mitstricker! Andernfalls bitte einen Link hierher weiter geben. Und natürlich ist die Anleitung für privaten Gebrauch kostenlos.)

And that’s the pattern: Charity socks.

(This pattern is free for private and non commercial use. If you want to pass it on, please don’t copy the pattern, but pass on a link to here. Except if you knit socks for charity. In this case you are invited to copy the pattern for everyone who wants to knit for charity also!)

Sicherheitsknopfloch

Security button hole

Die “Auflösung” der Knopffrage verrate ich natürlich noch nicht, wenn ihr das wissen wollt, dann müßt ihr am 27.07. im Bernina Blog vorbei schauen, da gibt es dann das fertige Bild. (Oder Geduld haben, bis ich Zeit habe, es hier zu zeigen.)

My button solution will not be shown here now. If you want to know that you’ll have to check the Bernina Blog on 07/27, there will be a picture of the finished jacket. (Or you are patient enough until I have the time to show it here.)

Aber derweil erzähle ich was von den Knopflöchern. Es gibt zwar ein paar Bilder, aber leider keine guten, die Makrofunktion dieser Kamera und ich stehen irgendwie auf Kriegsfuß. Oder ich sollte einfach die Bedienungsanleitung noch mal lesen…

But I’ll tell you something about my buttonholes. There are pics also, but not very good ones. The camera should be able to do Macro shots and sometimes does, but sometimes not. And I don’t know why. Maybe I should read the instructions again…

Problem bei dieser Jacke war, daß die Seide sehr leicht ausfranst und daß die oben aufliegenden Fäden auch nicht freiwillig liegen bleiben, wenn man sie durchtrennt. Handknopflöcher waren aus Zeitgründen keine Alternative, aber es gibt da auch ein paar Tricks mit der Maschine…

A problem with this fabric was, that the silk was fraying easily and also the loose fibers on top that form the pattern wont stay put once cut. Sewing button holes by hand was not an option due to the deadline, but there are some things you can do with the sewing machine…

KnopflochErster Schritt, ist die Position zu markieren und ein normales Augenknopflich zu nähen. Dabei wird die Raupe ein wenig “lockerer” eingestellt, also die Stichlänge minimal erhöht. Danach wird zwischen den Raupen Fray Check aufgetragen. Bei dem dicken Stoff sogar einmal auf der Jacke und einmal am Beleg.

(Den Schritt, bei dem man vier der Augenknopflöcher wieder auftrennen muß, weil man das Auge mal wieder an die falsche Seite genäht hat, den kann man gut weglassen…)

First step is to mark the position and sew the eyelet button hole. Change the stitch length of the “normal” setting of your sewing machine, making the stitch length a little longer. The button hole will be less densely sewn. Not apply fray check to the fabric between the sewn button hole. In my case (the fabric is very thick) from both sides. Apply on the jacket and apply on the facing.

(The step where you have to rip out four button holes because the eyelet is showing in the wrong direction can easily be omitted… )

KnopflochDanach den Fray Check wirklich gut trocknen lassen.

Danach das Knopfloch aufschneiden. (Falls man dabei die Raupe mit erwischt ist das nicht so schlimm, durch das Fray Check kann sich nicht alles auflösen.)

Allow the Fray Check to dry very well.

Then cut the button hole open. (If you cut some of the stitches it is not a problem, with the Fray Check on it it will not unravel.

Knopfloch fertigUnd dann wird noch mal ein Knopfloch genäht. Diesmal mit der normalen Stichlänge.

Am besten man orientiert sich wieder an seinen Markierungen, die sollte man also nicht entfernen, bevor man ganz fertig ist.

Meistens wird es nicht ganz so perfekt schön wie ein einfach genähtes, weil man (oder weil ich) dann doch nie zu hundert Prozent treffe, aber dafür hält es. Und wenn die Knöpfe zu sind, sieht man vom Knopfloch eh nicht viel…

Then bring your button hole back to the machine and sew the same eyelet button hole as before, but this time with the standard setting and dense stitches.

It works best if you use your original markings, so you should not remove those before everything is completely finished.

I have to admit that the result is normally not as perfect as a “normal” button hole because one (or because I…) never is able to match the two button holes perfectly, but it is stable and that’s a lot. And if the buttons are closed one doesn’t see to much of the button hole stitches anyhow…